Category Archives: everything

my Doug Engelbart story

There are many stories to tell about Doug Engelbart. He touched so many lives, and many stories are being told right now, in remembrance and celebration. There are stories about the invention of the mouse. Stories about his early work at SRI on packet switching. And of course, stories about the Mother of All Demos. I have a story about him, too, but mine isn’t about any of those events. My story takes place at a cocktail party in Menlo Park, about four or five years ago.


Rachel Smith with Doug Engelbart

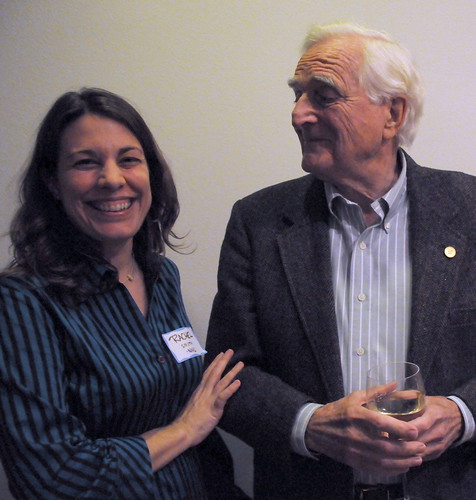
Rachel Smith with Doug Engelbart. Photo by Larry Johnson.


At the time, I was vice president of services for the New Media Consortium (NMC). We were participating in a jointly-sponsored event to commemorate the 40th anniversary of the Mother of All Demos called the Program for the Future. We heard panels and talks, gave a talk about NMC, and saw a screening of the Mother of all Demos. Many of my technology heroes were there. It was a bit like being in the presence of royalty, or miracle workers, or both at the same time. It was dazzling and awe-inspiring.

In the evening, we attended a cocktail party at the home of one of the organizers. I was standing with a group that included Doug, chatting and exchanging our favorite mobile apps, completely amazed to be having this normal conversation (well, normal for techies, I guess) with such incredible people.

Suddenly, my attention was distracted by an abrupt noise from the room behind me. I half turned to see what it was, and while I was looking away, I felt a swift, gentle yank on my ponytail! I turned quickly back and saw astonishment and the beginnings of amusement on every face — except Doug’s. He was wearing an expression of the most perfect innocence, for all the world as though he were absorbed in thought. I had no idea what to do — laugh? object? pretend nothing had happened? Then he gave me the tiniest possible wink, and I couldn’t help it, and I burst out laughing. He grinned like a schoolboy.

My story of Doug Engelbart is that moment: that instant when I understood him as more than the passionate, brilliant inventor and thinker he undoubtedly was. My story is that playful moment, the moment when Doug Engelbart pulled my ponytail and pretended he hadn’t.

I really want to love VideoScribe…

… but I just can’t. I *like* Sparkol’s VideoScribe, but I don’t *love* it. But that doesn’t mean it’s not lovable. I know people who have done very cool things with it, like Chipp Walters’ overview of Agilix xLi, along with many other examples — see the Sparkol YouTube channel for lots more. And I do think the “behind glass” hand is pretty neat.

I’ve only used the free trial versions (desktop and iPad app), so it’s also possible that the paid version is a whole different animal. I made a silly little movie about the beginning of the book Watership Down by Richard Adams, because I’m in the middle of reading that with my son and it’s on my mind. It took about 45 minutes to create this, starting from not really knowing how to use VideoScribe at all. If I were to make something similar now it would only take about 15 minutes. The learning curve isn’t bad at all.

Here’s my take on it:

When I compare it to my current workflow for creating this kind of movie, I find VideoScribe to be limiting. I’m used to being able to create images from scratch and control how they appear. I did create my own drawing in Illustrator (the image of the downs in the sample movie here), but as you can see, it didn’t come out quite the way I wanted it to in the video. I used the brush pen in Illustrator to get a brushy line quality, but in the movie you see the outline of each stroke and then all the strokes fill in at the end, so it looks odd.

I also wanted to add audio effects at different places in the movie, and I could not figure out how to do this. When I recorded an audio effect as a voiceover (just myself saying “Ta-da!”), it played at the very beginning, and I didn’t see a way to shift it to the point where I wanted it to be. It may be that there is a way to do it and I couldn’t find it, or it may be that this is only something you can do in the full-price version. Or it may not be possible at all.

However, it’s much less complicated to create a movie using VideoScribe than it is to do it the way I currently do it (with Brushes 1 and Final Cut Pro X). VideoScribe also has an advantage over Brushes 1 in that you can actually obtain it, which is significant for folks who are just starting out (the original Brushes is no longer available on the App Store, and the new one doesn’t let you work with the movie files in the same way). VideoScribe’s library of imagery seems to be extensive and can be supplemented by custom material, and it’s nice to have all the parts in one place: images, soundtrack, voiceover, and output. I use four different applications or services to achieve the same end.

Is VideoScribe right for you? Well, if you are looking for a relatively easy way to get into creating this kind of movie, and you don’t need an OCD-level of control over the output, and you’re willing to put in some time to learn the ins and outs of its unique user interface, then it might be. It’s certainly less complicated than working with a video crew — you can sit down and work on it any time, without reference to other people’s schedules, and you don’t need special lighting or space. The results are definitely polished enough to use for client work. It’s much easier to learn to use than Final Cut Pro X or even iMovie, and there are fewer moving parts to worry about. If you do decide to try it out, be aware that there’s a 7-day free trial. Don’t start until you have some time to devote to it, so you can give it a fair shot. I’d be curious to learn what you think if you try it.

Same site, new look (and changes under the hood)

Digital Visual Facilitation has had a facelift! (Also, an unplanned mini-vacation.) Both are a result of the news that Posterous, this blog’s former home, is closing down at the end of April. Over the past week or so, I’ve moved the blog to another host and converted it from Posterous to WordPress. The only issue I ran into is that some of the embedded links to movies, photos, and slide shows stopped working after the move and had to be relinked. I think I’ve caught them all, but if you find something odd, just drop me a note and I’ll get it fixed.

The process of moving house wasn’t difficult at all, really. I started with Sarah Gooding’s instructions for the process, and used a workaround described by Antonio Cangiano:

  1. I started by making a backup of my Posterous site as described here, and then downloading the backup to my computer.
  2. Next, I needed a place to set up the blog on the web again. Since digitalfacilitation.net simply pointed to ninmah.posterous.com, I removed that pointer and set up an empty WordPress install at digitalfacilitation.net.
  3. Then I tried to use the Posterous Importer plug-in for WordPress, but it didn’t appear to work (the little “working” indicator just spun and nothing happened). I tried twice (just in case, right?) and then looked for an alternative method. Following the “Quick Tip” link in Gooding’s instructions, I found Antonio Cangiano’s instructions for a workaround.
  4. Using the backup of my Posterous site, I created a new, empty blog at WordPress.com — apparently the Posterous Importer plug-in works on wordpress.com but not on private WordPress installations — and imported the Posterous backup into it. Once it was there, I exported it to WordPress eXtended RSS (WXR) format — an extra step, but it worked like a charm.
  5. Finally, I returned to my new, still empty WordPress installation at the new digitalfacilitation.net, and imported the WXR export.
  6. The very last step was to go through the posts and fix the missing images, videos, and slide shows. In each case, the URL was there, just not in a format that WordPress could use. For most of them, I pasted the URL into my browser and got fresh embed code from the original item to paste back into the blog post.

The mini-vacation was a result of a bug in the domain transfer system at my hosting provider, and was unrelated to the move. I decided to consolidate things by moving the domain registration for digitalfacilitation.net to the same provider where I’m now hosting it, and where my other blog is hosted. They had an issue that caused the domain to fall off the internet (there’s probably a more accurate technical explanation for what really happened) for a few days.

At any rate, welcome (back) to the new digitalfacilitation.net!

Two Apps to Watch: bContext and Underlay Stripper

Well, one app, and one tool that makes another app work better:

bContext

bContext is an iPad app that lets you record drawings and annotate them with audio. Thanks to some embedded editing tools, you can import images and draw over them, record yourself talking about what you are drawing, and create a video of the whole process. The drawing tools are not quite ready for the kind of detailed work I tend to do on my iPad — yet — but I have high hopes that they will be.

I had the pleasure of meeting bContext’s co-founders, CEO Massimo Scapini and CTO Felipe Saint-Jean, a couple of weeks ago when they were in town for TechCrunch’s Disrupt SF 2012 conference, and they gave me a tour of some of the new features that are coming up. I also got to put a in good word for some of my favorite wishlist features. This is definitely an app to keep your eye on!

Underlay Stripper

Underlay Stripper is a tool created by Altuit that runs on the computer (it’s not an iPad app) and works with the Brushes iPad app. I don’t believe it has been released yet, but I was able to beta test it and I am hooked. It lets you remove a layer from a Brushes drawing so that it doesn’t appear in the final image and video. This may not sound like a lot, but if you do iPad movies with Brushes, it’s huge: you can drop your sketch into the bottom layer, draw the movie on top of it, and then strip the sketch out so it doesn’t show in the final video. Fabulous!

I’ve used the beta extensively, and it’s reliable and simple to use. Keep your eye open for the official release — it’s a tool worth having.

Cleaning Chart Images with ScanScribe

The instructions below come from David Sibbet of The Grove and were updated by Cynthia Derosier of Good Juju. I’ve just edited them a little and am reposting them for convenience. If you’re looking for another method of cleaning chart images, I have previously posted instructions for cleaning chart images with Photoshop

Cleaning Up Your Charts

Once you’ve taken photos of your charts, you can run them through a program called ScanScribe to drop out the shadows and the gray or yellowish background that results from photographing paper charts. It’s quick and easy, once you get ScanScribe set up. It’s not like most applications — it’s really a script, so you have to be prepared to fiddle a little bit, but once it’s working it’s a great tool for the job. Like David, I haven’t used it’s other features, but I know it’s capable of more than just whitening images. ScanScribe is available for Mac and Windows platforms.

David Sibbet says, “The best program [for cleaning chart images] is still ScanScribe, a never-released piece of software from Xerox [now Parc]. The interface isn’t very intuitive, but it does a great job keeping your yellows intact. You can change the exposure settings: 4 or 7 seem to work best. You can also correct for keystoning under the edit function. TIFF files work best. These are the only functions I’ve ever used and it seems to work very well.”

Using ScanScribe

  1. Download ScanScribe from the Parc site: http://www2.parc.com/isl/groups/pda/scanscribe/
  2. Save it to a spot on your computer where you will be able to find it (perhaps make a ScanScribe folder inside your Applications or Programs folder).
  3. Double click on the Scan app. This will launch a terminal program that then opens the software, so don’t be alarmed when the new program opens.
  4. Under EXECUTION, open “SCANSCRIBE.” 
  5. Go to “Options” set your Automatic FB/BG Color Processing on Image Load/ background sensitivity to 4 (or 7 — you can experiment).
  6. Under FILE open the folder where you have your chart pictures. It doesn’t have menus that open automatically so you have to go through each click manually.
  7. Open your file. It may take a little while to process, during which time it can look like nothing is happening. After a bit, your photo should open. When it opens, the photo will be magically whitened! (If not, see the notes below).
  8. To adjust for keystoning, go to Edit/Keystone Unwarp. This gives you a box that you can change by using your cursor on the corners. Drag corners to where you want them to be on the photos. Then click the button in the window frame that says “run Keystone” and the picture will unwarp.
  9. Save As a TIFF file if possible, or a JPG if you can’t work with TIFFs.

Notes

Cynthia reports that she had a very large TIFF file and had to reduce its file size in order for the program to work. If you load the photo and have done all the steps correctly but still see no change, you may need to reduce the file size. Cynthia noticed that the script at the bottom indicated the computer was out of memory for a TIFF file, but did not run out of memory for a JPG of the same size.

I have noticed that ScanScribe can have difficulty opening files if they are too deep in my computer’s file system — that is, if they are inside a lot of nested folders. I think this is because all the folder names get added to the path name for the image, and perhaps the long path name exceeds some limitation in ScanScribe, but that’s just a guess. To get around the issue, I created a folder inside my Pictures folder called “For ScanScribe,” and I just drop all the photos in there that I want to clean up. ScanScribe remembers the last folder it opened images from, so this is a handy way to avoid having to click through your folders to find your images. I just save the edited versions right back into that same folder, and then move everything to where I actually want it when I’m done to keep the folder clean.

If you have additional questions, please check the ScanScribe discussion forum


Cleaning Chart Images in Photoshop

Update, Feb. 2020: This was originally posted on my first (and now defunct) blog, Ninmah Meets World. Unfortunately, I only posted part of it here before removing the original post. At some point I’ll rewrite it with current instructions. If you are looking for it, drop me a line (rachel at digitalfacilitation dot net) to let me know and I’ll push it up the priority list.

I get asked a lot how to clean up chart pictures in Photoshop, so this post is probably way overdue. I learned this process from David Sibbet and I’m just passing it along. There are lots of other ways to do this; this is just one method, and it happens to use Photoshop. Some of the other ways are faster, and some maybe give better results, but they mostly involve esoteric software that nobody owns. Click any image for a larger view.

The Goal
The idea here is to take those dark, uneven photos of charts taken right after they’ve been drawn…

(the original photo was here)

… and turn them into clean, bright images that look good on the computer and reproduce cleanly in print. (Okay, this one isn’t the best example, but it’ll do to illustrate the process.)

(the final photo was here)

(The rest of the post was on Ninmah Meets World)

Another paintbrush for the iPad

I haven’t tried it, but Sensu’s new brush looks like a delicious option for painterly work on the iPad. It converts from a paintbrush to a stylus, and the bristles look very well-shaped. Anyone tried one?

image of the brush's features

Features of the Sensu Brush

The (oooh, aaah) Sensu Brush

The video of my TEDxUFM talk ‘Drawing in Class’ is up!

The wonderful folks at UFM have begun putting videos of the TEDx talks from August 18 up on YouTube, and mine is one of them! They did a fantastic job with the editing. Take a look:

Other talks from this year are being added as they are ready. You can see Rocío Pinto’s La vida no es un algoritmo now (it’s in Spanish, but you can turn on subtitles).

Last week, I gave a TEDx talk in Guatemala…

… and it was an awesome experience!

The event was TEDxUFM at the Universidad Francisco Marroquin in Guatemala City. The theme was to explore education and the new culture of learning, especially as it involves play, questioning, and imagination. I am over-the-moon thrilled that I had the opportunity to participate in a TEDx event, especially this one, as the topic is close to my heart. The organizers and staff who put on TEDxUFM 2012 did a fantastic job — just look at this year’s lineup of speakers!

It was an honor to be speaking alongside USC’s Douglas Thomas (co-author of A New Culture of Learning) and Khan Academy developer David Hu, as well as the spectacular group of speakers and performers from Guatemala.

My visual notes of @douglast's talk at #TEDxUFM last Saturday

My visual notes of Doug Thomas’ TED talk, TEDxUFM, August 19 2012

More of my visual notes are coming soon to Flickr… I have to finish them! Following my own advice, I got the key points down and left spaces for embellishments to be added later. TED talks go by fast, and almost all the points are key!

My talk, Drawing in Class, explored visual note taking — particularly the role of personal visual note taking for students. The video will be up in four to six weeks, but here is the full slide set (with notes), posted on Slideshare:

Related Materials and Links:

While I was preparing for the talk, I found Nancy Duarte’s 10 Ways to Prepare for a TED-Format Talk to be a wonderful resource. I started with the sticky note tip and wrote each example or point on a note. Then I moved them around until I was happy with them, trimming and re-ordering until I liked the story.

Using sticky notes to plan my presentation

Preparing for my talk using Nancy Duarte’s advice

Her suggestions helped me to focus on the “why,” and the advice about rehearsing with the clock first running up and then running down was invaluable.

I found this page after I had already given the talk, but if a TED-format talk is in your future, you might want to take a look: How to “Do” a TED Talk from Teaching with TED.

The whole experience was incredibly cool, but I think my favorite part was being called a conferencista. How fantastic is that?

UPDATED 24 August — added more related links.
UPDATED 29 February 2020 — added notes to links that are no longer available.

precision lettering in iPad drawing apps

I received a question today that many people have asked me: How do I make my lettering so neat and precise when I’m using drawing apps on the iPad? I’ve been asked if it’s a font, or if I use a special stylus or some other trick. Here’s my (perhaps disappointingly simple) answer.

My iPad notes of MK Haley's keynote at #IFVP2012

A recent piece. I’m still working on my lettering, by the way. Always.

I don’t use a stylus; I just use my finger. I zoom way way in so that I can only see a few words at a time, and then I scoot along as I write. The precise lettering is mostly due to practice — if you look at some of the earliest work I did, you’ll see that I’ve come a long way 🙂

Bryan Alexander's Keynote

The very first iPad graphic recording I ever did – May 8, 2010. For reference, the iPad I was using (wifi + 3G) became available on April 30, 2010 — about a week earlier. I leapt right in.

One trick I can share is to line up the baseline of whatever you’re writing so that it’s a little bit above the app border on the iPad. For instance, if you zoom way in, you can move the page around to put the words about half an inch above the bottom edge of the app, which of course is straight. Then use that as a guide while you write. In Brushes, you’d do this by using the two-finger-spread to zoom in, then use two fingers to move the page around until your text was just above the toolbar (or the bottom of the app if you’ve hidden the toolbar). Write a bit, use two fingers to move the page sideways, and continue.

zooming in with Brushes

Zooming in and lining up the baseline of text in Brushes.

That’s the main reason I don’t use a stylus, by the way — I’m always zooming and moving the screen, and if I had to hold a stylus while I did it, it would take way too long.

Happy zooming!