Tag Archives: tools

Annotating Sketchnotes with Voicemap

Update, Feb. 2020: Voicemap is no longer available.

I’ve been playing with Voicemap, an online tool for adding audio and zooming points of interest to an image (like sketchnotes or a graphic recording). It hasn’t been easy. The instructions on the site aren’t very clear, and a lot of mistakes can’t be fixed without starting over. But I have finally completed my proof-of-concept Voicemap: An annotated review of visual notes I took during Doug Thomas’ TEDxUFM talk, “A New Culture of Learning” (link goes to the actual TEDxUFM talk).

(Voicemap no longer available)

Voicemap of my visual summary of “A New Culture of Learning” by Doug Thomas

Reflections

I really like Voicemap for the way it pairs audio with visual notes. Seems like it would be a great way to create a summary after a meeting: Upload the notes, then walk through them with a narration of the meeting’s highlights. Unlike the RSAnimate-style sketch movies, you don’t see the drawings being created in a Voicemap video — it starts with the image already finished — so it’s great for graphic recordings created during an event.

There are a few drawbacks. It looks like you have to publish the piece on Voicemap’s website, which means I can’t use it for many of my clients (too public). The format is better suited for pre-planned visual notes, or notes that are created after hearing the audio, so that you can walk through the image in a logical way. You’ll notice that I skipped around the page, following the flow of the talk rather than the visual structure on the page. That’s because I skipped around the page while creating the notes. Voicemap works better if you have a cleaner visual path to follow.

The most annoying thing is that the aspect ratio of the video when you edit it is different from the one you see when you view it (the editing one is 4×3, but the published one is closer to letterbox). The default embed code is also weird: it gives you a 640 x 640 viewer, which means your careful centering is shifted and everything is cut off on the right, with too much space on the left. The viewer above is actually cut off on the right side. If you want to see it more or less as it was meant to be viewed, try it on the Voicemap site.

Update: Voicemap contacted me and pointed out that I can change the width measurement to 640, which I did. This fixed the embedded display issue. To be fair, I did try that. I just changed it in the wrong place. Doh.

How You Do It

First, you start a project by entering some information about it (title, abstract, script, and so on). You can upload an audio file at this point also, although I had a great deal of trouble with that step. I tried several different formats (WAV, AIFF, MP3) and two different lengths (2:56 and 3:41). Eventually, the audio did load, but it took days in one case, and four or five upload attempts in another.

Once you get past that step, you can add a sketchnote image and set zoom points (points of interest, POI) that are timed to the audio track. You do this by listening to the track, pausing when you want to set a POI, then setting it and continuing. It really helps to have uploaded the script before you do this so that you can scroll through the script while you listen. When I did it that way, I found I could time the POI swaps better.

When everything is to your liking, you click Publish. From what I saw, publishing happens instantly.

Other Uses of Voicemap

It looks like graphic recorders can sign up with Voicemap, take a test, and become certified to do sketchnotes for audio clips that Voicemap sends them. Voicemap clients, then, can send in a script or audio clip and request a corresponding sketchnote video. The graphic recorders don’t get paid very much, but if you have an iPad or tablet, it looks like you could pick up a couple extra bucks illustrating Voicemap clips. I’m not sure how busy the service is yet.

Graphic recording of web meetings with the iPad – Yes, you can!

“So can I graphically record a web meeting on my iPad?”

That’s a question I get asked a lot, and historically, it has had a complicated answer. For a while, the answer was “Not if you want anyone in the web meeting to see your graphic recording while you’re doing it, no.” Then it was, “Yes, but only if they’re on the same wireless network you’re on, and even then it’s a lot of setup.” After that it was, “Technically, yes, but realistically, no,” because although it was technically possible to share your iPad’s screen to a desktop and then share the desktop’s screen in a web meeting, it wasn’t easy, smooth, fast, or reliable. As of last week, the answer has changed again.

That’s because last week, Squirrels released Slingshot, the first really workable solution that I’ve seen for real-time graphic recording in a web meeting using an iPad. Is it perfect? Nope. Is it good enough? Yes, for some situations. Is it for everybody? Nope.

Screenshot of iPad

My quick iPad drawing (screen shot from iPad).
I’m zoomed in a little, which is why it looks a bit fuzzy.

How Does It Work?

Slingshot lets you host a web conference in a snap from your desktop computer or mobile device. If you’re hosting from your desktop, you can use Airplay (built into your iOS mobile device) to mirror your device’s screen to your computer, where it is automagically screen-shared with everyone in the web meeting. Once I had downloaded and installed Slingshot on my computer, it took about five minutes to launch a meeting, connect my iPad, and share my iPad’s screen with someone in the web conference. I launched a drawing app on the iPad (Brushes in this case) and started drawing, just as I would if I were taking notes. My remote-viewing partner in crime (in this case my partner in many other things, Craig Smith) reported that the drawing was very smooth, no delay, no jumping around.

Squirrels also makes an app called Reflector, which mirrors your iPad screen to the desktop just like Slingshot. With Reflector, you have to join a web conference with something like Skype, WebEx, Connect, or Join.Me, and then share your screen. Slingshot skips all that by blending Reflector’s mirroring capability with an easy-to-use web conferencing tool, so you only have one thing to set up.

Photo of computer and iPad showing Slingshot

The iPad, where I was drawing, mirroring into Slingshot.
You’re seeing the Slingshot app floating over the Slingshot web page.
Don’t worry that the iPad is plugged in; it doesn’t need to be. I was just running out of juice.

Sounds Great! So Why Isn’t It Perfect?

First, because of how the mirroring works. Not only does your drawing get mirrored, but everything on your screen gets mirrored too — the palettes, title bar, whatever you can see. But we could live with that. The thing that really gets in the way is that the zooming gets mirrored as well.

To get good results and fit a lot of stuff on one screen, you need to zoom in when graphic recording on the iPad. Which is fine, except that when someone else is watching the screen and sees the zooming without any context, it’s very disorienting. I would be very careful about using this to record a web conference just because of the mirrored zoom. I wish there were a way to turn that off and just show the graphic recording unfolding without the zooming. That would be pretty darn close to perfect.

Second, you can’t do it just from the iPad, without the desktop computer. You still need to join the meeting on a desktop computer running Slingshot, and then you connect the iPad in order to mirror it. I really wanted to be able to join the meeting on the iPad and share the screen from there, but that’s not how it works.

The third reason isn’t particular to Slingshot. It’s just that live graphic recording on the iPad is not for everyone, regardless of how it’s shared in the web meeting. It’s slower than recording on paper and it requires more concentration, which means you can miss things. It’s much easier to get sucked into what you’re doing and forget to listen, especially if you’re not completely familiar with the drawing app.

Last but not least, both times I set up iPad sharing, Slingshot on my desktop crashed as I connected the iPad the first time. Once I relaunched and reconnected the iPad, all was well.

However, at long last, when someone asks if it’s possible to use their iPad to record a web meeting, I can say, “Yes! Yes it is.” Thanks, Squirrels!

Creating sketchnote joy with Inkflow by @Qrayon

Qrayon does it again! You may remember Air Sketch (which is still super awesome, by the way), the app that lets you wirelessly broadcast your iPad drawing to other devices on the same network while you draw it. This week, I happened upon another tool by Qrayon: Inkflow.

I am in love. Inkflow is a wonderful tool to blend digital and paper sketchnoting. You can use the app itself to take notes and organize them into books. You can also add typed text, images, and photos of notes you have taken on paper — which then become objects on the Inkflow page that you can move and scale with no loss of quality. Look at me, I’m so excited I’m jumping all over the place! Let’s get organized here and look at how Inkflow is for sketchnoting, the vector/bitmap comparison, a few key features, a list of what’s missing from my point of view, and whether or not I’d recommend it as a visual notetaking tool.

Sketchnoting in Inkflow

Writing and drawing in Inkflow is a beautiful thing. The flow is smooth, there’s no lag, and the canvas is large. Since I’ve only just begun to play with it, I’m using it as though it were Brushes, which is causing me some angst. But I can see that with a little practice I’ll get used to the way it works and do much nicer work. To test it out, I did a little visual notetaking while listening to the TED talk How Great Leaders Inspire Action by Simon Sinek.

Sketchnotes of Simon Sinek's TalkMy visual notes of “How Great Leaders Inspire Action” by Simon Sinek.
Click for a larger view.

Don’t let the non-white background alarm you; you can choose different styles. I just used the default for this one. You can actually change it after the fact, which rocks, and there’s a plain blank white one. It has a palm blocker too, so if you prefer a stylus you can pull up the palm guard to cover the bottom part of the screen.

One thing to note: A lot of the features I’m describing are only available in the paid version, which at the time of this writing costs $7.99. Definitely worth it.

Vector vs Bitmap

Inkflow is a vector drawing tool, which means that what you draw is stored as resizable objects. However, it behaves a little like a bitmap drawing tool (like Sketchbook Pro), which means that it feels like you’re painting with a brush. The lines are smoother and more even than I’m used to, and I can’t quite get the same variable quality of line that I love in Brushes (which is also a vector tool with a brushlike feel). The trail-off at the end of a stroke is different, too, which makes my lettering look a bit sloppy to my (self-critical) eye.

However, one of the coolest features of the vector-based Inkflow is that you can select, move, and resize parts of your drawing (or the whole thing). You can enlarge small things and they won’t get fuzzy, or shrink big things and they won’t get muddy. Oh, and if you need to rearrange your notes as you go, you can! File the selection tool under A for Awesome.

Adding Text or Photos

If you don’t feel like writing, you can type instead, and then draw or write alongside the typed text. You can also drop in photos or illustrations alongside your work, or annotate them. The stationery feature lets you pull in images to use as custom backgrounds (did someone say templates?).

Adding Paper Notes

I love this part. I have a bunch of notes I took on copy paper (you know, analog) for different meetings for whatever reason. I’ve been carrying them around in a folder and trying to decide what to do with them — I’m in an awkward place between using a paper notebook or my iPad at work, so I have notes in both places. Yuck.

With Inkflow (the paid version), you can take a photo of your paper notes and they get pulled into your Inkflow notebook. They become a vector image, so you can resize them up or down, move them around, select part of them, erase the little smudges around the edges… it’s totally cool. Now I have a work notebook that includes my loose notes, plus I can add as many pages as I need to for notes during meetings. Whoa.

What’s Missing?

The things that are keeping Inkflow from being absolutely perfect for my needs (I know, like it’s all about me, right?) are, in order of importance:

  • A lack of layers. This is the biggie, because I want to be able to draw outlines and color them in later, with the color underneath the outline. I also want to be able to experiment with stuff and get rid of it easily if it doesn’t work out. Update: Qrayon says they are working on a ‘draw-under highlighter’ that might help with this. Yay!
  • No quick way to zoom out to 100%. This was pretty frustrating while I was recording the sample. I do a lot of quick zoom outs to check size and placement of elements, and it’s annoying to have to do the pinch thing several times to make sure I’m looking at the right view.
  • Limited sizes and shapes of the brushes. Three brush shapes plus an eraser is actually okay; I can live without the airbrush. But the settings for tip size aren’t fine-grained enough for me. For instance, on the paintbrush, you can pick 24, 32, 48, 64… you get the idea. Nothing in between. I also miss being able to easily draw a dotted line. I use that a lot.
  • A limited active color palette. This is annoying, but it isn’t a show stopper. You have access to lots of colors, you just can only pick eight of them to use without mixing at any one time. Update: Qrayon responded to let me know that you can swipe the palette sideways for more colors, which I hadn’t realized. Definitely helps with setting up colorsets.
  • Zoom only goes to 12%. This bothered me a lot at first and then less as I learned to work with the app. I wanted to zoom in further, but I found that if I just worked at a slightly larger scale it was actually okay. I still would like a little more zoom action for that extra precision I like in my lettering. I love that the screen stays at full resolution even when I’m zooming.

So, Overall?

Overall, I love Inkflow and I’m looking forward to using it to take notes in my next meeting. It effectively combines several of my favorite features from other sketchnoting apps, it’s easy to use, and I love that it’s vector-based so I can move stuff around. Easily 4 out of 5 stars, and adding layers would kick it up to a 5. If you’re looking for a notetaking tool that’s simple but versatile, I can recommend it.

Updated 5-3-2014 with some news about color palettes and an upcoming draw-under tool.

Pencil and Book for Paper by 53

Do you take notes with the Paper app on your iPad? I haven’t used it very much, but after seeing these two tools, I think I will give it another go. Plus, it looks like zoom is available in Paper now, which is what I was missing before.

The first is Pencil, a Bluetooth stylus for the iPad that has an eraser and palm blocking (so you can rest your hand on the iPad surface while you draw with the stylus). It looks like — what else? — a pencil. The palm blocking and eraser features only work with Paper, but the stylus works with everything on your iPad. It comes in graphite or a beautiful wooden finish. I’m especially intrigued by the hint that they have handled the friction problem. I’m hoping this means that Pencil doesn’t feel too slippery or drag too much as some other styli do.


Pencil By 53Pencil By 53 by Daniel Y. Go, on Flickr (cc)


The other isn’t really a tool… it’s something you can do with your notes after they’re done. It’s called Book, and that’s just what it is. Moleskine and FiftyThree have teamed up to offer a printed and bound book with your notes from Paper in the lovely Moleskine format. I find myself wanting to create a set of new visual notes just to be able to get them as a Book. If you’re familiar with Paper, you know that notes are organized in virtual notebooks inside the app already. Book brings them to life. Imagine your notes from a conference or a course printed and bound afterward!

Speaking of which, do you run a conference? Consider hiring a visual notetaker to record the sessions in Paper, then send out copies of the printed version as a high-end conference giveaway. Ooooh. I even know a visual notetaker who would be interested.

Virtual Meeting Tool: The Check-in Grid

Getting people comfortable in a virtual meeting can be a challenge, especially if you plan to use some of the more advanced features of your web conferencing tools. Even if that’s not in your agenda, it’s helpful to have folks take a minute to check in once the group has assembled. You’re familiar, I’m sure, with the awkward-silence-and-simultaneous-speaking method of going around the virtual room. How about trying a visual alternative in your next meeting? This one was shared with me by a student in one of my digital facilitation workshops.

The check-in grid is a quick, easy and fun way to avoid the awkward stumbling while still giving everyone a chance to have his or her voice heard. It also lets folks experience the group whiteboard feature of a web conferencing tool during a safe and low-stakes activity, so that later, when you ask them to dot vote or contribute to a group visual, they aren’t totally lost.

You’ll need to enable the collaborative whiteboard feature in your web conferencing tool. Some of them require you to do this when you set the meeting up, and others let you activate it once the meeting has begun. (See below for alternative ideas if your system just doesn’t have this feature.)

Start by drawing a grid on the collaborative whiteboard that has at least enough squares for each person to have one (including yourself). You can do this in advance of the meeting, or while people are gathering in the call, or right after you call the meeting to order when everyone is present.

the check in grid - it looks like a tic tac toe board.

Draw a simple grid.


Next, set the stage for participation by saying that you’d like to have the group do a visual check-in. When you give the signal, everyone will pick an empty square and use the drawing tools to draw a simple face that reflects how they are feeling right now. Alternatively, you could frame the instructions in one of these other ways:

Draw a simple face that shows…
• …how you are feeling about our progress so far.
• …how you are feeling right now about the issue we have come together to discuss (name the issue so it’s clear).
• …how your weekend went.

And so on. Explain that there will be a little pandemonium for a moment as people sort out which square to use. Point out that there are enough for everyone, so if two people start to use one square, one of them should just choose a different one instead.

Show people where the drawing tools are and how they work, if they don’t already know. You can invite everyone to make a test mark outside the grid if they want to practice.

When everyone is ready, tell them to go ahead. Let them sort out the squares themselves – it’s a mess at first, but it will work out. It’s okay if they talk. Wait until it looks like most people have chosen before drawing your own image in an unused square.

filled-in version of the check in grid

Makes you want to know what’s up with the cat person, doesn’t it?


When everyone has finished, start at the top left and go along the rows. Ask each artist to identify him or herself and say something about why they chose to draw what they did. Acknowledge each person’s contribution.

There you go! You’ve given everyone a chance to speak and share something about themselves, and you’ve established a speaking order that you can use throughout the meeting to help avoid talking over one another.

Bonus Points:
Once everyone is done drawing but before you go around for the verbal check-in, take a screen shot or download the image, open it in your drawing program, share your screen, and graphically record everyone’s remarks around the outside of the grid. Only do this if you can manage it very smoothly and quickly, or you will lose the good energy built up by the drawing.

No collaborative whiteboard? No problem!
Alternative #1: Ask everyone to draw a quick face on a scrap of paper, take a photo with their phone, and either upload it to the web conferencing tool (if that’s easy) or email it to you right away. Flip through the uploaded drawings in the web conference, or share your screen and open them one by one on your computer. Have each person explain as above.

Alternative #2: There are a lot of free shared whiteboarding tools that you can use for your meeting. Flockdraw is one. You just create a whiteboard and share the link, and everyone can draw together using its incredibly simple interface. There are many other options too — just keep searching until you find one that you like.

flockdraw screenshot

A co-conspirator and I created this in about fifteen seconds on our first Flockdraw visit.


Alternative #3: Instead of drawing a face, everyone can use the whiteboard type tool to write one word that describes how they are doing (or answers whatever question you have asked them).

Give it a try — let me know how it goes!

I really want to love VideoScribe…

… but I just can’t. I *like* Sparkol’s VideoScribe, but I don’t *love* it. But that doesn’t mean it’s not lovable. I know people who have done very cool things with it, like Chipp Walters’ overview of Agilix xLi, along with many other examples — see the Sparkol YouTube channel for lots more. And I do think the “behind glass” hand is pretty neat.

I’ve only used the free trial versions (desktop and iPad app), so it’s also possible that the paid version is a whole different animal. I made a silly little movie about the beginning of the book Watership Down by Richard Adams, because I’m in the middle of reading that with my son and it’s on my mind. It took about 45 minutes to create this, starting from not really knowing how to use VideoScribe at all. If I were to make something similar now it would only take about 15 minutes. The learning curve isn’t bad at all.

Here’s my take on it:

When I compare it to my current workflow for creating this kind of movie, I find VideoScribe to be limiting. I’m used to being able to create images from scratch and control how they appear. I did create my own drawing in Illustrator (the image of the downs in the sample movie here), but as you can see, it didn’t come out quite the way I wanted it to in the video. I used the brush pen in Illustrator to get a brushy line quality, but in the movie you see the outline of each stroke and then all the strokes fill in at the end, so it looks odd.

I also wanted to add audio effects at different places in the movie, and I could not figure out how to do this. When I recorded an audio effect as a voiceover (just myself saying “Ta-da!”), it played at the very beginning, and I didn’t see a way to shift it to the point where I wanted it to be. It may be that there is a way to do it and I couldn’t find it, or it may be that this is only something you can do in the full-price version. Or it may not be possible at all.

However, it’s much less complicated to create a movie using VideoScribe than it is to do it the way I currently do it (with Brushes 1 and Final Cut Pro X). VideoScribe also has an advantage over Brushes 1 in that you can actually obtain it, which is significant for folks who are just starting out (the original Brushes is no longer available on the App Store, and the new one doesn’t let you work with the movie files in the same way). VideoScribe’s library of imagery seems to be extensive and can be supplemented by custom material, and it’s nice to have all the parts in one place: images, soundtrack, voiceover, and output. I use four different applications or services to achieve the same end.

Is VideoScribe right for you? Well, if you are looking for a relatively easy way to get into creating this kind of movie, and you don’t need an OCD-level of control over the output, and you’re willing to put in some time to learn the ins and outs of its unique user interface, then it might be. It’s certainly less complicated than working with a video crew — you can sit down and work on it any time, without reference to other people’s schedules, and you don’t need special lighting or space. The results are definitely polished enough to use for client work. It’s much easier to learn to use than Final Cut Pro X or even iMovie, and there are fewer moving parts to worry about. If you do decide to try it out, be aware that there’s a 7-day free trial. Don’t start until you have some time to devote to it, so you can give it a fair shot. I’d be curious to learn what you think if you try it.

Two Apps to Watch: bContext and Underlay Stripper

Well, one app, and one tool that makes another app work better:

bContext

bContext is an iPad app that lets you record drawings and annotate them with audio. Thanks to some embedded editing tools, you can import images and draw over them, record yourself talking about what you are drawing, and create a video of the whole process. The drawing tools are not quite ready for the kind of detailed work I tend to do on my iPad — yet — but I have high hopes that they will be.

I had the pleasure of meeting bContext’s co-founders, CEO Massimo Scapini and CTO Felipe Saint-Jean, a couple of weeks ago when they were in town for TechCrunch’s Disrupt SF 2012 conference, and they gave me a tour of some of the new features that are coming up. I also got to put a in good word for some of my favorite wishlist features. This is definitely an app to keep your eye on!

Underlay Stripper

Underlay Stripper is a tool created by Altuit that runs on the computer (it’s not an iPad app) and works with the Brushes iPad app. I don’t believe it has been released yet, but I was able to beta test it and I am hooked. It lets you remove a layer from a Brushes drawing so that it doesn’t appear in the final image and video. This may not sound like a lot, but if you do iPad movies with Brushes, it’s huge: you can drop your sketch into the bottom layer, draw the movie on top of it, and then strip the sketch out so it doesn’t show in the final video. Fabulous!

I’ve used the beta extensively, and it’s reliable and simple to use. Keep your eye open for the official release — it’s a tool worth having.

Cleaning Chart Images with ScanScribe

The instructions below come from David Sibbet of The Grove and were updated by Cynthia Derosier of Good Juju. I’ve just edited them a little and am reposting them for convenience. If you’re looking for another method of cleaning chart images, I have previously posted instructions for cleaning chart images with Photoshop

Cleaning Up Your Charts

Once you’ve taken photos of your charts, you can run them through a program called ScanScribe to drop out the shadows and the gray or yellowish background that results from photographing paper charts. It’s quick and easy, once you get ScanScribe set up. It’s not like most applications — it’s really a script, so you have to be prepared to fiddle a little bit, but once it’s working it’s a great tool for the job. Like David, I haven’t used it’s other features, but I know it’s capable of more than just whitening images. ScanScribe is available for Mac and Windows platforms.

David Sibbet says, “The best program [for cleaning chart images] is still ScanScribe, a never-released piece of software from Xerox [now Parc]. The interface isn’t very intuitive, but it does a great job keeping your yellows intact. You can change the exposure settings: 4 or 7 seem to work best. You can also correct for keystoning under the edit function. TIFF files work best. These are the only functions I’ve ever used and it seems to work very well.”

Using ScanScribe

  1. Download ScanScribe from the Parc site: http://www2.parc.com/isl/groups/pda/scanscribe/
  2. Save it to a spot on your computer where you will be able to find it (perhaps make a ScanScribe folder inside your Applications or Programs folder).
  3. Double click on the Scan app. This will launch a terminal program that then opens the software, so don’t be alarmed when the new program opens.
  4. Under EXECUTION, open “SCANSCRIBE.” 
  5. Go to “Options” set your Automatic FB/BG Color Processing on Image Load/ background sensitivity to 4 (or 7 — you can experiment).
  6. Under FILE open the folder where you have your chart pictures. It doesn’t have menus that open automatically so you have to go through each click manually.
  7. Open your file. It may take a little while to process, during which time it can look like nothing is happening. After a bit, your photo should open. When it opens, the photo will be magically whitened! (If not, see the notes below).
  8. To adjust for keystoning, go to Edit/Keystone Unwarp. This gives you a box that you can change by using your cursor on the corners. Drag corners to where you want them to be on the photos. Then click the button in the window frame that says “run Keystone” and the picture will unwarp.
  9. Save As a TIFF file if possible, or a JPG if you can’t work with TIFFs.

Notes

Cynthia reports that she had a very large TIFF file and had to reduce its file size in order for the program to work. If you load the photo and have done all the steps correctly but still see no change, you may need to reduce the file size. Cynthia noticed that the script at the bottom indicated the computer was out of memory for a TIFF file, but did not run out of memory for a JPG of the same size.

I have noticed that ScanScribe can have difficulty opening files if they are too deep in my computer’s file system — that is, if they are inside a lot of nested folders. I think this is because all the folder names get added to the path name for the image, and perhaps the long path name exceeds some limitation in ScanScribe, but that’s just a guess. To get around the issue, I created a folder inside my Pictures folder called “For ScanScribe,” and I just drop all the photos in there that I want to clean up. ScanScribe remembers the last folder it opened images from, so this is a handy way to avoid having to click through your folders to find your images. I just save the edited versions right back into that same folder, and then move everything to where I actually want it when I’m done to keep the folder clean.

If you have additional questions, please check the ScanScribe discussion forum


Post-workshop Debrief

Workshop Title

Last Friday, I led a workshop at The Grove called Digital Tools for Graphic Recording. Anne Merkelson moderated the session, and Tomi Nagai-Rothe and Ed Palmer provided backup and technical support. Over 130 people attended the free online workshop, which was scheduled to go for an hour but ended up running about 90 minutes. I learned a lot — especially about giving an online workshop to that many people — and I also mentioned a bunch of tools and offered to make my Sketchbook Pro brush sets available for download. Read on for all that info.

Lessons Learned

WebEx Lessons. We had some technical issues — at least, I did. I got kicked out of the conference twice when the WebEx client quit on me. (Thanks, everyone, for hanging in there til I got back!) We’re still not sure exactly what happened.

This was a much larger workshop than I’ve run before, and I now have some pre-workshop housekeeping steps that I’ll take care of next time. My thanks go to the attendees who helped me take care of these tasks on the fly this time! Next time, pre-flight will include:

  1. Setting the conference options in advance to mute the beeps when people enter and leave.
  2. Muting everyone at once! I knew there had to be a way to do that, but I sure couldn’t find it until someone showed me where it was.
  3. Logging in as myself and also as admin, then passing presenter control to myself so the admin account isn’t required the whole time. We have a theory that the client crashes were related to the fact that I was logged in as the admin.

There are a few other things I might do differently next time:

  1. We learned afterward that some people tried to access the session from their iPads and were not able to. I don’t have information about the nature of the problems, but next time I’ll recommend that participants use computers.
  2. It appeared that some people who joined the session after I had started sharing my screen couldn’t find the chat window. I did cotton on and help them locate it eventually, but next time I would add instructions for this to the introduction of the session.

We did some things right, which means attendees probably didn’t notice them. I’ll mention those, too:

  1. In addition to the presenter (me), we had one person who was focusing only on collecting and moderating questions, and two people who were focused on helping people who had connection troubles.
  2. The session “started” 15 minutes before the official start time so that people could come in, test their connection, make sure they could see and hear, and so on.
  3. I had the right headset! If you’re on a Mac, you want a USB headset, not the kind with a pink and a green connector.
  4. I remembered to hit “record!”

Presentation Lessons. I heard some feedback that the middle section of the presentation got kind of visually confusing. I had opened all my palettes in Sketchbook Pro (SBP), just as I do when I’m recording, but it would have made more sense to open them one at a time as I was talking about them (brushes only when I was talking about brushes, layers only for the layers piece, and so on).

Another comment was that I did a lot of things in SBP without explaining or narrating what I was doing. This may well have been confusing, especially to people who aren’t familar with the software. In the future I’ll try to be more explicit about saying what my mouse is doing!

Links & Notes

Here’s a list of links to some things I talked about. If I said something you wanted to look up and it’s not listed here, post a question in the comments and I’ll add it.

Workshop Agenda

Some of the key points I made were these:

  1. There are lots of options for digital graphic recording. When choosing which to use, match the tools to your own comfort and skill level and also to the meeting’s venue and outcomes.
  2. Set up your file in advance to facilitate the kind of distribution you will want. Use a low-res (72 dpi or thereabouts) for images that will be emailed and printed small-scale, on letter-sized paper. Use higher resolution (300 dpi) and a larger canvas size for images that will need to be printed larger. Remember that Sketchbook Pro has a limit on how large you can make your file — this is a flexible combination of print dimensions and resolution.
  3. Set up a custom brush set with the brushes you will need most. Create at least two sizes of each brush, one for thick lines like titles, and one for fine lines and details.
  4. Learn to use layers; I use at least three: one for outlines and details, one under that for colors, and one under that for shading and shadows.

Brush Sets

These sets are the ones I use most when I’m using Sketchbook Pro for graphic recording. They work on the computer, but not on the iPad (whole different brush thing there), and only with Sketchbook Pro. I use SBP 5.0, and they might not work with an earlier version. I know they’ll work on a Mac but I’m not sure if they’ll work on a PC too. (Let me know if you find out.)

They’re provided here with no warranty of any kind; if they run amok and wreak havoc on your computer, you will have my deepest sympathy, but that’s about it 🙂

Rachel’s favorite Sketchbook Pro brush set for graphic recording (72 dpi): use these brushes when you’re recording at screen resolution.

Rachel’s favorite Sketchbook Pro brush set for graphic recording (300 dpi): use these brushes when you’re recording at print resolution. They’re bigger so the lines will show up properly.

To install the brush sets:

  1. Download the file(s) and save them on your computer somewhere that you will be able to find them again. They should end in .zip.
  2. Launch Sketchbook Pro.
  3. If your brush palette isn’t open, go to Window > Brush Palette to make it appear.
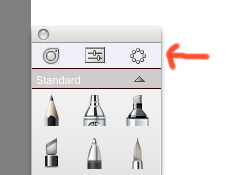
  4. Click and hold in the little tiny circle of circles in the top right of the brush palette (see below).
  5. Swipe your mouse straight down through the icon with three brushes and an arrow pointing down (tooltip says: Import Brush Set).
  6. Navigate to where you saved the brush sets. Click one of the .zip files and click Open. Ta da!
  7. Repeat steps 4-6 to load the other brush set, if you wanted both.

If you get the little spinny ball and the brush set doesn’t load the first time, don’t panic. Repeat steps 4-6 and it should work the second time.

circle-menu

The menu you need is here.

Unanswered Questions

There were a few questions from the workshop that we didn’t have time to address:

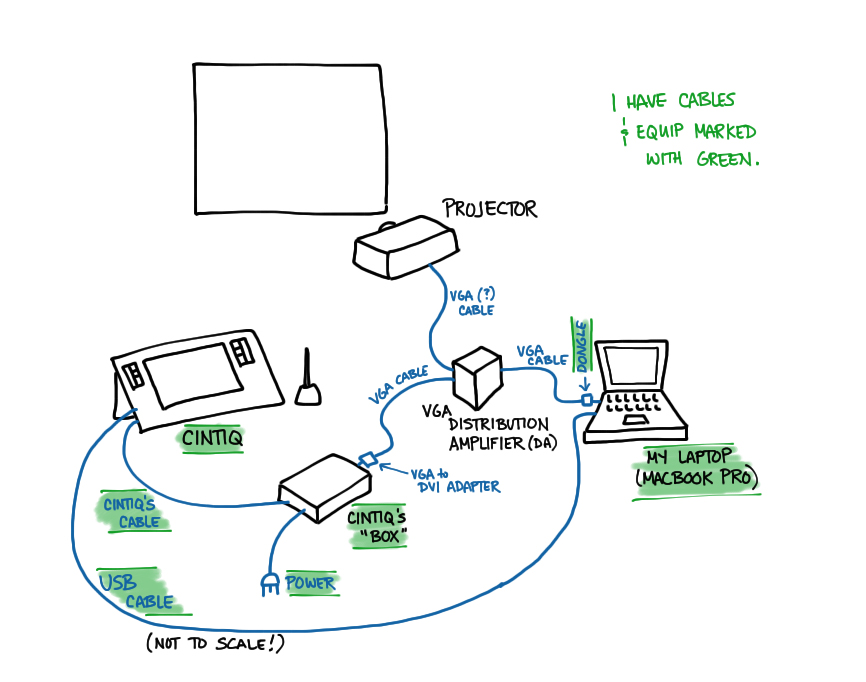
Q: Can you hook up an iPad to a projector through a VGA connector? Does it work if you are on WebEx? 

A: This question has a two-part answer. Yes, you can hook the iPad to a projector; however, you can’t control WebEx from it to the same extent as you can on a computer. The iPad doesn’t work like a VGA tablet. The tablet is an input device, like your mouse or keyboard; it talks to your computer, which can be connected to WebEx. The iPad is another computer, not an input device, so you can’t use it to control your computer* to run WebEx. There is an iPad app for WebEx, but it doesn’t give you all the functions you need to record a webmeeting.

* The caveat here is that technically you can use certain apps to control your computer from your iPad. They’re not yet robust or fast enough to allow the iPad to replace a tablet for real-time graphic recording in a web meeting, though.

Q: It seems there are a couple ways to look at it. (1) Facilitate a virtual digital meeting and record as you go, or (2) use a moderator, facilitator and recorder. When is that better than (3) using a video conference with the camera on the paper you are using on the wall — then you document for archiving after the meeting? 

A: In my personal opinion, (2) is better than (1) most of the time. A small meeting can be recorded and facilitated by one person, especially if everyone in the meeting knows one another and the content is not too emotional or controversial. Some graphic recorders, too, are skilled enough to handle more challenging meetings this way (I’m not one of them). Larger meetings, or meetings where the facilitator will frequently be called upon to manage the group’s energy, will benefit from having a separate graphic recorder and facilitator. Another attendee also suggested a third person, a moderator who handles the web conference itself. An excellent idea.

When choosing between (1) or (2) and (3) — recording in a web meeting versus using a webcam and paper — the factors in play are the comfort level of the facilitator/recorder and attendees with one method or the other, the equipment you have available, and what you want to do with the recording after the meeting. Personal preference is another factor. Neither method is inherently better than the other.

Q: How do you print all the different layers? Will a complete picture show up on one page of paper? 

A: All the layers that are visible will be included in the print. You can also flatten the file into one layer when you’re done, if you’re sure that you don’t need the layers any longer. I always keep one layered version and use “Save As” to make a flattened one, if I need to.

Q: What’s the maximum number of layers you use?

A: I’m a layer hog! When I forget to keep track, I can end up with a lot. I know I’ve had stacks up in the twenties before. Typically, I try to keep it to three or four, and on the iPad you can’t have more than six in SBP.

Thanks to all those who attended, and especially to those who helped me out with WebEx and made suggestions for future improvements.

Updated May 24, 2013, to fix missing images after the blog moved.

Projecting from Cintiq Tablet – Diagram

Cintiq setup diagram

This is a reference diagram I drew in order to remember the setup that worked for projecting from the Cintiq tablet while I drew on it. The VGA Distribution Amplifier (DA) is the key that makes the whole thing work. Ususally the AV folks can provide one.

Also, I just realized the USB cable goes from the Cintiq’s “box” to the laptop, not from the Cintiq itself as it appears here.