Tag Archives: tablet

Testing the new Work Visual app

Today everything aligned perfectly — time, equipment, and perseverance — and I was able to test the new Work Visual app by Holger Nils Pohl. I am SO excited! These are some initial notes about my experience.

I started by doing random doodles to get a feel for the interface, but of course the only way to really test it was to do some visual note-taking. I had been meaning to watch Tom Wujec’s TED talk on Solving Wicked Problems, so I fired it up and went to town. Disclaimer: I listened to it twice, and made liberal use of the pause button the second time, because the newness of the interface slowed me down a lot. (Know your tools!) Here’s the result, which doesn’t look substantially different from what I might have done with my old favorite, the original Brushes app. Click to see it larger:

Visual Notes of TED Talk

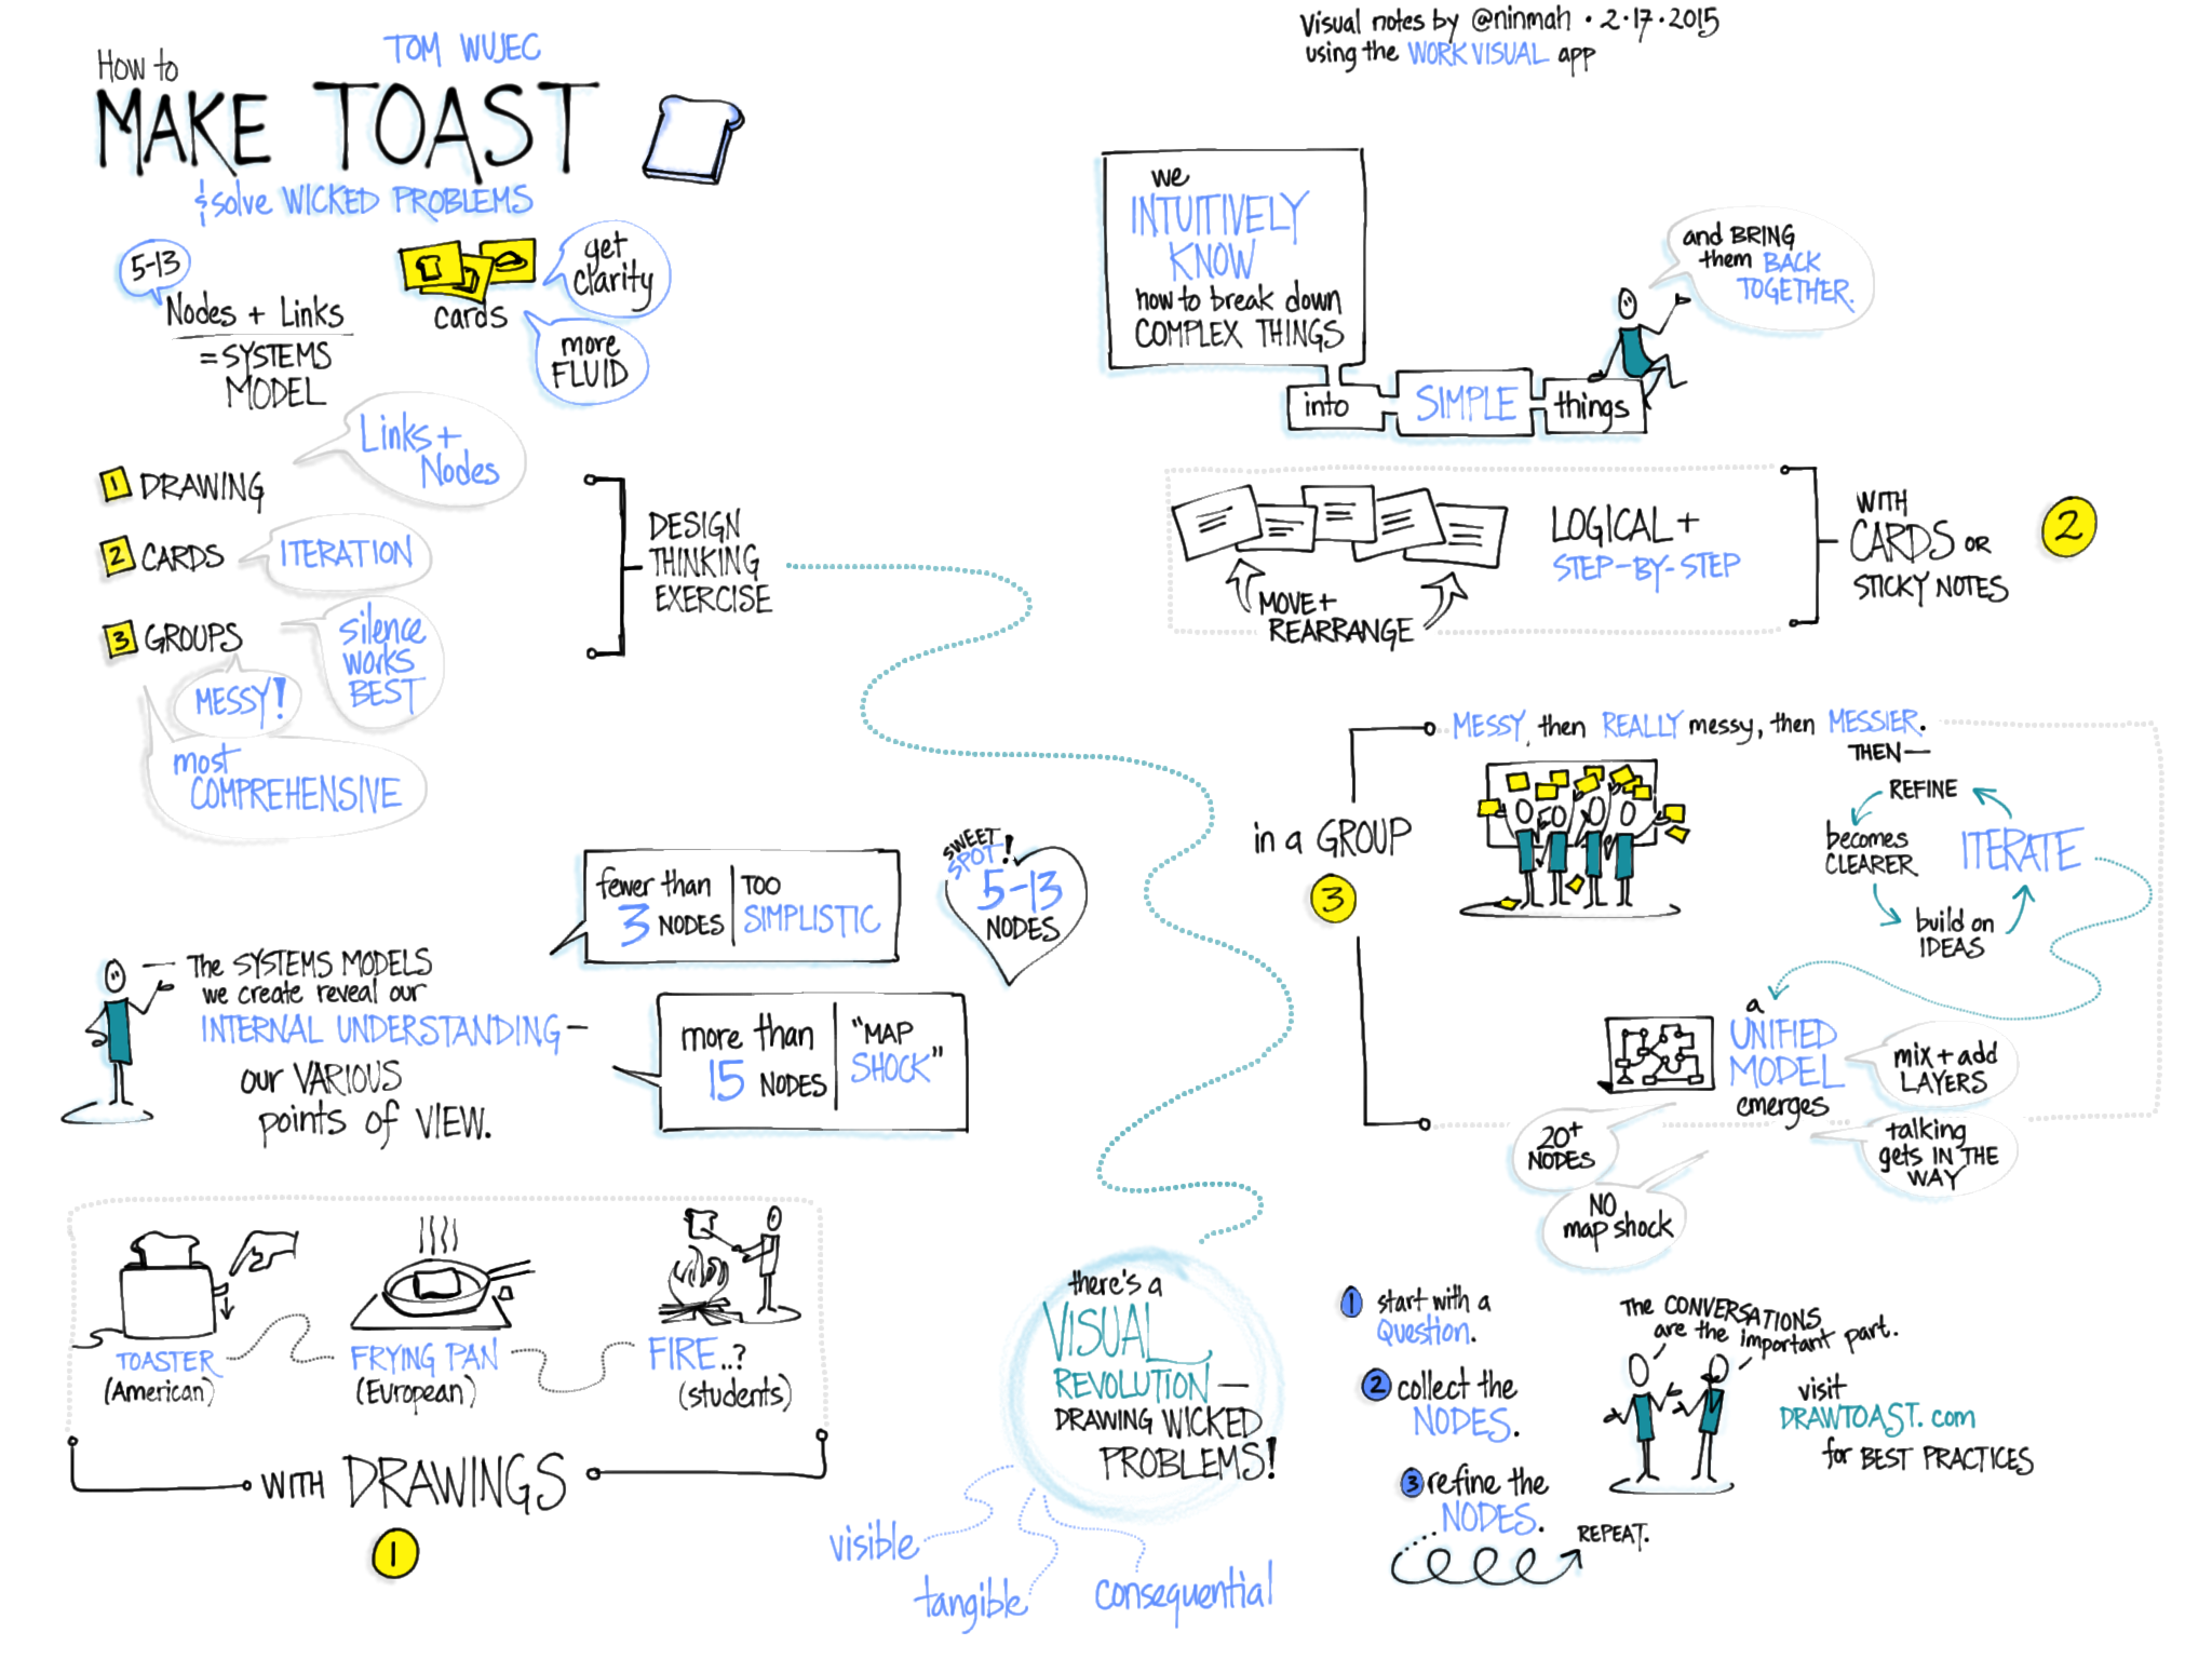
Visual notes of Tom Wujec’s TED talk, Wicked Problems, made during a trial of the beta version of the Work Visual app.


LOVE IT: What I already adore about the app!

  • I love the clean interface and the ease of switching layers and brushes.
  • I love that I can customize four brushes and they are right on the toolbar.
  • I love the zoom in (but not the zoom out, see below).
  • I love the line quality, which for me is one of the most critical components. Nailed it!

WISHES: What I would wish to see in future versions.

  • Double-tap to zoom out. If there is a quick way to zoom back to full screen, I never found it. This is what gave me the most trouble during my practice run.
  • I don’t know if it was the iPad I was using (I had to borrow one*), but the panning kept sticking while I was zoomed in. I’d start dragging with two fingers, and sometimes nothing would happen. This slowed me down a lot too.
  • There’s a strange thing that happens when one line crosses another, like when I’m lettering. At first I was disturbed by it, but then I realized that it wasn’t permanent and I was able to ignore it. What happens is that the color gets shifted around the crossed lines (on the left), but once you zoom or pan, it goes back to normal (on the right).
(Left) Color shifting when lines cross; (right) back to normal after zooming.

(Left) Color shifting when lines cross; (right) back to normal after zooming.


I wasn’t able to test the projection capabilities today, but I am super excited about them because it means you can FINALLY do graphic recording on the iPad while hooked up to a projector and not have to distribute airsickness bags to the audience beforehand. You can set it to only show the full screen, no matter how much you’re zooming and panning. Hurray! I also couldn’t test the video export but I hope to be able to once it’s ready.

I am so looking forward to the release of this app! Want to follow along while Holger develops it?

Work Visual on Facebook

Work Visual on Twitter

* Why I couldn’t use my own iPad: I’m still using the original Brushes app to create videos. Unfortunately, the export features of the original Brushes don’t work with the newest iOS. Also unfortunately (for me), TestFlight, which you need in order to test Work Visual, doesn’t work with older versions of iOS. So Brushes and the Work Visual beta cannot coexist on my iPad.

Decisions, decisions: Bamboo vs Cintiq vs iPad

I just wrapped up a coaching session on digital facilitation techniques and best practices that started with an overview of some of the hardware choices available, how to hook them up, and how to decide which to use for different situations. To help myself (and my client) think about the big picture, I created this graphic that shows one poor laptop besieged by input devices:

Thesetup

The idea is to get a feel for how they all connect to the computer. Some examples of software that can be used are also there. Working from the middle out, we have the laptop itself. Above it are some software choices: Sketchbook Pro (SBP) or PowerPoint (PPT) for displaying templates like The Grove’s Digital Graphic Guides or custom ones you create yourself, and a web conferencing system (WebEx in this drawing) to connect with meeting participants. Then, around the laptop are three possible hardware/input device choices: The Wacom Cintiq LCD tablet, the Apple iPad, and the Wacom Bamboo tablet. As you can see, the iPad and the Cintiq have displays and can mirror what’s on the laptop, while the Bamboo does not.

Connecting To the Computer

These instructions assume that you have the hardware and you’ve followed the packaged instructions for installing the software drivers that come with them. Don’t try to use the tablet without the drivers. It will only make you unhappy.

The Bamboo is the easiest to connect: just plug in the USB cable and you’re good to go.

The Cintiq and the iPad are tied for second, depending on whether you have a greater fear of cables or of configuring software. The Cintiq comes with a “black box” that has one cable on one side that attaches to the tablet itself. On the other side of the box are 3 cables: one is the power cord, one is a USB cable that plugs into the computer, and the third is the DVI (digital video) cable that plugs into (most likely) an adapter and then into your computer, unless you’re using a computer that has a DVI out already. Your Macbook Pro doesn’t so you need one of those little dongle thingies (mini display port to DVI for the newer ones). If you’re not picky about how it looks you can get a cheaper, non-Apple one from Amazon. I have one of each and can’t tell the difference once they’re hooked up. Switch on the power on the tablet and you’re good to go. Don’t forget to calibrate it to the pen EVERY SINGLE TIME you turn it on, switch from mirroring to not mirroring your display, or hook it back up again. Bleh. You do this in preferences and it only takes a second, but still! Every time.

The iPad takes a little prep, but then it’s easy as long as you’ve got a wireless connection or a computer-to-computer network set up and the technology gods aren’t particularly pissed at you for any reason. What makes it work is a little app by Avatron Software called Air Dsiplay. Air Display turns your iPad into another monitor for your computer, as well as an input device. It’s so incredibly cool. Download the app on your iPad and follow the on-screen instructions (for Mac or Win) to install the desktop application and establish your iPad as connectable. Then, as long as the iPad and the computer are on the same wireless network (or ad hoc network, which means your computer creates a network that your iPad can connect to, but you won’t have Internet access while this is going on), the iPad can be selected in the Air Display drop down on the computer. Once you do that, the iPad becomes a second monitor. You’ll see your computer desktop and applications in miniature on the iPad, and you can control them with taps and swipes. No joke. It’s really freaky and really cool all at once.

When to Use Which?

Use the Cintiq if you possibly can. I realize that’s a little oversimplified, but I stand behind it. However, since sometimes you can’t:

The Bamboo is good for situations where you need to be portable. For instance, if you need to facilitate a virtual meeting while on a business trip, it’s much easier to pack and carry than the Cintiq and much more reliable than the network-dependent iPad. Drawbacks include the difficulty of writing legibly with it — you’ll have to practice a lot and get used to zooming and panning — and the awkwardness of writing on one surface while watching another.

The iPad is not yet good for web facilitation, despite the indisputable coolness of Air Display. I’m hoping that it’s going in that direction, though. Right now the tracking (the time between drawing a line and seeing it appear) is too slow, and I’ve had it not work on some wireless networks depending on how the network is configured. For now, I’m sticking to using the iPad for in-person digital recording only.

The Cintiq is the easiest to use (once it’s hooked up) but taking it on the road is a lot like traveling with an octopus: cables and stuff everywhere. Because you can look where you’re writing, you get much better fidelity for text and drawings. It works really well for visually facilitating web-based meetings.

If you really want to freak your computer out, and I don’t recommend this although I did try it myself, hook it up to the Cintiq, then hook that up to a projector (you’ll need a switcher to make this work). Once you have that set up, turn on Air Display and add your iPad as, technically, the fourth monitor (laptop screen, Cintiq, projector, and iPad). Then watch the poor computer cycle through them trying to get a fix on what on earth you want it to do, and at what resolution. It kind of makes your eyeballs hurt in sympathy. Poor thing.

Disclaimer: I do work for The Grove, but I’d have linked to the Digital Graphic Guides anyway because I think they’re fantastic for web-based facilitation.