Tag Archives: cintiq

Post-workshop Debrief

Workshop Title

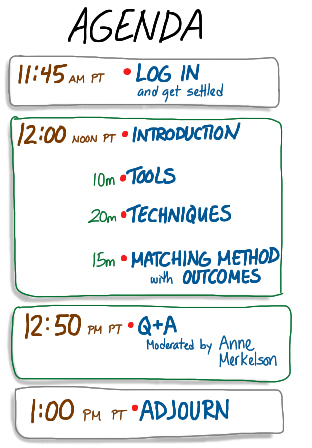
Last Friday, I led a workshop at The Grove called Digital Tools for Graphic Recording. Anne Merkelson moderated the session, and Tomi Nagai-Rothe and Ed Palmer provided backup and technical support. Over 130 people attended the free online workshop, which was scheduled to go for an hour but ended up running about 90 minutes. I learned a lot — especially about giving an online workshop to that many people — and I also mentioned a bunch of tools and offered to make my Sketchbook Pro brush sets available for download. Read on for all that info.

Lessons Learned

WebEx Lessons. We had some technical issues — at least, I did. I got kicked out of the conference twice when the WebEx client quit on me. (Thanks, everyone, for hanging in there til I got back!) We’re still not sure exactly what happened.

This was a much larger workshop than I’ve run before, and I now have some pre-workshop housekeeping steps that I’ll take care of next time. My thanks go to the attendees who helped me take care of these tasks on the fly this time! Next time, pre-flight will include:

  1. Setting the conference options in advance to mute the beeps when people enter and leave.
  2. Muting everyone at once! I knew there had to be a way to do that, but I sure couldn’t find it until someone showed me where it was.
  3. Logging in as myself and also as admin, then passing presenter control to myself so the admin account isn’t required the whole time. We have a theory that the client crashes were related to the fact that I was logged in as the admin.

There are a few other things I might do differently next time:

  1. We learned afterward that some people tried to access the session from their iPads and were not able to. I don’t have information about the nature of the problems, but next time I’ll recommend that participants use computers.
  2. It appeared that some people who joined the session after I had started sharing my screen couldn’t find the chat window. I did cotton on and help them locate it eventually, but next time I would add instructions for this to the introduction of the session.

We did some things right, which means attendees probably didn’t notice them. I’ll mention those, too:

  1. In addition to the presenter (me), we had one person who was focusing only on collecting and moderating questions, and two people who were focused on helping people who had connection troubles.
  2. The session “started” 15 minutes before the official start time so that people could come in, test their connection, make sure they could see and hear, and so on.
  3. I had the right headset! If you’re on a Mac, you want a USB headset, not the kind with a pink and a green connector.
  4. I remembered to hit “record!”

Presentation Lessons. I heard some feedback that the middle section of the presentation got kind of visually confusing. I had opened all my palettes in Sketchbook Pro (SBP), just as I do when I’m recording, but it would have made more sense to open them one at a time as I was talking about them (brushes only when I was talking about brushes, layers only for the layers piece, and so on).

Another comment was that I did a lot of things in SBP without explaining or narrating what I was doing. This may well have been confusing, especially to people who aren’t familar with the software. In the future I’ll try to be more explicit about saying what my mouse is doing!

Links & Notes

Here’s a list of links to some things I talked about. If I said something you wanted to look up and it’s not listed here, post a question in the comments and I’ll add it.

Workshop Agenda

Some of the key points I made were these:

  1. There are lots of options for digital graphic recording. When choosing which to use, match the tools to your own comfort and skill level and also to the meeting’s venue and outcomes.
  2. Set up your file in advance to facilitate the kind of distribution you will want. Use a low-res (72 dpi or thereabouts) for images that will be emailed and printed small-scale, on letter-sized paper. Use higher resolution (300 dpi) and a larger canvas size for images that will need to be printed larger. Remember that Sketchbook Pro has a limit on how large you can make your file — this is a flexible combination of print dimensions and resolution.
  3. Set up a custom brush set with the brushes you will need most. Create at least two sizes of each brush, one for thick lines like titles, and one for fine lines and details.
  4. Learn to use layers; I use at least three: one for outlines and details, one under that for colors, and one under that for shading and shadows.

Brush Sets

These sets are the ones I use most when I’m using Sketchbook Pro for graphic recording. They work on the computer, but not on the iPad (whole different brush thing there), and only with Sketchbook Pro. I use SBP 5.0, and they might not work with an earlier version. I know they’ll work on a Mac but I’m not sure if they’ll work on a PC too. (Let me know if you find out.)

They’re provided here with no warranty of any kind; if they run amok and wreak havoc on your computer, you will have my deepest sympathy, but that’s about it 🙂

Rachel’s favorite Sketchbook Pro brush set for graphic recording (72 dpi): use these brushes when you’re recording at screen resolution.

Rachel’s favorite Sketchbook Pro brush set for graphic recording (300 dpi): use these brushes when you’re recording at print resolution. They’re bigger so the lines will show up properly.

To install the brush sets:

  1. Download the file(s) and save them on your computer somewhere that you will be able to find them again. They should end in .zip.
  2. Launch Sketchbook Pro.
  3. If your brush palette isn’t open, go to Window > Brush Palette to make it appear.
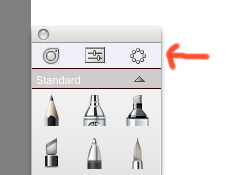
  4. Click and hold in the little tiny circle of circles in the top right of the brush palette (see below).
  5. Swipe your mouse straight down through the icon with three brushes and an arrow pointing down (tooltip says: Import Brush Set).
  6. Navigate to where you saved the brush sets. Click one of the .zip files and click Open. Ta da!
  7. Repeat steps 4-6 to load the other brush set, if you wanted both.

If you get the little spinny ball and the brush set doesn’t load the first time, don’t panic. Repeat steps 4-6 and it should work the second time.

circle-menu

The menu you need is here.

Unanswered Questions

There were a few questions from the workshop that we didn’t have time to address:

Q: Can you hook up an iPad to a projector through a VGA connector? Does it work if you are on WebEx? 

A: This question has a two-part answer. Yes, you can hook the iPad to a projector; however, you can’t control WebEx from it to the same extent as you can on a computer. The iPad doesn’t work like a VGA tablet. The tablet is an input device, like your mouse or keyboard; it talks to your computer, which can be connected to WebEx. The iPad is another computer, not an input device, so you can’t use it to control your computer* to run WebEx. There is an iPad app for WebEx, but it doesn’t give you all the functions you need to record a webmeeting.

* The caveat here is that technically you can use certain apps to control your computer from your iPad. They’re not yet robust or fast enough to allow the iPad to replace a tablet for real-time graphic recording in a web meeting, though.

Q: It seems there are a couple ways to look at it. (1) Facilitate a virtual digital meeting and record as you go, or (2) use a moderator, facilitator and recorder. When is that better than (3) using a video conference with the camera on the paper you are using on the wall — then you document for archiving after the meeting? 

A: In my personal opinion, (2) is better than (1) most of the time. A small meeting can be recorded and facilitated by one person, especially if everyone in the meeting knows one another and the content is not too emotional or controversial. Some graphic recorders, too, are skilled enough to handle more challenging meetings this way (I’m not one of them). Larger meetings, or meetings where the facilitator will frequently be called upon to manage the group’s energy, will benefit from having a separate graphic recorder and facilitator. Another attendee also suggested a third person, a moderator who handles the web conference itself. An excellent idea.

When choosing between (1) or (2) and (3) — recording in a web meeting versus using a webcam and paper — the factors in play are the comfort level of the facilitator/recorder and attendees with one method or the other, the equipment you have available, and what you want to do with the recording after the meeting. Personal preference is another factor. Neither method is inherently better than the other.

Q: How do you print all the different layers? Will a complete picture show up on one page of paper? 

A: All the layers that are visible will be included in the print. You can also flatten the file into one layer when you’re done, if you’re sure that you don’t need the layers any longer. I always keep one layered version and use “Save As” to make a flattened one, if I need to.

Q: What’s the maximum number of layers you use?

A: I’m a layer hog! When I forget to keep track, I can end up with a lot. I know I’ve had stacks up in the twenties before. Typically, I try to keep it to three or four, and on the iPad you can’t have more than six in SBP.

Thanks to all those who attended, and especially to those who helped me out with WebEx and made suggestions for future improvements.

Updated May 24, 2013, to fix missing images after the blog moved.

Projecting from Cintiq Tablet – Diagram

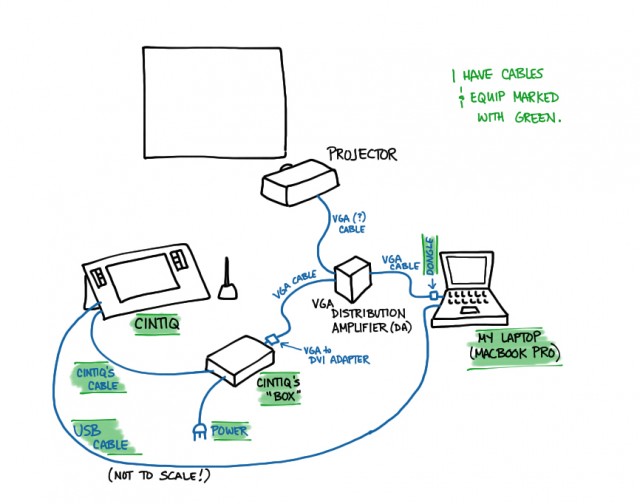
Cintiq setup diagram

This is a reference diagram I drew in order to remember the setup that worked for projecting from the Cintiq tablet while I drew on it. The VGA Distribution Amplifier (DA) is the key that makes the whole thing work. Ususally the AV folks can provide one.

Also, I just realized the USB cable goes from the Cintiq’s “box” to the laptop, not from the Cintiq itself as it appears here.

Tools for Virtual Meetings

I get asked a lot about the tools I use to graphically record virtual meetings. ‘Virtual meetings’ in this case means web conferencing sessions, where people are connected from all over the place using computers and some kind of software like WebEx, Connect, GoToMeeting, LiveMeeting, Elluminate, and so forth. The web conferencing software has to either support screen sharing or have a really, really good whiteboard feature. A previous post talks a little bit about my setup, but here’s a little more about why I choose the tools that I do. As always, YMMV.

The Short Answer

Mostly, I use the Wacom Cintiq tablet with WebEx meetings. The Cintiq is an LCD tablet that works like a second monitor you can write on with a special pen or stylus. I use Sketchbook Pro as the software, because it’s very responsive and it has all the basic features I need for digital graphic recording. I attach the Cintiq to my laptop, set up the monitors so they are not mirrored, log in to WebEx, and share the Cintiq screen.

The Longer Answer: Hardware

Wacom Cintiq Tablet (or similar)

Pros: Very easy to write on; best option for web conferencing.

Cons: Expensive; not very portable; can be tricky to hook up and calibrate.

Cintiq

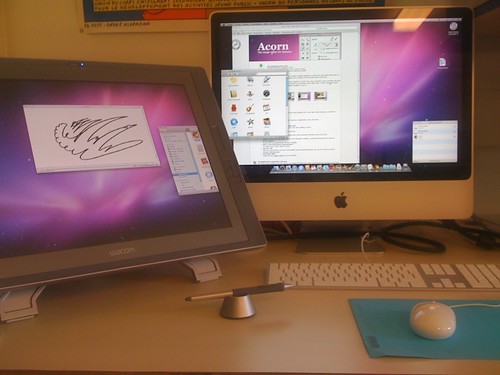
The 21UX. Oooh. Aaaah. Photo by David Roessli. Creative Commons.

The Cintiq comes in two sizes (12WX and 21UX). Currently, I use the 12WX, but I’m trying to get hold of a 21UX. With the 12WX, once all my palettes, brushes, colors, and so on are open, a lot of the canvas is covered. What I do to get around this is set up the Cintiq as a second monitor (instead of mirroring my displays) and I put all the palettes on my regular computer monitor, and just put the canvas on the Cintiq. Then I share the Cintiq (you can choose which monitor you’ll share). I have more canvas space to write on, and the palettes aren’t in the way and distracting the watchers.

The downside is that I have to put down the stylus, pick up the mouse, and mouse over to the other monitor when I want to change brushes or colors. This takes a little practice, but it’s not too bad once you get used to it. The 21UX has enough screen real estate that I could put the palettes right on that screen and not have a problem. Unfortunately, the 21UX is very hard to obtain because it’s always out of stock.

Wacom Bamboo Tablet (or similar)

Pros: Not very expensive; portable; very easy to connect to the computer.

Cons: Difficult to do detail work; you write in one place and watch it happen somewhere else.

Wacom Bamboo One

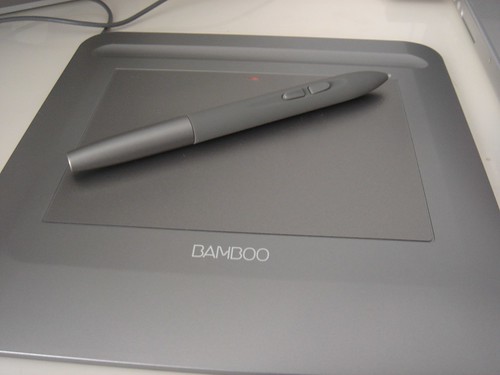
The Wacom Bamboo. Sleek, isn’t it? Photo by JeanbaptisteM. Creative Commons.

The Cintiq is my first preference. It’s expensive, though. There’s a cheaper alternative, which is a tablet that doesn’t have an LCD display, like the Wacom Bamboo (you can get the smallest one for $99). This tablet is much more portable and much more affordable, and also easier to hook up (just one cable as opposed to several).

The downside is that it’s much more difficult to do graphic recording using this kind of tablet. The surface is very slippery, making the pen hard to control — though you can work around this by placing a sheet of paper over the tablet — but the really difficult part is that you’re drawing in one place (the tablet) while you look in another (the computer screen). Even after a lot of practice, I still find it frustrating to try to record with it in real time. I think it’s because I like to do a lot of detail work, and it’s really not good for that.

Apple iPad (or similar)

Pros: Really really portable; easy to record on; lots of low-cost options for drawing tools.

Cons: Can’t really be used in web conference settings. Yet.

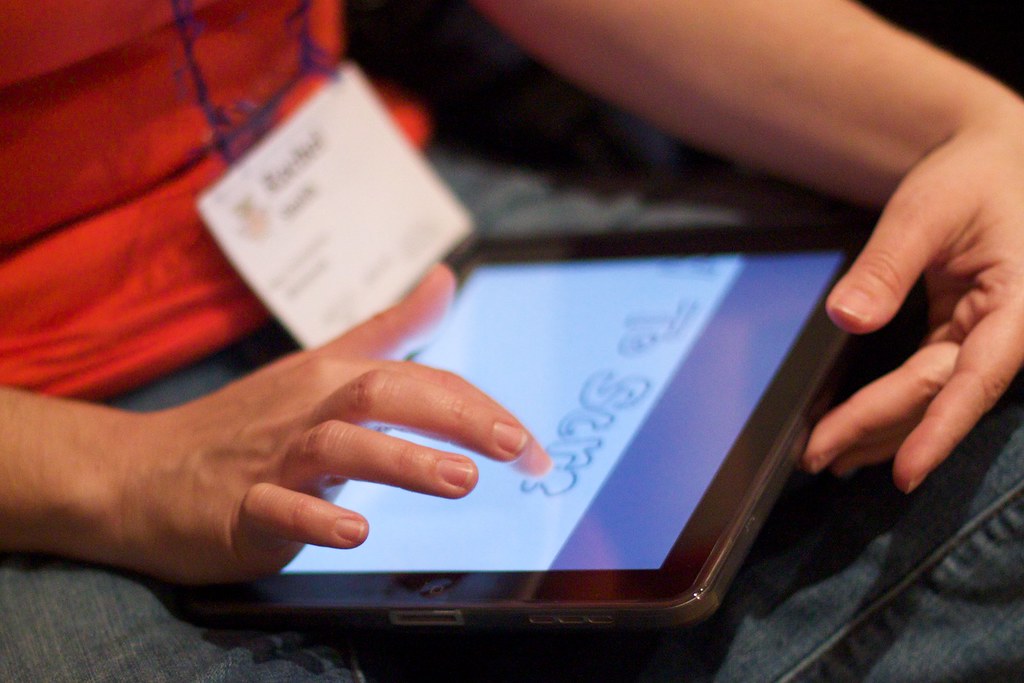
Me, graphic recording on the iPad. Photo by Alan Levine. Creative Commons.

The other question I get quite often is whether the iPad can be used for graphic recording in web conferences. The answer is mostly no, with a tiny little bit of yes. Obviously, you can do graphic recording on the iPad, and I do a lot of it and I love it. However, you can’t really use it for web-based virtual meetings, because there is no way (no reliable way, that is) to broadcast what you’re doing on the iPad to the people in the meeting. The web conferencing iPad apps that exist don’t let you draw on the whiteboard or share your screen (none that I know of allow this, anyway), and you can’t use the iPad to control your computer like you can with the Cintiq.

Well, this is not strictly 100% true, and that’s where the tiny bit of yes comes in. There are a couple of apps for the iPad that sort of let you either broadcast what you’re drawing (Air Sketch) or use the iPad like a tablet/monitor (Air Display), but they are not fast enough or reliable enough to support real-time meetings yet.

I’m still using my first-generation iPad, by the way. Works great.

Software

I use Autodesk Sketchbook Pro for digital graphic recording on the computer. It’s got the basic set of tools I need (layers, customizable brushes, color palettes), it’s relatively inexpensive, and it’s responsive enough to make real-time graphic recording possible.

On the iPad, I still use either Sketchbook Pro or Brushes, although there are a number of other apps that work equally well. The trick is to pick one that feels right and practice with it until the tools are second nature.


Decisions, decisions: Bamboo vs Cintiq vs iPad

I just wrapped up a coaching session on digital facilitation techniques and best practices that started with an overview of some of the hardware choices available, how to hook them up, and how to decide which to use for different situations. To help myself (and my client) think about the big picture, I created this graphic that shows one poor laptop besieged by input devices:

Thesetup

The idea is to get a feel for how they all connect to the computer. Some examples of software that can be used are also there. Working from the middle out, we have the laptop itself. Above it are some software choices: Sketchbook Pro (SBP) or PowerPoint (PPT) for displaying templates like The Grove’s Digital Graphic Guides or custom ones you create yourself, and a web conferencing system (WebEx in this drawing) to connect with meeting participants. Then, around the laptop are three possible hardware/input device choices: The Wacom Cintiq LCD tablet, the Apple iPad, and the Wacom Bamboo tablet. As you can see, the iPad and the Cintiq have displays and can mirror what’s on the laptop, while the Bamboo does not.

Connecting To the Computer

These instructions assume that you have the hardware and you’ve followed the packaged instructions for installing the software drivers that come with them. Don’t try to use the tablet without the drivers. It will only make you unhappy.

The Bamboo is the easiest to connect: just plug in the USB cable and you’re good to go.

The Cintiq and the iPad are tied for second, depending on whether you have a greater fear of cables or of configuring software. The Cintiq comes with a “black box” that has one cable on one side that attaches to the tablet itself. On the other side of the box are 3 cables: one is the power cord, one is a USB cable that plugs into the computer, and the third is the DVI (digital video) cable that plugs into (most likely) an adapter and then into your computer, unless you’re using a computer that has a DVI out already. Your Macbook Pro doesn’t so you need one of those little dongle thingies (mini display port to DVI for the newer ones). If you’re not picky about how it looks you can get a cheaper, non-Apple one from Amazon. I have one of each and can’t tell the difference once they’re hooked up. Switch on the power on the tablet and you’re good to go. Don’t forget to calibrate it to the pen EVERY SINGLE TIME you turn it on, switch from mirroring to not mirroring your display, or hook it back up again. Bleh. You do this in preferences and it only takes a second, but still! Every time.

The iPad takes a little prep, but then it’s easy as long as you’ve got a wireless connection or a computer-to-computer network set up and the technology gods aren’t particularly pissed at you for any reason. What makes it work is a little app by Avatron Software called Air Dsiplay. Air Display turns your iPad into another monitor for your computer, as well as an input device. It’s so incredibly cool. Download the app on your iPad and follow the on-screen instructions (for Mac or Win) to install the desktop application and establish your iPad as connectable. Then, as long as the iPad and the computer are on the same wireless network (or ad hoc network, which means your computer creates a network that your iPad can connect to, but you won’t have Internet access while this is going on), the iPad can be selected in the Air Display drop down on the computer. Once you do that, the iPad becomes a second monitor. You’ll see your computer desktop and applications in miniature on the iPad, and you can control them with taps and swipes. No joke. It’s really freaky and really cool all at once.

When to Use Which?

Use the Cintiq if you possibly can. I realize that’s a little oversimplified, but I stand behind it. However, since sometimes you can’t:

The Bamboo is good for situations where you need to be portable. For instance, if you need to facilitate a virtual meeting while on a business trip, it’s much easier to pack and carry than the Cintiq and much more reliable than the network-dependent iPad. Drawbacks include the difficulty of writing legibly with it — you’ll have to practice a lot and get used to zooming and panning — and the awkwardness of writing on one surface while watching another.

The iPad is not yet good for web facilitation, despite the indisputable coolness of Air Display. I’m hoping that it’s going in that direction, though. Right now the tracking (the time between drawing a line and seeing it appear) is too slow, and I’ve had it not work on some wireless networks depending on how the network is configured. For now, I’m sticking to using the iPad for in-person digital recording only.

The Cintiq is the easiest to use (once it’s hooked up) but taking it on the road is a lot like traveling with an octopus: cables and stuff everywhere. Because you can look where you’re writing, you get much better fidelity for text and drawings. It works really well for visually facilitating web-based meetings.

If you really want to freak your computer out, and I don’t recommend this although I did try it myself, hook it up to the Cintiq, then hook that up to a projector (you’ll need a switcher to make this work). Once you have that set up, turn on Air Display and add your iPad as, technically, the fourth monitor (laptop screen, Cintiq, projector, and iPad). Then watch the poor computer cycle through them trying to get a fix on what on earth you want it to do, and at what resolution. It kind of makes your eyeballs hurt in sympathy. Poor thing.

Disclaimer: I do work for The Grove, but I’d have linked to the Digital Graphic Guides anyway because I think they’re fantastic for web-based facilitation.