You’ve been in that meeting. Usually it’s a remote meeting, but not always. The presenter or facilitator has just finished a segment, and they say, “Any questions or comments? Questions? No? Okay, let’s move on,” and the meeting sweeps on before you manage to get your question out.
Or maybe you’ve been that presenter. You want to answer
people’s questions, so you say, “Any questions or comments?” Then the silence
stretches on for a year or two and you nervously continue: “Anyone? No? Okay,
let’s move on,” all the while wishing that someone had asked a question or
shared a remark.
Interestingly, whenever one of those happens in a meeting, the other one is usually happening too. That year-long pause for the facilitator or presenter is really only a couple of seconds long. However, that person is experiencing something called podium time, or the terrifying skewing of any period of silence so that it seems to go on forever no matter how short it actually is. (Another quality of podium time is that the time available for any given agenda item passes at an accelerated rate, but that’s a topic for another post.)
We have a fear of radio silence, and as the person in
charge, we feel it’s our job to prevent it. But I want to encourage you to
think of silence as your friend, if what you want is to get people to ask
questions or share their comments. It’s hard to do. Here’s how I taught myself
to embrace the silence and make space for people to talk.
1. Leave enough space for people to respond. It takes someone a few seconds to mentally frame a question or remark, and another few seconds to decide to speak. In a remote session, it takes a few more seconds after that to decide that no one else is going to start talking so it’s safe to speak up. If you don’t give people all those seconds, nothing will happen.
I do it by keeping a beverage handy. After I ask for questions and comments, I pick up my beverage — slowly — and take a sip. I might take a second sip. Then I slowly set the beverage back down. Almost every time, someone is speaking by the time I’ve placed it back on my desk.
This is especially useful if you’re on video, because
everyone can then see you are committed to your beverage and you aren’t going
to be talking for a few seconds while you sip.
2. Ask for
participation in an inviting way. There’s a world of difference between
these two openers:
“Any questions?”
and
“What questions do you have?”
The first one, “Any questions?” is okay, but not great. It
carries a tiny implication that you don’t actually expect anyone to ask
anything. While we’re used to hearing it, it’s not the most inviting way to ask
for remarks. It says, “I have to stop in case anyone is confused, but otherwise
I’d like to keep going.”
The second one, on the other hand, says, “I imagine you must have questions, and I’m looking forward to hearing what they are.” It’s an inviting way to make space.
Likewise, when asking people to participate in a
conversation, some ways of framing the invitation are better than others. This
is useful when you’re trying to encourage a group discussion about something.
Consider these two phrases:
“Anyone have any comments about this?”
and
“What would you like to say about this?”
Again, the first one is a little dismissive. There’s a slight implication that you’ll pause, but only if anyone really wants to say something. The second one indicates that you expect people to have something to say, and you’re ready to listen. It’s especially effective combined with the beverage trick, which makes it crystal clear that you’re not moving on for a while.
3. Ask people to stay off of mute. There are two reasons I prefer small groups to remain un-muted. First, it’s a hurdle to participation. A small one, sure, but it’s there, and I want people to be able to act on their impulse to speak. Second, it allows the chuckles and the gasps and the other small sounds to come through, which really brings a group alive.
The exception is when there is sudden or temporary background noise. People obviously can and should mute if they need to sneeze, cough, or speak to someone near them; or if there is intrusive environmental noise like construction sounds, dogs barking, and so on.
If the session is a one-way presentation given to many people, the norms are different and I am more likely ask people to mute by default. But for teamwork, groupwork, and small workshops or classes, keeping everyone’s microphone hot can increase participation.
4. Learn to love the silence. This isn’t easy, but it’s essential. That silence after you invite participation is actually your friend. It’s easy to imagine that everyone is wishing you’d just move on, already — and in all likelihood, someone in the group is probably feeling that way, which is fine. But it’s also likely that other people do want to ask or say something, and it’s important to give them the space.
When you allow the silence to exist, you create a vacancy that others can lean into and fill. If you welcome the silence and sit in it calmly, it will be an inviting silence: a step back so that others can step forward.
Your meeting room is all prepared. Your templates, markers, and sticky notes are at hand. But you and your client are both (very properly) practicing social distancing. So you have a face-to-face process for [strategy, visioning, brainstorming, decision-making, you name it], and you suddenly need to deliver this session remotely. You don’t even know where to start. Great! Let’s do this.
This is a bare-bones crash course in how to translate your face-to-face offering to a virtual one. We’ll cover:
Your mindset
Your mental model
Converting your existing agenda
Getting help
Matching processes with tools
Common problems you may encounter
It can be a lot more complex than this, but this is a good starting point if you’ve never done it before. Throughout, I’ve named tools that I personally prefer, but you can choose others that do the same thing. Let’s go.
Your Mindset
First, stop panicking. This is do-able, and you can do it. Also, your participants really need you to hold the container for them while they work, and you can’t do that effectively while you are panicking. So leave the panic at the door.
Second, accept that something will go wrong, and when it does, embrace it. I’ve done remote sessions for years and I still open each one with the thought, “Hmm, I wonder what will go wrong today?” I phrase it a little differently, though. I think to myself, “Hmm, I wonder what I will learn today?” Everything that goes wrong is a gift, because it teaches you something you didn’t know. It’s okay. Remain calm, explain what’s happening, and work the problem. It’ll be fine.
Third, let go of the fear that your virtual session will by definition be worse than your face-to-face one would have been. That isn’t necessarily true, especially for some kinds of work which are actually easier to do online. Accept that it will be a different experience, not necessarily a worse one, and aim to provide the best experience that you can.
Your Mental Model
This part is for those who have almost no experience in
virtual settings, so you can wrap your mind around how it’s set up. Skip this
section if you’ve participated in a bunch of remote sessions before. Otherwise,
read on.
You’ll have a meeting room, just like you do any other time. People will connect to the meeting room and remain in it for the duration of the session. The tool I use to create the meeting room is Zoom. Everyone connects to the same Zoom link and can use a phone or their computer to hear what’s going on. They can see each other (if they’re using video cameras) and anything that I’m sharing on my screen too. Only the host (me, or you in your case) needs a Zoom account.
You’ll have supporting tools, like you do in any other session. Instead of sticky notes, paper charts, and paper templates, you’ll use digital tools so your participants can engage in the hands-on activities you want them to do. They will connect to these tools using a web browser, while they are still connected to the meeting in Zoom. You give the link to the supporting tool or tools (go easy — multiple tools get confusing really fast), and everyone connects to it. I use tools like MURAL for sticky notes and visual templates, Trello for kanban boards, and Google Docs for shared editing.
A diagram of my typical set up with Zoom, Mural, and an iPad for graphic recording.
Pro tip: Usually, people are either looking at Zoom or they are looking at the shared tool, so if you are going to be working in a shared tool for a while, have people turn off their video camera in Zoom. Even when they are in Zoom breakout groups while using a shared tool, their focus will be on the tool, not on Zoom. Turning off the video camera can make the audio clearer and the tools load faster for people with limited bandwidth.
If you do graphic capture, you’ll also have a tablet (iPad or similar) that you can write on. You’ll share this screen in the Zoom session while you’re capturing. I use Concepts as my drawing app, but I recommend others for first-timers.
Converting Your Existing Agenda
The basic crash-course process for this consists of five steps:
Take out 25% of your activities (or make your session 50% longer). You can’t get as much done in the same amount of time, especially when you’re new at this. Transitions will eat up a lot more time than you expect. See this post for more details, including when to add breaks.
Identify the process you are using at each stage in your agenda, then select a tool that matches it and supports its desired outcome(s). Use as few tools as possible, even if it means using the same tool for two or more different activities. See the table below.
Create any templates or other materials you need so that they are ready in the selected tools. Include instructions right in the tool whenever possible, so that they can refer back to them if they get confused.
Visualize the transitions you will be asking participants to make between tools. How will you help them make the switch and get oriented? How will you teach them the basics of the tool so they are able to do what you ask them to do? How will you support them when they get stuck? Answer these questions for yourself, and you will be better able to support them through the session. Draw a diagram of the transitions between tools for your own reference. Make notes on your copy of the agenda to remind you what to say and when to say it.
Practice with each tool beforehand. Make mistakes, so that when participants make the same mistake, you can help them out. Do everything you are asking them to do. Find out where you need to give extra instructions to prevent mishaps.
Getting Help
Everyone is trying to learn this very fast right now. Several of the tools I use either have fantastic online tutorials (I’m looking at you, Zoom) or have staff who can help guide you through the basics, or both. Sign up for a demo webinar (thank you, MURAL) if they are on offer. Google the name of your tool plus “tutorial” or “demo” to find what’s available.
The new meeting space! Embrace it. Photo by Burst on Unsplash.
Matching Processes with Tools
Here is a list of common processes that you might need to use, and tools that support them. It’s obviously not an exhaustive list, but these are some of the most common things I do in virtual sessions. Again, I’ve listed my favorite tools; there are many others available.
Process You Want to Do (links in this column go to how-to articles)
Tools That Support It (links in this column go to the tool’s website)
Problem: People behind firewalls can’t access certain tools.
Solution: Have them do a pre-meeting tech check. Some tools have a test link (for instance, Zoom’s is here). For others, like MURAL or Google Docs, set up an open-access test document and send the link to your participants ahead of time.
Problem: People get lost switching between tools.
Solution: Visualize how this will work before you start. Give clear, explicit instructions, both verbally and written down in the tool they will use. Spend an extra minute making sure everyone is with you before you start. Have a colleague or volunteer present who can help stragglers figure out how to get where you are.
Problem: Not everyone has a video camera.
Solution: Ask the group what they prefer to do in this case: turn off all cameras, or have people use them if they are available. Keep in mind that the people who show up on video will have more perceived power and will have a different experience than those who don’t. Personally, I tend to be an all-or-nothing facilitator when it comes to video, but it’s up to you and your group.
Problem: Someone can’t connect to one of the tools.
Solution: If you have a tech helper, ask them to work with the person. If it just can’t be resolved, pair that person up with a buddy who is responsible for making sure that person’s ideas and input get added to the shared document. Share your screen through Zoom so they can watch what’s happening in the tool, even if they can’t get there themselves.
Caution: This is the only time you should screen share a tool that people are actively using. Otherwise, some folks will get lost between the real tool and your screen share, and they are likely to get confused at some point.
Problem: Someone’s audio or video suddenly stops working when it had been working before.
Solution: Ask them to leave the meeting and re-join. If that doesn’t work, ask them to leave the meeting, reboot their computer, and then re-join. Usually that fixes it.
Problem: There’s a ton of background noise from someone’s microphone that’s making it hard for others to hear.
Solution: In working sessions, I prefer to have everyone stay off mute; the conversation flows more naturally that way. However, sometimes there is a lot of noise in one location. Look on the participant list in Zoom to see whose microphone icon is filling up with green, and politely ask that person to mute themselves unless they need to say something until the noise has stopped.
Caution: It’s difficult to switch back to Zoom to mute and unmute while working in one of the web-based tools if you’re not used to it. Give people extra time to do this. They can return to Zoom by selecting its icon (blue with a white video symbol) from their task tray (PC) or dock (Mac).
I hope this crash course helps you find a starting point. As you do this more, you’ll get more comfortable with it. Remember that people are generally supportive when you invite them along on a learning journey like this. And good luck!
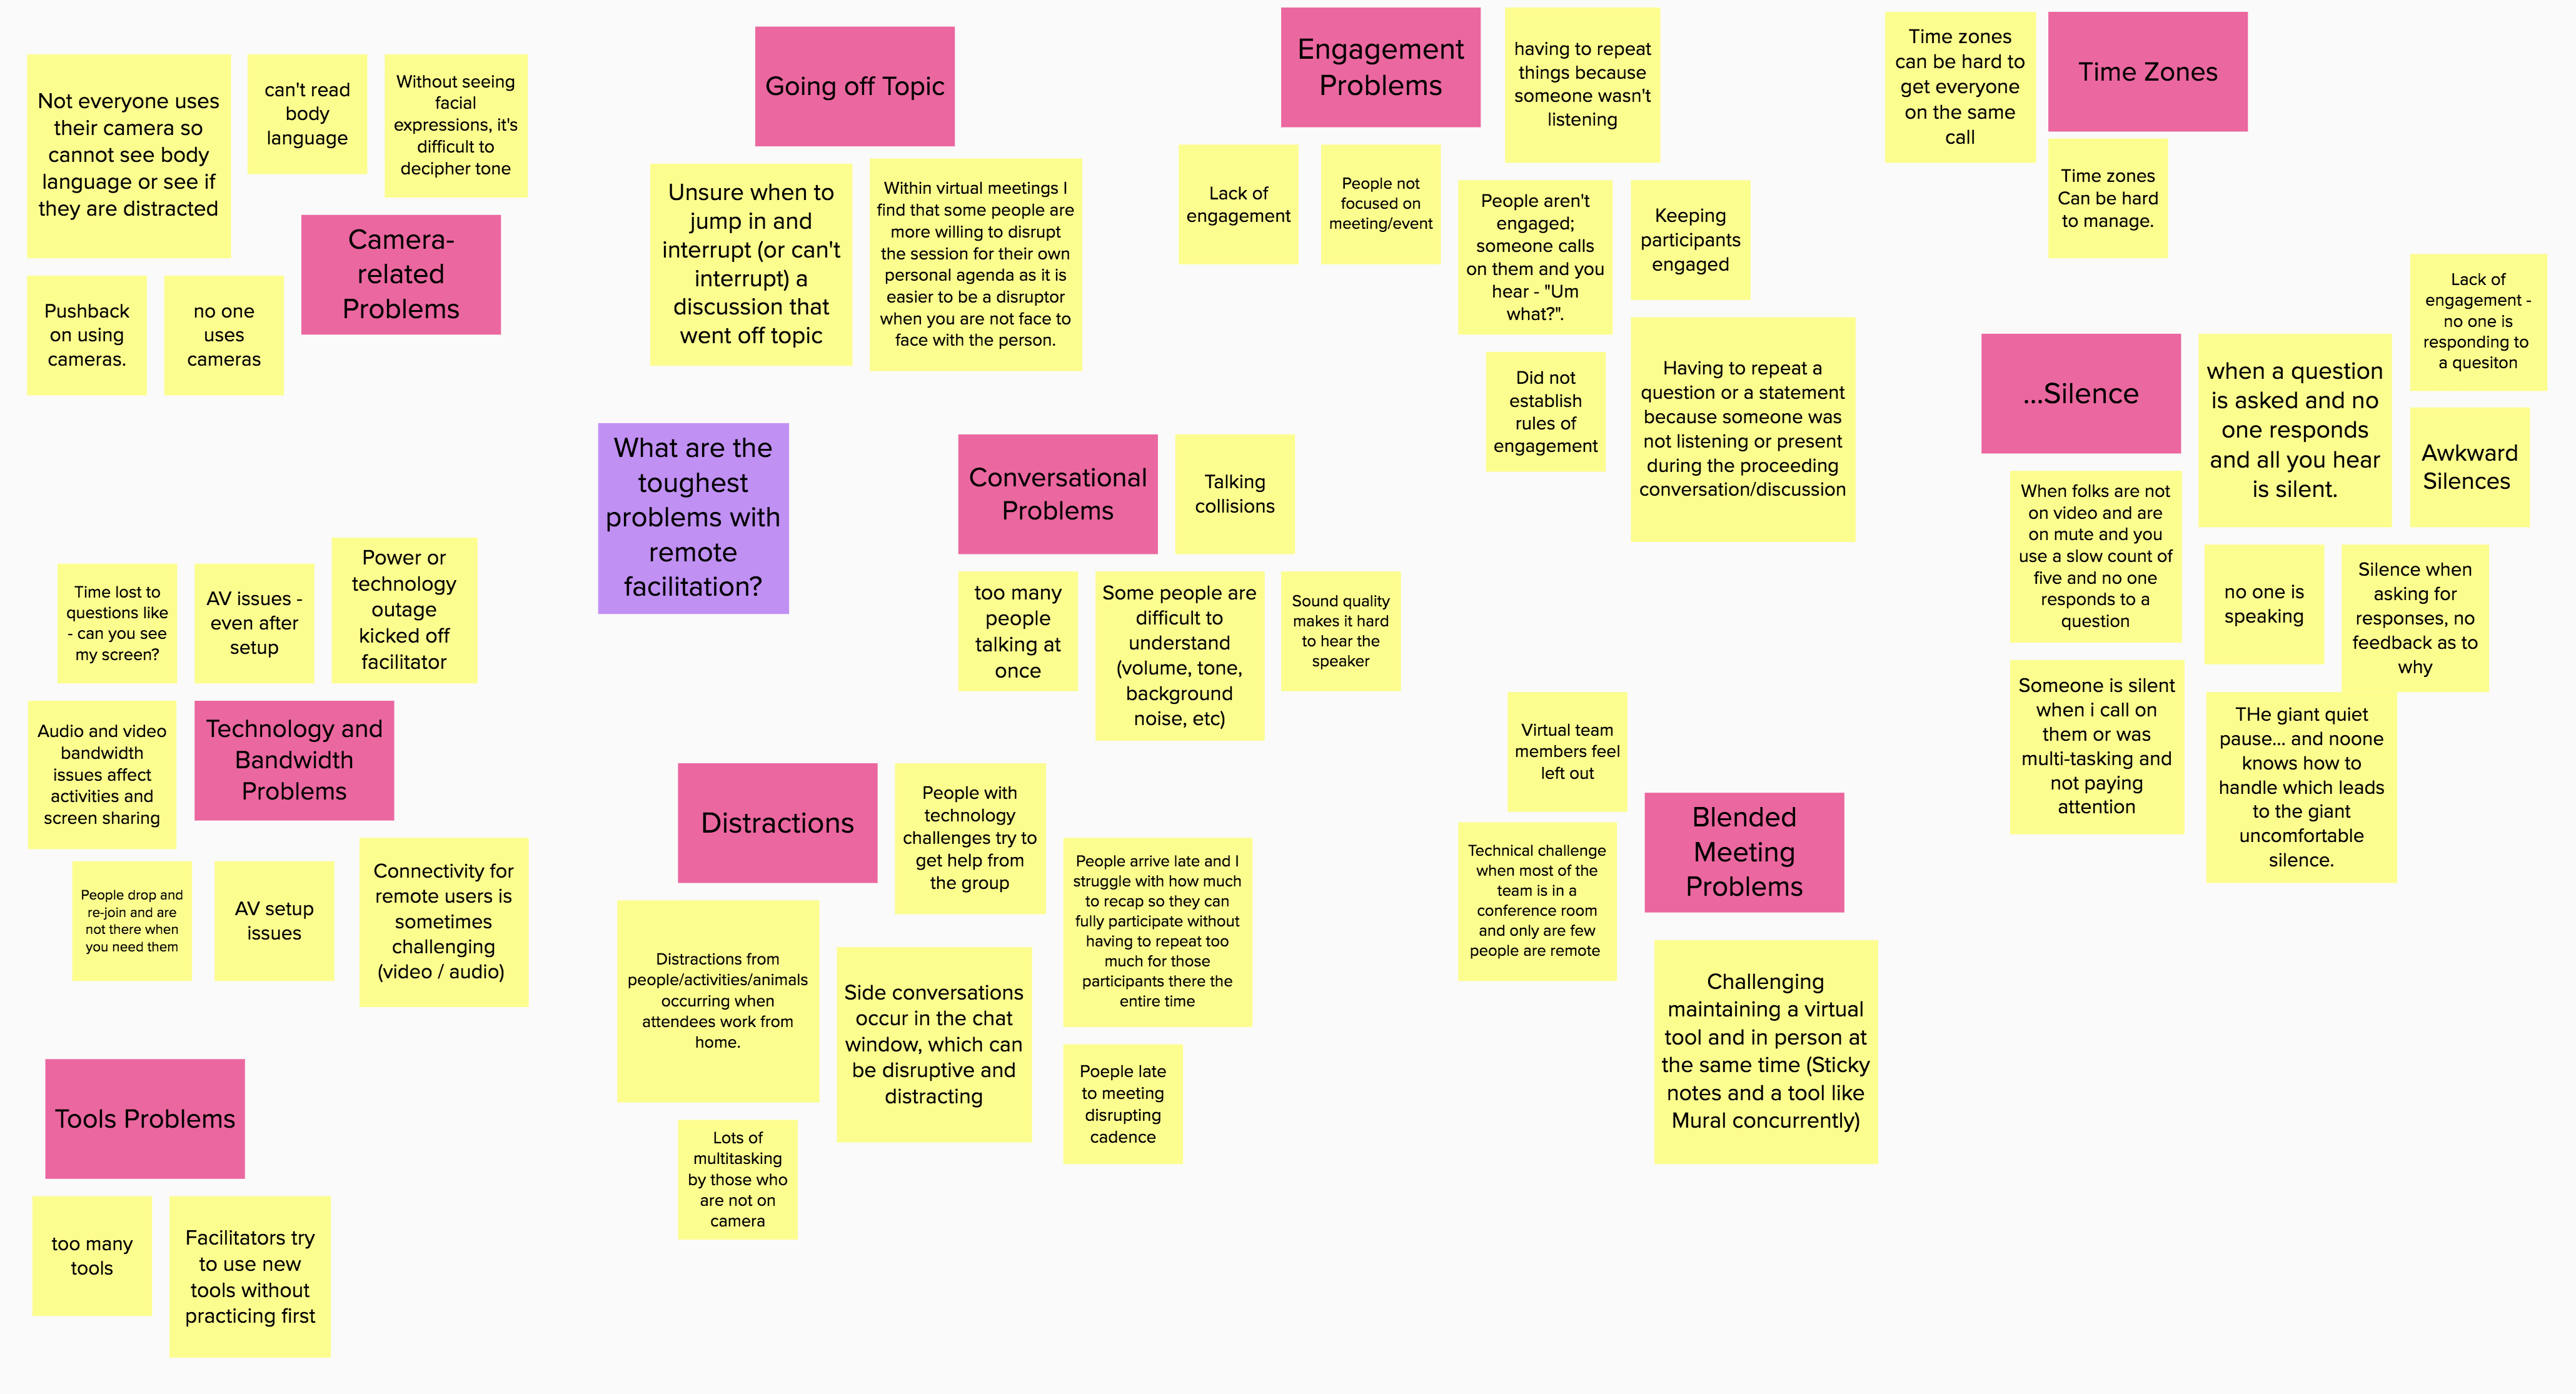
Using a sticky note tool for brainstorming in remote meetings is a wonderful method to gather a lot of different ideas quickly. But once those ideas are up on the shared board, the task of sorting through them and choosing which options to pursue can be daunting. Here’s a method for tackling all that information and turning it into a manageable dataset, and a list of some of the pros and cons of doing it this way.
Step 1: Get the ideas out.
Gather your remote team and get them into the same sticky note board using whatever tool you prefer. (My example here was done in Mural.) Pose a good question and ask them to write one idea per sticky note. They can place ideas anywhere on the board. To make later steps easier, ask them all to use the same color note; yellow, for instance. Anything but red, green, or blue. (A nice feature of Mural is that it’s easy to turn a bunch of notes all the same color in one click, even after they’ve been created.)
A wall of words — fresh from the brainstorm! Click the images if you want to read the notes.
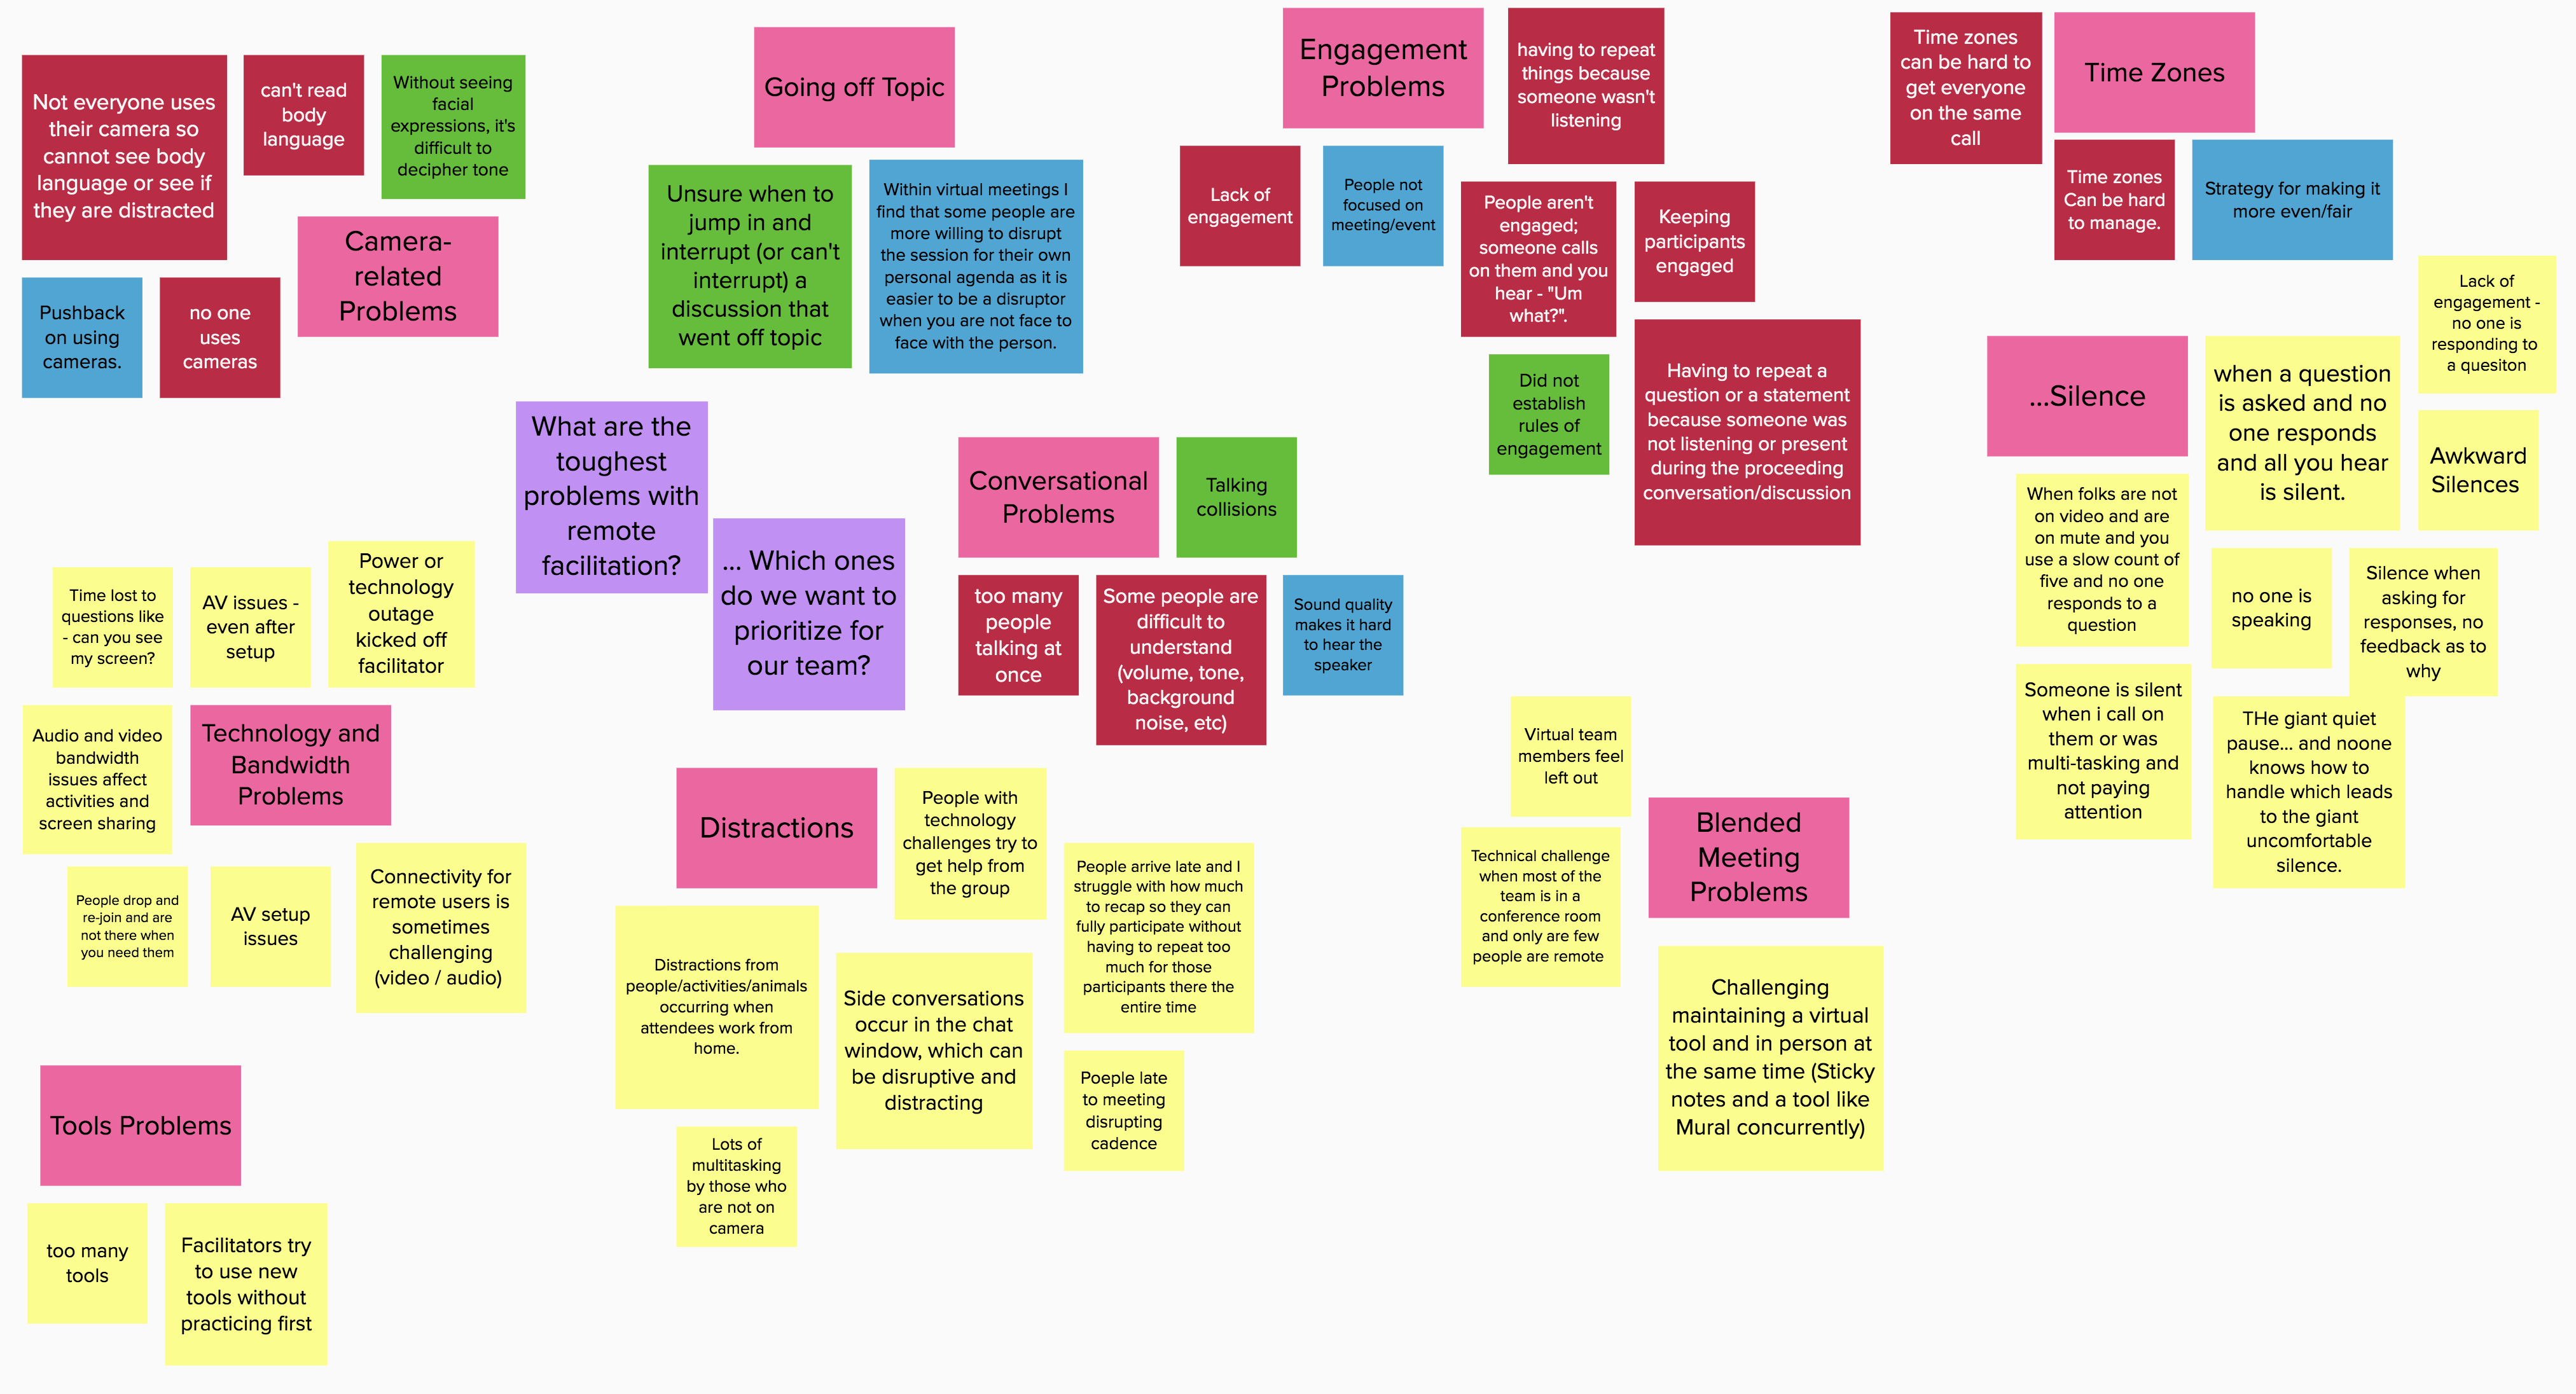
Step 2: Get the ideas organized. No judgment!
As a group, spend some time clustering the notes and removing or consolidating duplicates. At this stage, you’re just looking for things that are alike. You’re not evaluating anything. You can do this any way you like; if you have a high-energy group, ask them to silently cluster the notes all at the same time, and watch them fly around the board.
If your group is larger, or if you have some folks who are unfamiliar with the tool you’re using, silent clusters can be a little alarming and you might want to take a slower pass as a whole group, or assign sections of the board to breakout groups and then come together to finalize the clusters.
Make sure the clusters are clear and that all the notes in each cluster belong in that group. Naming each cluster as you go is helpful, too.
Sticky notes clustered into groups. The pink notes are the cluster labels.
Step 3: In, Out, or Discuss?
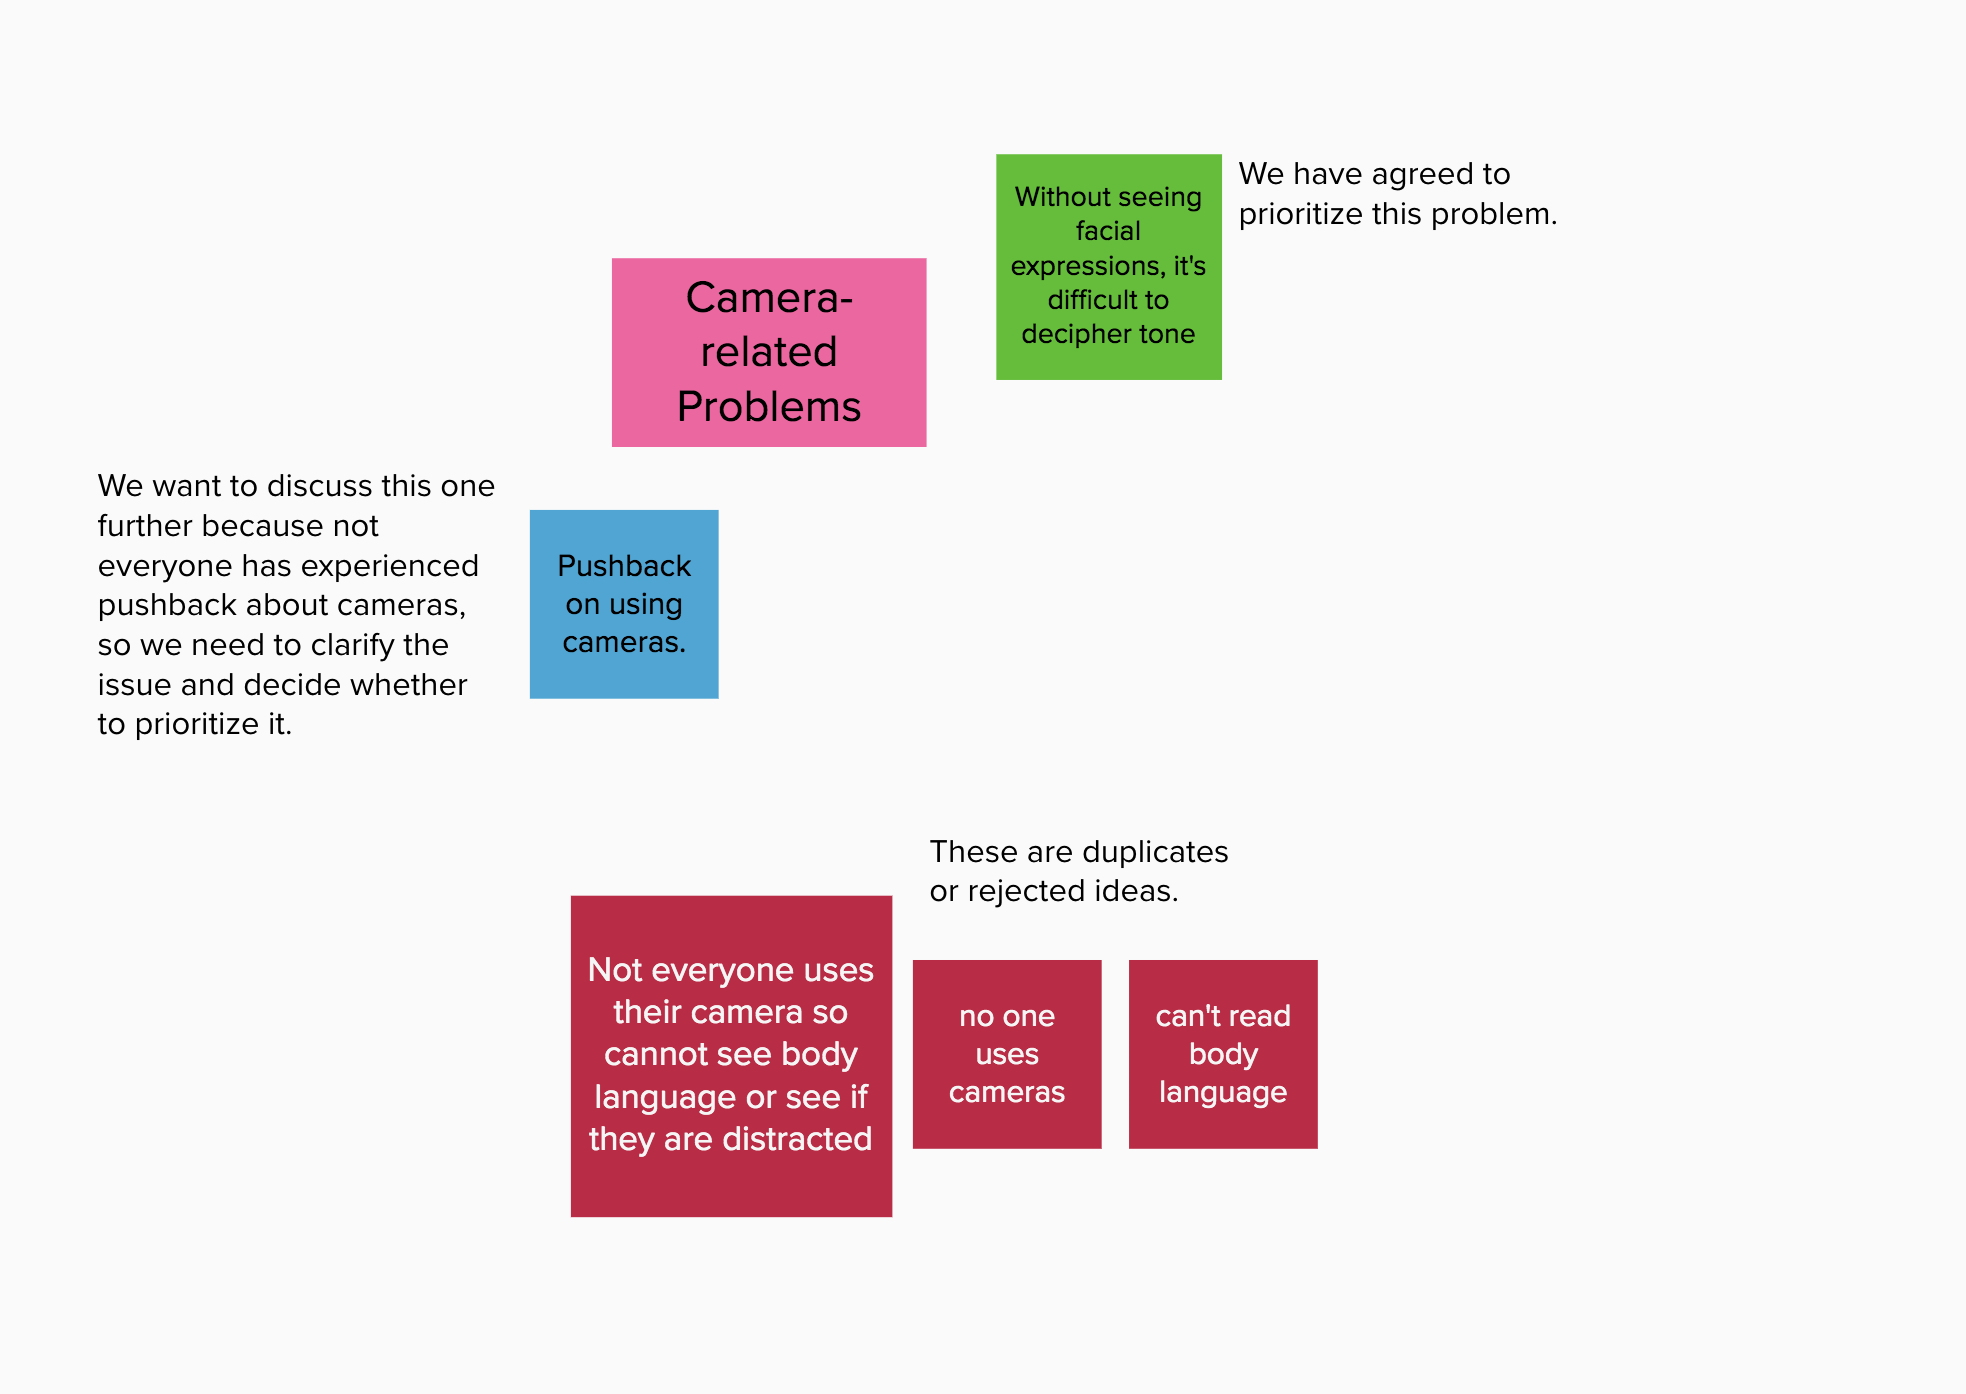
Make sure your guiding question is clear, and change it if you need to. The question must help participants decide whether ideas are in or out of scope. For example, in the fictitious brainstorm shown in my screenshots, the original question was, “What are the toughest problems with remote facilitation?” At this stage, though, I would need to amend the question to add, “… and which problems do we want to prioritize solving for our team?” There needs to be some reason for people to decide whether to keep or discard each idea, so make sure your question is pertinent. This second question makes the end goal clear: We are selecting priorities for action.
Now work through one cluster at a time. Set this up by saying something like, “We’re going to do a quick first pass on the ideas in each cluster. I’ll read out a note, and you tell me if it’s definitely IN, definitely OUT, or needs more discussion.”
Then further explain the labels:
In: An idea the
group definitely wants to accept or adopt. It’s a no-brainer, a table-stakes
item, something you’re already working on, or just plain required.
Out: An idea that doesn’t require any further consideration. It’s out of scope, technically impossible, too expensive (time or money), duplicates another idea already under consideration, or was meant as a joke.
More discussion:
Anything else, including things that some people think are “in” and others
think are “out.”
Work through each cluster note by note. If the group agrees
unanimously that an idea is IN, turn the note green. If they agree unanimously
that it’s OUT, turn it red. Otherwise, turn it blue.
As you read each note, people may only say “In,” “Green,” “Out,” “Red,” “Discuss,” or “Blue.” Again, if opinions on a given note are divided, it’s blue. Even if one person thinks something different from everyone else, turn it blue.
Work through all the clusters. When you’re done, all the notes should be either red, green, or blue.
Asynchronous or silent option: If this is too time-consuming or tedious-sounding for your group, you can use another method. Open up the board to voting, and ask each person to vote only on those ideas they think should be IN. If there’s a note that someone thinks should be discussed, they can turn it blue. If a note is OUT, leave it alone. Take a sweep through at the end. Any notes that have the same number of votes as people become green. Any notes that have no votes become red. Notes that are blue stay blue, and notes that have some votes but not the total possible number of votes also become blue. This can be done in between meetings to free up meeting time for discussion.
Note that some sticky note boards don’t have a vote option, and some have the option but don’t let you limit how many votes a person can put on a single idea. You have to invoke the honor system, but people usually play fair.
Working through each cluster. In this image, five clusters have been dealt with already, revealing four accepted ideas (green) and five ideas that need further discussion (blue). Notice that we’ve refined the guiding question here as well.
Step 4: Deal with the Blues.
The group can now ignore the red notes; they don’t matter.
The green ones can float to the top or side (or leave them where they are) —
they will move forward into the next phase, but you don’t need to talk about
them now.
For each blue note:
Call the group’s attention to the note so they are all looking at the same thing. Ask, “What do we need to talk about here?” Facilitate the conversation, helping them work through the issues. At the end, the note should either be turned red or turned green. It’s perfectly okay to revise the note before changing the color, but it needs to be red or green at the end.
When you’re done, everything on the board should either be red or green (or a cluster name). Copy the green notes into a new workspace.
Talking about the blue ideas to get clarity and decide whether to make them red or green. The plain-text annotations are just for illustration here; I don’t write them on the sticky note board.
Step 5: Work with the Greens.
Working with the duplicated green notes, you can re-cluster (if needed — I usually don’t), dot vote, place the notes on a hi-low grid or a risk wall or something similar, or use the method(s) of your choice to decide which ideas to implement or adopt. Every idea has been considered, but no time has been wasted on ideas that don’t merit (or don’t need) discussion.
These are the green ideas from all of the original cluster groups, and this is one way to assess the relative value of the selected ideas. The ones in the lower right will yield the greatest impact for the least effort, in the group’s opinion.
Pros:
This method takes an overwhelming number of choices and turns it into a manageable number of choices pretty quickly.
As the group moves through the process, they feel a great sense of speed and progress rather than feeling bogged down or stuck.
It can bring in different voices, because people often have strong opinions about some of the notes and less strong opinions about others. They tend to speak up when they care about an idea.
Cons:
This can be a tough exercise for people who are color blind. See if your sticky note tool allows you to highlight notes in another way, such as changing the shape (star? stop sign? triangle?) or adding a sticker (check mark? X mark? question mark?).
Be careful about getting bogged down in conversation as you turn notes blue. Cut off blossoming discussions and let the group know you’ll get back to it once the notes are sorted out.
It’s possible for a vocal subset of the group to take over, causing others to check out. Manage this by asking for different voices to speak up, asking more vocal people to step back, or assigning a different champion to each cluster. Using the asynchronous or silent voting option can help combat this problem.
In-Room Adaptation
If you’re working with real sticky notes in a co-located meeting, you can still use this method. Grab markers in green, red, and blue. Add a big green checkmark to the “in” sticky notes. Make a big red “x” on the “out” sticky notes. Write a blue question mark on the “discuss” notes. Just make your marks in the edges of the notes, not over the words, so that people can read the original notes later. To change a blue note to a green or red one, cross out the question mark and add the appropriate green or red marking.
This is a question I get asked a lot: How do you ‘read the room’ when you’re meeting virtually? In other words, how can you tell whether people are tracking or checked out, where the group energy is, and when it’s time for a break or some other shift? My answer: it’s not actually all that different from reading the room in face-to-face settings, although we tend to think it is.
It’s stressful for a skilled in-room facilitator to imagine
working without the body language cues that are so familiar and so revealing, I
know. But I think we make this harder than it is. There’s an expectation that because
we lose body language, a virtual meeting won’t be as good as being in the room
together and that it’s going to be an inferior experience.
But it doesn’t have to be. Start with an engaging agenda,
where people have things to do that will achieve outcomes they care about. Let
them create, write, draw, discuss, decide. Give them tools to support doing
that work at a distance. Ask good, thought-provoking questions. Then get out of
the way.
To read the room, look for the same things that you look for
in a face-to-face gathering. The only difference is that instead of ‘body
language,’ you’re tuning in more to tone of voice, evidence of activity, and
the clues that you can get from the collaborative tools you’ve selected.
Are people working? Are they digging in to the things they
need to talk about or build? Keep tabs on how many different people are
participating — just a few, or most, or pretty much everyone? If there’s
silence, is it paired with intense creation (generating sticky notes, writing
in a document, whatever) or is it paired with a lack of activity? If it’s the
former, there’s no problem; let them work.
On the other hand, if there’s a lot of silence and nothing
seems to be happening, that’s a cue that something maybe wrong. If that’s what
I notice, I will usually make a neutral observation about it and then simply
ask what’s up. That might look like this:
“I’m noticing that it’s been quiet for a couple of minutes and I’m not seeing anything show up on the shared tool we’re using. Is something not working well for you that we can maybe change?” I have no way of knowing why people aren’t participating unless I ask them. If I’ve created the right container, there’s enough safety that people can speak up and tell me what’s going on for them. I can then make adjustments as needed to re-engage the group, take a break, or help them tease out whatever issue is causing the block.
Here’s a sampling of responses I’ve gotten to that question
in the past, to give you an idea of what you might hear:
What are we supposed to be doing, again? (My instructions weren’t clear)
We can’t open/find the collaborative tool (Again, this is on me to get them where they need to be)
We can’t answer this question because we don’t have enough information (Time to reframe the question)
This isn’t the right thing for us to be talking about right now (Let’s find out what the right thing is, and talk about that)
We don’t see how this activity will get us to our outcome (I can briefly explain how I think it will and ask for suggestions that would make it work better for them)
All of us have just gotten an emergency text and we’re looking at our email because there’s a crisis that just came up for our team (Okay, let’s give you space to work through that)
There’s usually a very good reason people aren’t participating, and it’s almost always resolvable. But you won’t know until you ask — which is just as true in a face-to-face meeting as it is in a virtual one. We’re simply used to leaning more on what we see than on what we hear to make that determination.
Just remember, silence can be your friend in a virtual setting. It can feel really uncomfortable because you can’t see what people are doing, but it can be a strong signal for change in a group that doesn’t like to speak up or criticize. Be open and inviting so that the group feels they can trust you to fix whatever needs to be fixed, and you’ll find that reading the virtual room isn’t difficult, it’s just different.
Photo (woman biting pencil while sitting on chair in front of computer during daytime) by JESHOOTS.COM on Unsplash
Ever been in a virtual meeting where something was being decided? How did it go? Perhaps it started with some discussion, maybe someone shared some slides with graphs or data, people talked for a while to present different points of view, and someone finally said, “It seems like we should do x and y and then z.” And, almost always, right after that someone asks the absolute worst question you can ask in a virtual meeting.
“Does everyone agree?”
“Um… no?”
On the surface, it seems like a simple, even straightforward
question. It seems to ask what we really need to know: Are we in agreement? Have we reached a decision? Can we end the meeting
and go our separate ways, knowing we are aligned on this one? That’s the
information you actually want. “Does everyone agree?” is simply poor shorthand
for all of that.
When someone asks this question in a face-to-face meeting,
you can at least scan the faces of those around you to look for obvious signs
of discomfort, disagreement, or confusion. In fact, I’ll bet that’s your first
reaction when someone asks this. In a remote setting, you get a lot less
information from doing that, even if everyone is visible on video. So you have
to rely on what people say in
response.
However, there is no possible way to respond to this
question that accomplishes anything useful. First of all, we can’t know what
everyone else thinks without hearing from them individually. We all realize
that, but we also know that if we stay silent, there will be an embarrassing
pause, so we often speak up. The people who really do agree tend to speak
first, because it’s generally easier to express agreement than dissent. So you
hear a bunch of “Yes!” responses from those who are satisfied and/or just want
the meeting to end.
Potential dissenters also realize that there is no room for pushback in that question. The responses you really need — the objections, the need for further information or clarification, or the alternative proposals — aren’t invited. Even if someone tries to speak up with “Um… no?” it’s often drowned out by the polite chorus of “Yes!” So how do you find out if people are in agreement if you can’t use that question? Try an alternative that draws out the responses you need, like one of these:
“It sounds like we should do x and y and then z. Does anyone
have an alternate proposal right now?”
“I’m curious if anyone has a different perspective before we
make a final decision. Anyone?”
“Does anyone still have questions or reservations about this
decision?”
Or, simply invert the question so that people who do agree keep quiet and people who don’t are invited to come forward: “Is there anyone who does not agree?”
Then keep quiet yourself for a minute to give people time to frame a response. My favorite trick for this is to take a leisurely sip of my beverage right after asking the question, and then keep quiet until I’ve carefully placed my cup back down on my desk. Works every time.
Do make sure you allow enough time to actually discuss anything that comes up. If you don’t, people will quickly catch on that you’re really asking, “We all agree, right?” and they won’t bother speaking up. It may extend the discussion a bit, but that will pay off in stronger alignment at the end.
How do I manage a quick check in during a Zoom meeting when some people are co-located in one (physical) room, some are in their offices, and some are on the phone? And I have a paper list of names, but not sure who’s actually attending? We’ve met everyone and they all know each other, but I want their voices in the virtual room.
Blended meetings are tough. It’s a lot easier to pay attention to someone right next to you than to a voice on the phone. Setting the tone with an inclusive check in is a great way to bring the remote people into the room—or bring the in-room people into the virtual setting, depending on your point of view.
Photo by Benjamin Child on Unsplash
Check In Ideas
Ahead of time, ask an in-room partner to bring in a bunch of interesting, small objects. Have each in-room person select an object. Ask each remote person to look around their space and select an interesting object. For the check-in, each person shows their object to the camera or describes it aloud and says why it connects with them at this moment.
Have each person describe the local weather where they are and then share their internal weather state (stormy, calm, sunny, frozen…). The in-room group only needs to describe the outside weather once for everyone there, and then each person can share their individual internal state.
Ask each person to use a marker to draw a circle on a scrap of paper, then fill it in with eyes, nose, and mouth to create a simple drawing of their mood. Under the circle, have them write their name. Each person holds up the drawing to the camera, says who they are, and says something brief about their mood drawing.
Beyond the Check In
It’s also essential to make sure that the remote folks are never overlooked throughout the course of the meeting, so anything you can do to give the in-room people a way to imagine something real about the remote people’s surroundings will help.
This is one of my favorite ways to bring remote people into a room where several others are gathered. I’m assuming that the facilitator is in the room with some participants and other people are connected from their individual locations, but this works if the facilitator is remote and has an in-room partner, too.
Bring a stack of table tent cards to the meeting and set them out for the in-room people to write their names on.
Recruit an assistant in the room to be your virtual liaison. As people are getting settled, have your assistant get the remote people’s names on additional cards. Make sure that each remote person is represented on a separate tent card.
Set the remote people’s tent cards in a ring in the center of the table, or place them between other people’s chairs, so they are present at the table.
When you go around for check ins or other round-robin responses, include the remote people by reading their names from the cards.
For groups that meet this way routinely, you could assign a remote card to each in-room person and have them be accountability buddies with their remote counterpart. Buddies are responsible for ensuring their remote person gets copies of documents during or after the meeting (texting images of visual captures at critical points or getting the remote buddy’s ideas onto sticky notes, for example).
If I’m remote and there are a bunch of remote individuals plus a room full of people attending the meeting, I might rename the ‘room’ in my list of participants to include the names of everyone present there. For example:
‘Meeting Room 101’ shows up in my software’s participant list. Bob, Doris, Sara, and Michael are present in the room. I rename the ‘participant’ to ‘Bob, Doris, Sara, Michael’ instead of ‘Meeting Room 101.’
Obviously, this has limitations if the number of co-located people is large. In that case, I try to get someone in the room to tell me who is there and keep me informed as people arrive and leave, and I use an old-fashioned list on paper.
What are your favorite ways to be inclusive in blended meetings?
I’m delighted to announce a project that’s been underway for several months now: a new online workshop developed in collaboration with TeamCatapult called Virtual Team Facilitation. The workshop is hosted by TeamCatapult and will be co-taught by their CEO Marsha Acker and myself.
It’s offered in a two-day online format and includes a mini team intensive that gives participants an opportunity to really practice what they’ve learned. The workshop focuses on creating and facilitating effective team engagements in virtual settings. It’s different from my current Grove workshop Facilitating Virtual Collaboration in that the new workshop is framed within the context of agile teaming methodology and taking agile practices into virtual settings. Some experience with agile team facilitation is required. We review key tenets of agile facilitation but don’t cover it in depth — TeamCatapult has another course for that. Learn more about Virtual Team Facilitation and/or register here.
In today’s FVC (Facilitating Virtual Collaboration) workshop, the topic came up about how facilitators can engage participants in a remote meeting so that they don’t check email, tune out, stop listening, and fail to … well… participate. My unusual and occasionally unpopular advice: It’s not entirely your problem.
A project I’ve been working on for three years is tantalizingly close to completion… it’s a book! The working title: Beyond Virtual Meetings.
I think the world would be a better place if people could work together more effectively at a distance. Based on experience and observation, I’d say that working with a remote team can be pretty painful and frustrating… but it doesn’t have to be. So that’s what I’m writing about: how you, as a team member, team leader, or facilitator, can make remote collaboration better for yourself and everyone you work remotely with.
The Grove recently published a short interview in which I talk about some of the main themes.
One possible path through Part I
Writing the book itself has been an interesting process, sometimes fun, sometimes painful; just like writing any book, I imagine. At this point, the manuscript is complete and I’m doing an editing pass to tighten it up. We don’t have a publication date yet but I’ll post it when we do! The current draft has three parts: the first, illustrated here, is about being facilitative in online settings, finding out what your team needs most, and creating a beautiful virtual workspace to support collaboration. The second part includes agendas and checklists for doing virtual work (both in meetings and in between meetings, when lots of important work happens too!). The third part is a collection of 70 best practices for yourself and your teams to make remote collaboration smoother, easier, and more effective.
There’s a website attached to the book, too, which is where I talk about actual tools. The book’s best practices are linked to types of tools rather than specific ones. Look up the tool type on the website to find specific applications you might want to try. The website will also have a bunch more best practices — there were too many to fit in the book — all targeted at specific areas your team needs to work on. You can see the site in its embryonic stage right now! (Just the tool reviews, though. No best practices there yet.)
Want to stay informed? Sign up to be notified when the book is ready. If you think this book will be helpful, I’d love it if you’d leave a quick comment saying so. Thanks!
One of the most common mistakes people make when planning virtual meetings is allocating time incorrectly. Hint: the problem is not usually that meetings end early.
Time by Alex Tian (cc by-nd)
To help you avoid this error, here is a handy formula you can use to calculate how long something will take in a virtual meeting.
How long would this conversation with this group of people take in a face-to-face meeting? Write it down. We’ll call that number n.
Add modifiers to n as follows:
If there is no facilitator, double n before continuing. Then hire or assign a facilitator.
If there are more than 10 people involved (not counting the facilitator):
For 11-15 people, add 5 minutes to n.
For 15-20 people, add 10 minutes to n.
For 21-30 people, add 15 minutes to n.
For more than 30 people, design pre-work to take care of as much as you can before the meeting, then add 20 minutes to n.
Will you be switching tools during the meeting? For instance, going from screen-sharing to a collaborative sticky note board, Google doc, or similar?
If so, add 5 minutes for every time you switch to a new tool.
If the additional tool is new to at least half the group, add another 5 minutes.
If the additional tool requires participants to log in, add another 2 minutes.
If the additional tool requires a download or plug-in, add another 5 minutes.
If you don’t display clear written instructions about how to access and use the tool, add 5 minutes.
Will you be using breakout rooms in this meeting? Add 5 minutes for each time you go into breakouts.
Will the group need to make a major decision during this conversation?
For groups up to 15, add 10 minutes to propose the decision and check for agreement.
For groups of 16-20, add 15 minutes to propose the decision and check for agreement.
For groups over 20, add 15 minutes to propose the decision and check for agreement, and expect a lot of follow-up questions after the meeting.
If the group is very divided about the content of the decision, add another 5-10 minutes to the decision time.
Will you be keeping a Parking Lot, and do you expect more than two Parking Lot issues to come up? If so, add 5-10 minutes to resolve the Parking Lot issues.
Look at the total you have so far. For every 60 minutes, add 5 minutes for stretch breaks. If you’re over two hours total, add another 10 minutes for a sanity break in the middle.
Remember to add 10 minutes up front for people to connect to the meeting and get their audio and video sorted out.
Remember to add 5 minutes at the end of the meeting to review decisions and action steps.
As an example, let’s look at a group of 14 people who need to brainstorm ideas about their next product launch, select two, and assign research leads to each idea. It would take them 45 minutes to get this done in one focused face-to-face meeting with a facilitator, so n is 45.
Add 5 minutes for the number of people (14): 50 minutes
We’ll use screen sharing and Boardthing (a sticky note tool), so we add 5 minutes: 55 minutes
Boardthing doesn’t require an account or a download, so we don’t need to add any time for that.
Naturally we will create clear, visual instructions for Boardthing and show them before we switch as well as in Boardthing itself, so we don’t have to add 5 minutes for not doing that.
We will be using breakout groups once, so we add 5 minutes: 60 minutes
The group will need to make a major decision, so we add 10 minutes: 70 minutes
The group isn’t particularly deeply divided, so we don’t need to add time for that.
We don’t expect a long Parking Lot, so we don’t need to add time for that.
We add a 5-minute stretch break: 75 minutes
We add 10 minutes at the start for getting settled: 85 minutes
We add 5 minutes at the end to review decisions and actions: 90 minutes
In order to accomplish our objectives in a virtual meeting, we need to set aside 90 minutes, including a 5-minute stretch break.
By now you’re probably wondering whether this is meant to be satire. Nope. I’m serious. This is how long it takes to do real work when you’re not face-to-face. If you plan for it and people are prepared in advance, the meeting will run much smoother. People will feel great about achieving their objectives in the time they set aside. And hey, if you’re wrong, you can always end the meeting early.