Tag Archives: remotemeetings

Why is remote work so hard? And how can we make it easier?

Over the years I’ve spoken to hundreds of people who have attempted some kind of collaborative online work only to have it go sideways. It happens to me, too. It’s pretty common, since tools for remote collaboration are not yet a completely solved problem.[1]

What struck me in these conversations is the commonality of feeling that people express when they tell me about the problems they’ve had. They’re understandably frustrated, sure, but there’s also a sizable chunk of disappointment and betrayal in the mix: My tools let me down, and I feel personally hurt.

Photo by Tim Gouw on Unsplash

It’s totally natural to feel this way. It comes about in part because we unconsciously expect the technology to take away some of the burden of whatever we’re doing, the way a word processor takes away some of the burden of typing with spelling correction, easy undo, delete, and cut and paste. We expect that the technology will bear some of the burden of designing, planning, running, and facilitating the remote work we need to do. We certainly expect it to help connect people who are located at a distance from each other. We expect the work, therefore, to be easier. And then we try it, and it isn’t, and we feel let down.

The truth is, in the world of remote collaboration, technology doesn’t make anything easier. Technology just makes some things possible that aren’t otherwise possible.

It’s not actually supposed to be easier; as I said, the tools aren’t there yet. But based on experiences with older technologies that are solved problems, like telephones and word processors and spreadsheets, we imagine it should be easier to get people together online and have a meeting and get real work done, and we feel disappointed and betrayed when it isn’t.

So how can we address this issue? During those conversations with disappointed remote workers, I asked why the work felt so painful. Their responses resolved into three major problems that came up again and again. The bad news is, these problems make remote work a struggle. The good news is, they are fixable, though not with a purely technical solution.

The three problems that make remote work so much harder boil down to these:

  • The structure of the engagement doesn’t match the intended outcomes.
  • The collaborative bandwidth we expect to be available to us, is reduced.
  • People don’t feel co-present with one another, and instead feel disconnected.

Let’s look at how each one shows up and what you can do to fix it in your next remote engagement.

Problem 1: The structure of the engagement doesn’t match the intended outcomes.

This causes frustration because people can’t do the work they have shown up to do, which is very unsatisfying. The fix is straightforward and can be implemented even before the engagement starts, although I am always ready to pivot during an engagement if it turns out I goofed in my planning.

Now that’s a complex structure. Photo by Juliana Malta on Unsplash

When designing a remote engagement, carefully think through what you want to accomplish in a given period of time, and how you can best use that time to get to your outcomes. It takes more time and more thought than preparing for a similar face-to-face meeting, but the work itself is not all that different.

These are the questions I ask myself to make sure the structure is going to match the outcomes of my remote engagement:

  1. What does this group need to accomplish before the engagement ends?
  2. Are they also invested in those outcomes? If not, what do I need to do to either realign the outcomes or increase people’s investment in them before we start?
  3. What is the highest and best use of our time together? The phrasing of this question comes from my colleague Marsha Acker, CEO of TeamCatapult, and I love how it helps me prioritize what should be done together and what can be done asynchronously (or not at all).
  4. When I imagine each participant sitting alone at their computer, what can I offer that will help them accomplish the outcomes they are invested in? Here, I’m thinking about activity design, tools, careful instructions, smooth transitions, and tech support, but I’m also thinking about the attitude or presence that I will bring to the group — calm and supportive.
  5. How am I going to make sure no one gets lost when we switch from one tool or context to another? What am I going to do when someone gets lost anyway?
  6. How long can I expect them to focus on this engagement? Is that enough time to accomplish all the outcomes? If not, what do I need to change about my design?

There are two reasons this takes longer for a remote engagement than a face-to-face one: most of us aren’t used to doing complex remote engagements, so we have to think about it more than we would if it were a face-to-face engagement; and the toolset is wider and requires more research than the familiar in-room toolset. Both of those things do get easier with time and practice.

Problem 2: The collaborative bandwidth we expect to be available to us, is reduced.

We’re all aware that there are many rich communication channels available to us when we are standing face-to-face with someone, especially if we’re in a well-appointed meeting space with tools to support the work that needs to be done. When we switch to an online setting, we are also acutely aware that many of those channels have been stripped away; the most common one that people miss is body language, but it’s not the only compromised channel. I call those channels, and the capacity they have to enable communication, collaborative bandwidth.

Collaborative bandwidth is defined as the number of channels available to support collaborative group work and the capacity of those channels to enable communication in the service of that work. (p. 24)[2]

Imagine the amount of communication your group has to have in order to accomplish its outcomes. Imagine all that communication moving through a wide pipe, big enough with room to spare. No problem. Now imagine the pipe gets smaller — a lot smaller. Like 80% smaller. Communication slows down, mushes together, and becomes unclear and frustrating. That’s exactly what’s happening in a remote engagement that doesn’t have enough collaborative bandwidth.

Plenty of room in this pipe. Photo by Eryk on Unsplash

The fix is simply to make the pipe bigger: add enough collaborative bandwidth to accomplish what needs to get done. Audio is one channel, video is another, sharing screens is a third, and using hands-on tools to co-create something is a fourth (there are many others). If your design includes enough channels to support the work you are doing, you can reduce this pain point or remove it entirely. I usually use different channels throughout an engagement depending on what we’re doing at the time. (See footnote #2 if you want to get geeky with collaborative bandwidth.)

Problem 3: People don’t feel co-present with one another, and instead feel disconnected.

Co-presence is the feeling of being somewhere together with someone. I learned about it from Rachel Hatch, who was at the Institute for the Future at the time. She was exploring technologies to support co-presence and the idea of replacing telepresence, where you are present on video and audio, with co-presence, where you are present in other ways as well. The concept has stuck with me and influenced the way I plan my remote engagements ever since. I find that people who feel co-present are more productive and effective at collaborative work than people who don’t feel co-present.

To really bring this concept home, think about attending a webinar where you have no idea who else is there, or even how many attendees there are. The audio only supports the speaker or panelists; the only visuals you see are the ones they choose to share. It feels like you are alone on one side of a one-way mirror. During Q&A, you find out that some people you know are also attending, but you have no opportunity to connect with them. This is the opposite of co-presence. It might be a good way to deliver a lecture, but it’s a terrible way to do collaborative work.

. . . Anyone else here? Photo by Jacob Le on Unsplash

Now think about a virtual coffee break with your best friend or a close family member. It’s just the two of you, your video connection is working great, the audio is clear, and you each have your favorite hot beverage in hand. You sip and laugh and comfort each other about whatever you’re struggling with at the moment. This is absolutely co-presence. Although it’s a social example, this is the feeling that will help people work together better remotely.

When you are co-present, the distance between you disappears.
Photo by Brooke Cagle on Unsplash

To bring co-presence into a remote engagement, I ask myself this question as I’m preparing for it: What approaches and tools will work best for this group in this situation to increase their sense of co-presence? The answer will be different depending on the size of the group, who is in it, and what you all need to accomplish together.

Here are some of the ways I do it:

  • Request (coax, if necessary) that people use a video camera for conversations that are personal in nature, like check-ins and check-outs.
  • Ask people to choose a photograph, either one of theirs or one that they like from a site like Unsplash, and share it while they tell us briefly why they chose it. (I use this as an icebreaker, or right after a break in a longer engagement.)
  • Set up small breakout groups so people can connect with a few other people while they work, rather than always being in a large group. Mix up the breakouts for different activities.
  • Establish a chat backchannel and encourage people to use it while working (yes, even in a meeting) if they have questions, off-topic ideas, or just want some individual connection.
  • Let go of the feeling that I need to control every interaction in order to stay “in charge,” and accept that technology can mediate interactions that I’m not party to — and don’t need to be party to. In other words, allow people to whisper behind my back.

These are just a few of the many solutions to this problem. Once you begin to think about helping people create a sense of co-presence, it changes the way you structure the engagement and the way you show up online.

I try always to plan for and to consider all three of these common problems when designing a remote engagement. I hope this helps you create engagements that connect and inspire you and the people you work with.

Footnotes


[1] That is to say, they are not yet as invisible and reliable as the landline telephone, which could be used by anyone whether or not they had any understanding of how it worked. You still need to know too much about remote collaborative tools for them to be truly comfortable yet.


[2] Smith, R. (2014). Collaborative bandwidth: creating better virtual meetings. Organization Development Journal, 32(4), 15-35. An excerpt of the article is available on The Grove’s website. The link on that page to download the full article no longer works, but libraries and scholarly databases usually include OD Journal. 

How to Get People to Speak Up in Your Remote Sessions

You’ve been in that meeting. Usually it’s a remote meeting, but not always. The presenter or facilitator has just finished a segment, and they say, “Any questions or comments? Questions? No? Okay, let’s move on,” and the meeting sweeps on before you manage to get your question out.

Or maybe you’ve been that presenter. You want to answer people’s questions, so you say, “Any questions or comments?” Then the silence stretches on for a year or two and you nervously continue: “Anyone? No? Okay, let’s move on,” all the while wishing that someone had asked a question or shared a remark.

Interestingly, whenever one of those happens in a meeting, the other one is usually happening too. That year-long pause for the facilitator or presenter is really only a couple of seconds long. However, that person is experiencing something called podium time, or the terrifying skewing of any period of silence so that it seems to go on forever no matter how short it actually is. (Another quality of podium time is that the time available for any given agenda item passes at an accelerated rate, but that’s a topic for another post.)

We have a fear of radio silence, and as the person in charge, we feel it’s our job to prevent it. But I want to encourage you to think of silence as your friend, if what you want is to get people to ask questions or share their comments. It’s hard to do. Here’s how I taught myself to embrace the silence and make space for people to talk.

1. Leave enough space for people to respond. It takes someone a few seconds to mentally frame a question or remark, and another few seconds to decide to speak. In a remote session, it takes a few more seconds after that to decide that no one else is going to start talking so it’s safe to speak up. If you don’t give people all those seconds, nothing will happen.

I do it by keeping a beverage handy. After I ask for questions and comments, I pick up my beverage — slowly — and take a sip. I might take a second sip. Then I slowly set the beverage back down. Almost every time, someone is speaking by the time I’ve placed it back on my desk.

Take a nice slow sip. Photo by BBH Singapore on Unsplash

This is especially useful if you’re on video, because everyone can then see you are committed to your beverage and you aren’t going to be talking for a few seconds while you sip.

2. Ask for participation in an inviting way. There’s a world of difference between these two openers:

“Any questions?”

and

“What questions do you have?”

The first one, “Any questions?” is okay, but not great. It carries a tiny implication that you don’t actually expect anyone to ask anything. While we’re used to hearing it, it’s not the most inviting way to ask for remarks. It says, “I have to stop in case anyone is confused, but otherwise I’d like to keep going.”

The second one, on the other hand, says, “I imagine you must have questions, and I’m looking forward to hearing what they are.” It’s an inviting way to make space.

Likewise, when asking people to participate in a conversation, some ways of framing the invitation are better than others. This is useful when you’re trying to encourage a group discussion about something. Consider these two phrases:

“Anyone have any comments about this?”

and

“What would you like to say about this?”

Again, the first one is a little dismissive. There’s a slight implication that you’ll pause, but only if anyone really wants to say something. The second one indicates that you expect people to have something to say, and you’re ready to listen. It’s especially effective combined with the beverage trick, which makes it crystal clear that you’re not moving on for a while.

3. Ask people to stay off of mute. There are two reasons I prefer small groups to remain un-muted. First, it’s a hurdle to participation. A small one, sure, but it’s there, and I want people to be able to act on their impulse to speak. Second, it allows the chuckles and the gasps and the other small sounds to come through, which really brings a group alive.

The exception is when there is sudden or temporary background noise. People obviously can and should mute if they need to sneeze, cough, or speak to someone near them; or if there is intrusive environmental noise like construction sounds, dogs barking, and so on.

If the session is a one-way presentation given to many people, the norms are different and I am more likely ask people to mute by default. But for teamwork, groupwork, and small workshops or classes, keeping everyone’s microphone hot can increase participation.

4. Learn to love the silence. This isn’t easy, but it’s essential. That silence after you invite participation is actually your friend. It’s easy to imagine that everyone is wishing you’d just move on, already — and in all likelihood, someone in the group is probably feeling that way, which is fine. But it’s also likely that other people do want to ask or say something, and it’s important to give them the space.

Pause and embrace the silence. Photo by Mateus Campos Felipe on Unsplash

When you allow the silence to exist, you create a vacancy that others can lean into and fill. If you welcome the silence and sit in it calmly, it will be an inviting silence: a step back so that others can step forward.

A Crash Course in Translating Your Process to a Virtual Setting

Your meeting room is all prepared. Your templates, markers, and sticky notes are at hand. But you and your client are both (very properly) practicing social distancing. So you have a face-to-face process for [strategy, visioning, brainstorming, decision-making, you name it], and you suddenly need to deliver this session remotely. You don’t even know where to start. Great! Let’s do this.

Photo by Febrian Zakaria on Unsplash.

This is a bare-bones crash course in how to translate your face-to-face offering to a virtual one. We’ll cover:

  • Your mindset
  • Your mental model
  • Converting your existing agenda
  • Getting help
  • Matching processes with tools
  • Common problems you may encounter

It can be a lot more complex than this, but this is a good starting point if you’ve never done it before. Throughout, I’ve named tools that I personally prefer, but you can choose others that do the same thing. Let’s go.

Your Mindset

First, stop panicking. This is do-able, and you can do it. Also, your participants really need you to hold the container for them while they work, and you can’t do that effectively while you are panicking. So leave the panic at the door.

Second, accept that something will go wrong, and when it does, embrace it. I’ve done remote sessions for years and I still open each one with the thought, “Hmm, I wonder what will go wrong today?” I phrase it a little differently, though. I think to myself, “Hmm, I wonder what I will learn today?” Everything that goes wrong is a gift, because it teaches you something you didn’t know. It’s okay. Remain calm, explain what’s happening, and work the problem. It’ll be fine.

Third, let go of the fear that your virtual session will by definition be worse than your face-to-face one would have been. That isn’t necessarily true, especially for some kinds of work which are actually easier to do online. Accept that it will be a different experience, not necessarily a worse one, and aim to provide the best experience that you can.

Your Mental Model

This part is for those who have almost no experience in virtual settings, so you can wrap your mind around how it’s set up. Skip this section if you’ve participated in a bunch of remote sessions before. Otherwise, read on.

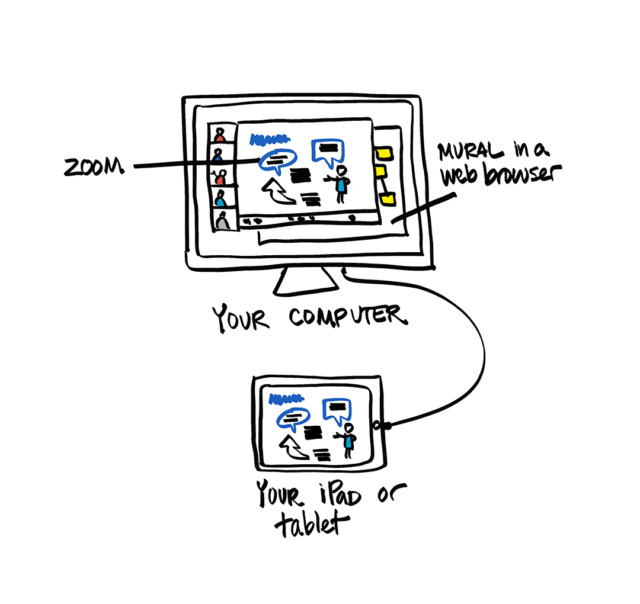
You’ll have a meeting room, just like you do any other time. People will connect to the meeting room and remain in it for the duration of the session. The tool I use to create the meeting room is Zoom. Everyone connects to the same Zoom link and can use a phone or their computer to hear what’s going on. They can see each other (if they’re using video cameras) and anything that I’m sharing on my screen too. Only the host (me, or you in your case) needs a Zoom account.

You’ll have supporting tools, like you do in any other session. Instead of sticky notes, paper charts, and paper templates, you’ll use digital tools so your participants can engage in the hands-on activities you want them to do. They will connect to these tools using a web browser, while they are still connected to the meeting in Zoom. You give the link to the supporting tool or tools (go easy — multiple tools get confusing really fast), and everyone connects to it. I use tools like MURAL for sticky notes and visual templates, Trello for kanban boards, and Google Docs for shared editing.

A diagram of my typical set up with Zoom, Mural, and an iPad for graphic recording.

Pro tip: Usually, people are either looking at Zoom or they are looking at the shared tool, so if you are going to be working in a shared tool for a while, have people turn off their video camera in Zoom. Even when they are in Zoom breakout groups while using a shared tool, their focus will be on the tool, not on Zoom. Turning off the video camera can make the audio clearer and the tools load faster for people with limited bandwidth.

If you do graphic capture, you’ll also have a tablet (iPad or similar) that you can write on. You’ll share this screen in the Zoom session while you’re capturing. I use Concepts as my drawing app, but I recommend others for first-timers.

Converting Your Existing Agenda

The basic crash-course process for this consists of five steps:

  1. Take out 25% of your activities (or make your session 50% longer). You can’t get as much done in the same amount of time, especially when you’re new at this. Transitions will eat up a lot more time than you expect. See this post for more details, including when to add breaks.
  2. Identify the process you are using at each stage in your agenda, then select a tool that matches it and supports its desired outcome(s). Use as few tools as possible, even if it means using the same tool for two or more different activities. See the table below.
  3. Create any templates or other materials you need so that they are ready in the selected tools. Include instructions right in the tool whenever possible, so that they can refer back to them if they get confused.
  4. Visualize the transitions you will be asking participants to make between tools. How will you help them make the switch and get oriented? How will you teach them the basics of the tool so they are able to do what you ask them to do? How will you support them when they get stuck? Answer these questions for yourself, and you will be better able to support them through the session. Draw a diagram of the transitions between tools for your own reference. Make notes on your copy of the agenda to remind you what to say and when to say it.
  5. Practice with each tool beforehand. Make mistakes, so that when participants make the same mistake, you can help them out. Do everything you are asking them to do. Find out where you need to give extra instructions to prevent mishaps.

Getting Help

Everyone is trying to learn this very fast right now. Several of the tools I use either have fantastic online tutorials (I’m looking at you, Zoom) or have staff who can help guide you through the basics, or both. Sign up for a demo webinar (thank you, MURAL) if they are on offer. Google the name of your tool plus “tutorial” or “demo” to find what’s available.

The new meeting space! Embrace it. Photo by Burst on Unsplash.

Matching Processes with Tools

Here is a list of common processes that you might need to use, and tools that support them. It’s obviously not an exhaustive list, but these are some of the most common things I do in virtual sessions. Again, I’ve listed my favorite tools; there are many others available.

Process You Want to Do
(links in this column go to how-to articles)
Tools That Support It
(links in this column go to the tool’s website)
Breakout groupsZoom
Breakout groups with templates and sticky notesZoom, along with:
MURAL, pre-loaded with your template
Check in circleZoom, sharing an image of the participants in a circle
Creating or editing a shared piece of writingGoogle Docs or Office 365
Creating or editing a shared presentationGoogle Docs or Office 365
Discussion circleZoom, using video if you can
Dot votingMURAL
FishbowlZoom
Flow charts, roadmaps, quad grids, other visual toolsMURAL or Google Slides or Office 365
Graphic recordingZoom, along with:
iPad or tablet and drawing program of choice
Kanban boardsTrello or MURAL
Looking at a shared resourceZoom, using screen sharing
PollingZoom
Sticky notesMURAL
Threaded conversations, text chat, sidebar conversationsSlack

Common Problems You May Encounter

Problem: People behind firewalls can’t access certain tools.

Solution: Have them do a pre-meeting tech check. Some tools have a test link (for instance, Zoom’s is here). For others, like MURAL or Google Docs, set up an open-access test document and send the link to your participants ahead of time.

Problem: People get lost switching between tools.

Solution: Visualize how this will work before you start. Give clear, explicit instructions, both verbally and written down in the tool they will use. Spend an extra minute making sure everyone is with you before you start. Have a colleague or volunteer present who can help stragglers figure out how to get where you are.

Problem: Not everyone has a video camera.

Solution: Ask the group what they prefer to do in this case: turn off all cameras, or have people use them if they are available. Keep in mind that the people who show up on video will have more perceived power and will have a different experience than those who don’t. Personally, I tend to be an all-or-nothing facilitator when it comes to video, but it’s up to you and your group.

Problem: Someone can’t connect to one of the tools.

Solution: If you have a tech helper, ask them to work with the person. If it just can’t be resolved, pair that person up with a buddy who is responsible for making sure that person’s ideas and input get added to the shared document. Share your screen through Zoom so they can watch what’s happening in the tool, even if they can’t get there themselves.

Caution: This is the only time you should screen share a tool that people are actively using. Otherwise, some folks will get lost between the real tool and your screen share, and they are likely to get confused at some point.

Problem: Someone’s audio or video suddenly stops working when it had been working before.

Solution: Ask them to leave the meeting and re-join. If that doesn’t work, ask them to leave the meeting, reboot their computer, and then re-join. Usually that fixes it.

Problem: There’s a ton of background noise from someone’s microphone that’s making it hard for others to hear.

Solution: In working sessions, I prefer to have everyone stay off mute; the conversation flows more naturally that way. However, sometimes there is a lot of noise in one location. Look on the participant list in Zoom to see whose microphone icon is filling up with green, and politely ask that person to mute themselves unless they need to say something until the noise has stopped.

Caution: It’s difficult to switch back to Zoom to mute and unmute while working in one of the web-based tools if you’re not used to it. Give people extra time to do this. They can return to Zoom by selecting its icon (blue with a white video symbol) from their task tray (PC) or dock (Mac).


I hope this crash course helps you find a starting point. As you do this more, you’ll get more comfortable with it. Remember that people are generally supportive when you invite them along on a learning journey like this. And good luck!

Help! They want me to do remote graphic recording next week!

With many face-to-face events (wisely) being switched to remote events right now, I’ve seen a lot of questions go by on Facebook from graphic recorders who are being asked if they can work their magic remotely. You can! Even if you’ve never done it before, you can. I’ve got you.

My first (test) recording using the Concepts app

The screen shots in this post were made using Concepts on an iPad. If you have a different drawing app, a non-iPad tablet, or you’re using a drawing tablet with your computer, the basic points are the same; just find the equivalent tools in the application that you have. Check the bottom of the post for a list of common applications and links to their tutorials.

Here’s the list of what you need to know.*

  1. Set up three brushes and an eraser.
  2. Choose a simple and limited color palette, and save the palette for quick reference.
  3. Set up three layers, name them, and don’t panic when you get them mixed up.
  4. Set aside 2-6 hours just to practice.
  5. Get a headset that’s comfortable and reliable.
  6. Ask for a 30-minute tech check sometime before the meeting begins.

Those are the basics. Everything else is optional for the moment.

There is a little more detail to each of those steps, of course. Let’s take a look.

1. Set up three brushes and an eraser.

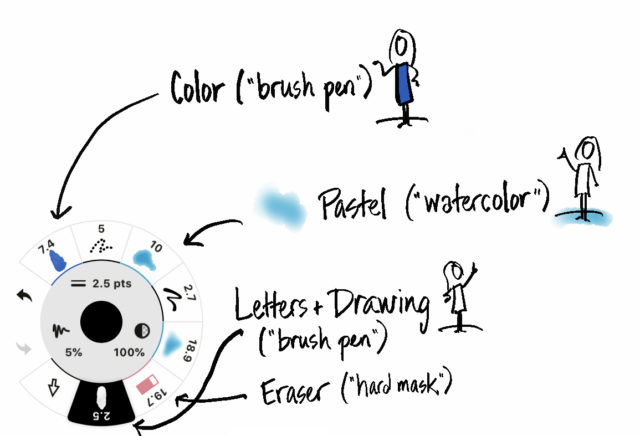
I use a small solid brush for most of my lines and letters; a larger solid brush for color fills; and a slightly larger watercolor brush for shadows and pastel effects. My eraser is usually sized in between the two solid brush sizes.

My brushes in Concepts. The numbers are the size in pixels (2.5 for the outline, 19.7 for the eraser, 10 for the pastel, and 7.4 for the color fill). Ignore the other brushes for now.

If you want to do solid titles rather than outline & fill, you will also want a larger brush for the titles (or know how to quickly switch between a large and small pen size for your single lettering brush).

Pro tip for neat lettering: With the canvas at 100% zoom (that is, fully zoomed out so you can see the whole page), make a mark like the upright of a capital letter (like P or R or I or D) at the scale (size) you want to write in. Zoom in to a comfortable level for writing, note where the upright is, tap undo to get rid of it, and start writing where it was, at the scale that it was. Zoom out now and then to check your orientation.

I set my brushes up in advance and save them for easy access. Ideally, you will be able to see them all at the same time and just tap to switch.

Can you use more? Sure. Do you want to? Eventually. This week, stick to three. Trust me.

2. Choose a simple and limited color palette, and save it for quick reference.

This one is so important that it’s worth looking up a tutorial for how to do it in your tool if it isn’t obvious. My most basic palette has black, a pastel blue, a pastel grey, a bright blue, and red. Sometimes I swap in another color for the two blues for different recordings. I also have white in my palette, but I use it rarely, and sometimes I include a yellow for glow and highlight effects.

My most basic color palette for the Concepts app. Concepts allows up to 8 colors in one palette, so sometimes I add yellow.

I use black for lettering and for outlining my icons. Red is for emphasis. Light blue is for pastel effects and light gray is for shadows and fills (shadows are done with the pastel brush and fills with the color fill brush). Bright blue is for splashes of color in icons and titles.

Like the brushes, you want to be able to see all the colors in a permanent or flyout palette and just tap the one you need. Can you use more colors? Of course. Eventually. This week, keep it simple.

3. Set up three layers, name them, and don’t panic when you get them mixed up.

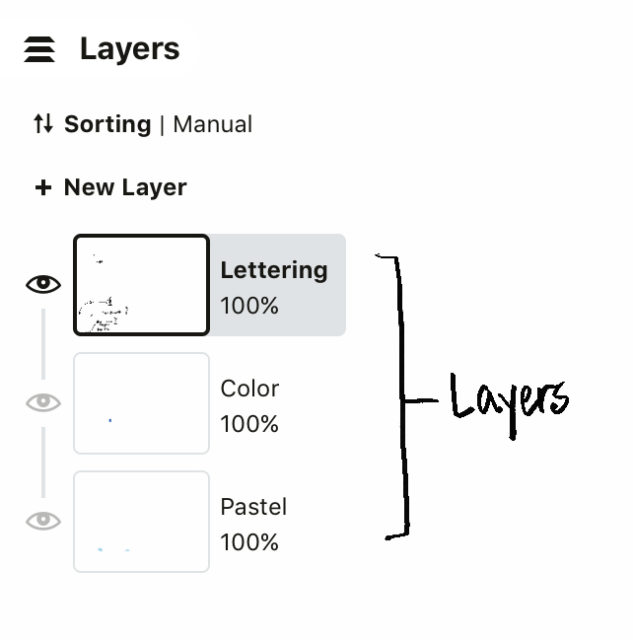
From bottom to top, the layers are: pastels, color, line-work. Or whatever names will remind you of those classifications. That way, your letters and outlines are on top, colors slip neatly behind the outlines, and you can gaily sweep pastels behind icons and letters with no fear of messing up the clarity.

My basic layers setup. Concepts allows you to assign a brush to a particular layer, which helps make sure I don’t mix them up, but I still manage to do it sometimes.

You will mix up the layers at some point and put your outlines on your pastel layer or vice versa. If it’s the pastel on the outline layer, it’s immediately obvious and you can hit ‘undo’ and fix it. It’s harder to notice when you start writing on your pastel or color layer. Don’t stress when you do notice, and don’t undo a lot of writing. Just make a new layer, drag it to the bottom of the stack, and start using that for your pastels or colors as needed. There are no layer police and you will be fine.

4. Set aside 2-6 hours to practice.

And you can guess which end of that scale I’d rather you were on, right? The more you practice, the calmer you will be; the calmer you are, the better your work will be. It will take a while to get the hang of zooming in to write and zooming back out to check sizing, of switching pens and colors, of working with the layers. Don’t stress.

The very first graphic recording I ever did on an iPad, back in 2011.
… And this is a few years later, in 2014. See where a little practice will get you?

Here’s a practice regime that I use when testing a new drawing app:

  • Set up layers, pens, and colors. Take time to mess with the settings until you understand how they work — up to 30 minutes.
  • Write your name, draw some icons or people, practice the stuff that makes your work yours — about 15 minutes. This is not the most valuable practice activity, so don’t spend the bulk of your time here. This is just a warm up.
  • Find a photo of a chart you’ve done that you like. Try to recreate it on the iPad. This will teach you more about how your app works than almost anything else. Notice what you can and can’t recreate, adjust your brushes and colors, and get comfortable with your own style — up to 3 hours. I don’t recommend tracing a photo, because you won’t really understand how your app handles scale if you do that. Instead, look at a copy of the chart and recreate it on a blank screen.

    Next, go to TED.com or find a podcast or a news channel or something that you can listen to and record. Pick an episode and play it. Record it as it plays, then play it again and just look at your recording while you listen. Notice what you got and what you missed. You’ll miss more than you are used to, especially at first, but always.

    Let me say that again. You will always miss more when you are digitally graphically recording than when you are doing it on paper. Everyone does. It’s because the interface is more complicated than paper and pen, so a part of your brain that usually helps you listen and record is always dealing with the interface instead.

    Play another video or podcast and record that one. Do this three or four times. Take a minute to compare your last one with your first one — see the progress? You can totally do this.

    This is also the time when you want to get yourself into weird interface places so you can get yourself out of them. If you accidentally hit a button and the whole screen changes and it takes you 15 minutes to figure out why and how to undo it, that’s a gift: next time it happens, you’ll know how to fix it.

    Spend up to 2 hours on this part.

So much for the recording part. The rest is technical details.

5. Get a headset that’s comfortable and reliable.

You’ll work better if you can hear clearly and if your ear doesn’t hurt (ask me how I know). ‘Nuff said. I use the Plantronics Savi 730.

6. Ask for a 30-minute tech check sometime before the meeting begins.

The tech crew will want to know a couple of things from their end, but they don’t know what you need to know. Here’s what you need to check:

  • Ask to be put in the exact audio setup that the meeting or conference will use, and ask someone to speak from the place(s) where the speaker(s) will be sitting or standing. (If it’s a Zoom meeting where everyone will dial in separately, you don’t have to ask for this specially, because the tech check itself should be set up the same way.) Make sure you can hear.
  • Test how to mute your microphone so that you can cuss if you need to without everyone hearing it. (Again, ask me how I know.) Make sure you really are muted and that you know how to unmute. Clarify whether it’s okay for you to speak up if you can’t hear, or if there’s some other way they want you to handle this, like typing in the chat box or texting someone.
  • Share your iPad or tablet screen into the meeting and get them to confirm what they can see. Draw a little, and ask them to tell you how fast it shows up for them. Notice if there’s any drawing lag on your end while you are connected that isn’t there when you’re not connected (there shouldn’t be, but it’s not unheard of).
  • Ask whether they expect to switch between you and anyone’s slides or other shared materials, and get clear on what the schedule and expectations are if that’s going to happen. If you will have to click buttons on your end to make this happen, practice sharing and un-sharing your screen until it’s easy.

Make sure your device is charged, including the stylus, if you’re using an Apple Pencil or other stylus that has a battery. If possible, plug in to power while you work. If you’re using an iPad with Zoom, connect your iPad to the computer with the charging cable and share it through the cable. You’ll get a better connection and your iPad will charge while you work.

Finally, and perhaps most importantly, don’t panic. Stuff will go wrong. You’ll lose a brush or a color. You’ll mess up layers. The app will quit in the middle (or you’ll accidentally hit the round button and minimize the app when you didn’t mean to; ask me how I know…). Just keep breathing. It’s not the end of the world. Everyone is upside down right now because of all the rapid changes and the uncertainty of what will happen today, tomorrow, or next week. Be calm, and people will support you as you do your best, even if you screw up.

Ask me how I know.

Q & A

Q. What if my app can’t hide my drawing tools?
This is a nice-to-have feature, where you can see the tools but the participants can’t. If the app you choose doesn’t have it, don’t worry about it. It’s infinitely better to use an app that you are comfortable with that doesn’t have this feature, than to struggle with one you don’t like that does.

Q. Should I use the lasso tool to move or resize stuff?
Not if this is your first rodeo, no. (Sorry-not-sorry about the pun.) You can tweak it post-production if it really bugs you, but just go with what you’ve got while you’re working live. Better to keep moving.

Q. My app lets me make icons ahead of time and just paste them in, but you didn’t mention that. Why not?
Because it will slow you down. It feels like a shortcut, but as you’re learning how to listen and write and use the app, it will slow you down too much. It’s tempting, but leave it for now. You can work up to that later.

Q. What’s the best drawing app to use?
If you are totally at a loss as to where to start, try Procreate. I’ve done these screen shots with Concepts because it’s what I currently use when I record, to the point that I’ve lost facility with other apps. However, I don’t recommend Concepts to a beginner. It’s powerful, but boy is the interface confusing. Plus it lacks a quick way to zoom back to 100% size, which can trip you up.

In reality, the best app to use is the one that feels good to you, which may or may not be Procreate or Concepts. Try a few and see which seems to make the most sense, then use that one. This is worth taking a little time to do.

I’ve listed some common options here; there are others. Some of these may not have all the features I mention in this article, like a watercolor brush or layers. If you find that you love one that doesn’t have those features, great. Make it work for you using the tools that it does have. I’ve also linked to a tutorial for each app, when I could find a good one.

Q. What’s the best stylus to use?
Again, the one that feels most comfortable to you. I use an Apple Pencil.

Q. You’re sure I can do this?
Positive. You got this. Go help people stop traveling.


* This is the crash-course, bare-minimum, starting-from-zero-got-to-do-it-in-five-days level of information. There’s a lot more to it than this, but this will get you going.