We all have days when we just don’t like our jobs – when a bunch of annoyances seem to pile up at once, and we start feeling like we can’t take it anymore. When this happens to me, I imagine going to my manager and saying “I really don’t like my job right now.” Then I imagine what he’d say to me. It’s probably not what you’d think.
My manager is a smart, supportive person who wants his people to grow. So I know that what he’d say to me is, “Wow, that’s terrible. How can I help you fix that?” What he’s asking here is not to listen to me rant or whine about what’s bothering me. He’s asking for actionable ideas that are within my (or his) control that will make the situation better. This is a totally reasonable and useful thing for him to ask, but chances are I won’t be ready with a good response in that moment. By the time I want to have this conversation, I’m so annoyed or frustrated or upset that I’m not seeing solutions. I need to vent before I can think clearly – but I don’t want to vent at him.
Instead, I work through my problems using a template that starts with a full-on vent and ends with sane, actionable ideas to address the pain points I’m feeling at work. It looks more or less like this:
I start by filling in the first column on the left, all the way down. What’s bugging me? This is where I get to vent it all out. I recommend printing the PDF template and writing by hand in case you want to shred it later. Some of what I write in this column should never see the light of day. Usually, I start to feel better as soon as I’ve put it all down on paper.
In the second column, I get to dream. What would I prefer to have happen, if I could have anything at all? It doesn’t matter whether I can bring it about – but what would the situation look like if it were perfect?
The third column is for acknowledging real issues that stand between what’s I feel now (first column) and what I envision (second column). Is it something I don’t have (like a tool or resource) or something I don’t know (like a skill)? Is it how another person behaves? Some of these blockers I will have control over, and some I won’t. That’s OK.
I usually take a break after completing the first 3 columns. A few hours or even a day later, I’ll come back and work on column 4. What can I personally do (or ask my manager to personally do) to move closer to my ideal version of events in column 2? This is the most difficult part, but it’s also where the gold is buried in this exercise. It’s important to acknowledge what is and isn’t within my power to control at this point, and to be honest about steps I could take that I might not look forward to.
Note that I’m not committing to doing all these things. Some of them might be difficult, and some are probably outside my comfort zone or I wouldn’t have the problem in the first place. I might need coaching or support to do some of them. But what I am doing is making a list that shows I have some control over the frustrating parts of my job.
The final step is to underline or circle the actions I will actually do or ask my manager to do. Then I can either start doing them or set up some time to present my ask to him. Usually, there’s enough that I can do on my own that I don’t even need to schedule time with my manager before getting started.
Why It Works
The impact of this framework is that it moves me from feeling frustrated, powerless, and stuck to being an active agent for positive change in my own life. Remember the change formula: C = DVF > R. CHANGE only happens when people combine DISSATISFACTION with the current situation with a compelling VISION of something better and clear FIRST STEPS toward action, thus overcoming RESISTANCE to change. Lacking any of the DVF elements, there is no C. This framework links the D, the V, and the F together very clearly, so I have a path to overcome my own resistance to change.
If you’re a manager yourself, consider sharing this framework with your team. It should help them clarify what they can do and what they may need from you to ease the pain points of their own jobs.
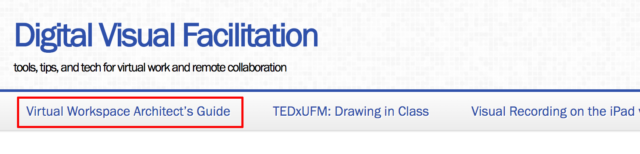
Yesterday I released five previously unpublished chapters from a manuscript I wrote while working at The Grove a few years ago. The mini-book, called The Virtual Workspace Architect’s Guide, explains how to bring your team together to create a virtual workspace that supports remote collaboration and covers the whole process of figuring out what your team prefers and requires, establishing which interactions aren’t being adequately supported, selecting a set of tools that will work for you, and rolling them out with your team.
It’s free to download. If you want it again later, you can find it under the permanent link at the top of the blog (“Virtual Workspace Architect’s Guide”) for easy access.
The button highlighted in red links to the Guide’s permanent page.
It’s designed for anyone who suddenly finds themselves working remotely and needing to engage in ongoing collaboration with a team or group. Full details are provided on the page linked from the button.
Your meeting room is all prepared. Your templates, markers, and sticky notes are at hand. But you and your client are both (very properly) practicing social distancing. So you have a face-to-face process for [strategy, visioning, brainstorming, decision-making, you name it], and you suddenly need to deliver this session remotely. You don’t even know where to start. Great! Let’s do this.
This is a bare-bones crash course in how to translate your face-to-face offering to a virtual one. We’ll cover:
Your mindset
Your mental model
Converting your existing agenda
Getting help
Matching processes with tools
Common problems you may encounter
It can be a lot more complex than this, but this is a good starting point if you’ve never done it before. Throughout, I’ve named tools that I personally prefer, but you can choose others that do the same thing. Let’s go.
Your Mindset
First, stop panicking. This is do-able, and you can do it. Also, your participants really need you to hold the container for them while they work, and you can’t do that effectively while you are panicking. So leave the panic at the door.
Second, accept that something will go wrong, and when it does, embrace it. I’ve done remote sessions for years and I still open each one with the thought, “Hmm, I wonder what will go wrong today?” I phrase it a little differently, though. I think to myself, “Hmm, I wonder what I will learn today?” Everything that goes wrong is a gift, because it teaches you something you didn’t know. It’s okay. Remain calm, explain what’s happening, and work the problem. It’ll be fine.
Third, let go of the fear that your virtual session will by definition be worse than your face-to-face one would have been. That isn’t necessarily true, especially for some kinds of work which are actually easier to do online. Accept that it will be a different experience, not necessarily a worse one, and aim to provide the best experience that you can.
Your Mental Model
This part is for those who have almost no experience in
virtual settings, so you can wrap your mind around how it’s set up. Skip this
section if you’ve participated in a bunch of remote sessions before. Otherwise,
read on.
You’ll have a meeting room, just like you do any other time. People will connect to the meeting room and remain in it for the duration of the session. The tool I use to create the meeting room is Zoom. Everyone connects to the same Zoom link and can use a phone or their computer to hear what’s going on. They can see each other (if they’re using video cameras) and anything that I’m sharing on my screen too. Only the host (me, or you in your case) needs a Zoom account.
You’ll have supporting tools, like you do in any other session. Instead of sticky notes, paper charts, and paper templates, you’ll use digital tools so your participants can engage in the hands-on activities you want them to do. They will connect to these tools using a web browser, while they are still connected to the meeting in Zoom. You give the link to the supporting tool or tools (go easy — multiple tools get confusing really fast), and everyone connects to it. I use tools like MURAL for sticky notes and visual templates, Trello for kanban boards, and Google Docs for shared editing.
A diagram of my typical set up with Zoom, Mural, and an iPad for graphic recording.
Pro tip: Usually, people are either looking at Zoom or they are looking at the shared tool, so if you are going to be working in a shared tool for a while, have people turn off their video camera in Zoom. Even when they are in Zoom breakout groups while using a shared tool, their focus will be on the tool, not on Zoom. Turning off the video camera can make the audio clearer and the tools load faster for people with limited bandwidth.
If you do graphic capture, you’ll also have a tablet (iPad or similar) that you can write on. You’ll share this screen in the Zoom session while you’re capturing. I use Concepts as my drawing app, but I recommend others for first-timers.
Converting Your Existing Agenda
The basic crash-course process for this consists of five steps:
Take out 25% of your activities (or make your session 50% longer). You can’t get as much done in the same amount of time, especially when you’re new at this. Transitions will eat up a lot more time than you expect. See this post for more details, including when to add breaks.
Identify the process you are using at each stage in your agenda, then select a tool that matches it and supports its desired outcome(s). Use as few tools as possible, even if it means using the same tool for two or more different activities. See the table below.
Create any templates or other materials you need so that they are ready in the selected tools. Include instructions right in the tool whenever possible, so that they can refer back to them if they get confused.
Visualize the transitions you will be asking participants to make between tools. How will you help them make the switch and get oriented? How will you teach them the basics of the tool so they are able to do what you ask them to do? How will you support them when they get stuck? Answer these questions for yourself, and you will be better able to support them through the session. Draw a diagram of the transitions between tools for your own reference. Make notes on your copy of the agenda to remind you what to say and when to say it.
Practice with each tool beforehand. Make mistakes, so that when participants make the same mistake, you can help them out. Do everything you are asking them to do. Find out where you need to give extra instructions to prevent mishaps.
Getting Help
Everyone is trying to learn this very fast right now. Several of the tools I use either have fantastic online tutorials (I’m looking at you, Zoom) or have staff who can help guide you through the basics, or both. Sign up for a demo webinar (thank you, MURAL) if they are on offer. Google the name of your tool plus “tutorial” or “demo” to find what’s available.
The new meeting space! Embrace it. Photo by Burst on Unsplash.
Matching Processes with Tools
Here is a list of common processes that you might need to use, and tools that support them. It’s obviously not an exhaustive list, but these are some of the most common things I do in virtual sessions. Again, I’ve listed my favorite tools; there are many others available.
Process You Want to Do (links in this column go to how-to articles)
Tools That Support It (links in this column go to the tool’s website)
Problem: People behind firewalls can’t access certain tools.
Solution: Have them do a pre-meeting tech check. Some tools have a test link (for instance, Zoom’s is here). For others, like MURAL or Google Docs, set up an open-access test document and send the link to your participants ahead of time.
Problem: People get lost switching between tools.
Solution: Visualize how this will work before you start. Give clear, explicit instructions, both verbally and written down in the tool they will use. Spend an extra minute making sure everyone is with you before you start. Have a colleague or volunteer present who can help stragglers figure out how to get where you are.
Problem: Not everyone has a video camera.
Solution: Ask the group what they prefer to do in this case: turn off all cameras, or have people use them if they are available. Keep in mind that the people who show up on video will have more perceived power and will have a different experience than those who don’t. Personally, I tend to be an all-or-nothing facilitator when it comes to video, but it’s up to you and your group.
Problem: Someone can’t connect to one of the tools.
Solution: If you have a tech helper, ask them to work with the person. If it just can’t be resolved, pair that person up with a buddy who is responsible for making sure that person’s ideas and input get added to the shared document. Share your screen through Zoom so they can watch what’s happening in the tool, even if they can’t get there themselves.
Caution: This is the only time you should screen share a tool that people are actively using. Otherwise, some folks will get lost between the real tool and your screen share, and they are likely to get confused at some point.
Problem: Someone’s audio or video suddenly stops working when it had been working before.
Solution: Ask them to leave the meeting and re-join. If that doesn’t work, ask them to leave the meeting, reboot their computer, and then re-join. Usually that fixes it.
Problem: There’s a ton of background noise from someone’s microphone that’s making it hard for others to hear.
Solution: In working sessions, I prefer to have everyone stay off mute; the conversation flows more naturally that way. However, sometimes there is a lot of noise in one location. Look on the participant list in Zoom to see whose microphone icon is filling up with green, and politely ask that person to mute themselves unless they need to say something until the noise has stopped.
Caution: It’s difficult to switch back to Zoom to mute and unmute while working in one of the web-based tools if you’re not used to it. Give people extra time to do this. They can return to Zoom by selecting its icon (blue with a white video symbol) from their task tray (PC) or dock (Mac).
I hope this crash course helps you find a starting point. As you do this more, you’ll get more comfortable with it. Remember that people are generally supportive when you invite them along on a learning journey like this. And good luck!
With many face-to-face events (wisely) being switched to remote events right now, I’ve seen a lot of questions go by on Facebook from graphic recorders who are being asked if they can work their magic remotely. You can! Even if you’ve never done it before, you can. I’ve got you.
My first (test) recording using the Concepts app
The screen shots in this post were made using Concepts on an iPad. If you have a different drawing app, a non-iPad tablet, or you’re using a drawing tablet with your computer, the basic points are the same; just find the equivalent tools in the application that you have. Check the bottom of the post for a list of common applications and links to their tutorials.
Here’s the list of what you need to know.*
Set up three brushes and an eraser.
Choose a simple and limited color palette, and
save the palette for quick reference.
Set up three layers, name them, and don’t panic
when you get them mixed up.
Set aside 2-6 hours just to practice.
Get a headset that’s comfortable and reliable.
Ask for a 30-minute tech check sometime before
the meeting begins.
Those are the basics. Everything else is optional for the
moment.
There is a little more detail to each of those steps, of course. Let’s take a look.
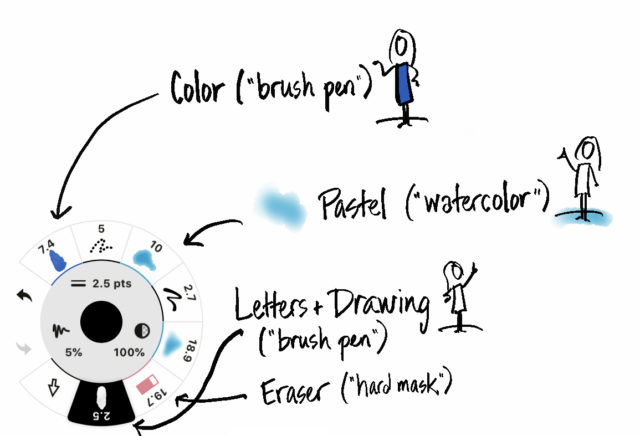
1. Set up three brushes and an eraser.
I use a small solid brush for most of my lines and letters; a larger solid brush for color fills; and a slightly larger watercolor brush for shadows and pastel effects. My eraser is usually sized in between the two solid brush sizes.
My brushes in Concepts. The numbers are the size in pixels (2.5 for the outline, 19.7 for the eraser, 10 for the pastel, and 7.4 for the color fill). Ignore the other brushes for now.
If you want to do solid titles rather than outline &
fill, you will also want a larger brush for the titles (or know how to quickly
switch between a large and small pen size for your single lettering brush).
Pro tip for neat lettering: With the canvas at 100% zoom (that is, fully zoomed out so you can see the whole page), make a mark like the upright of a capital letter (like P or R or I or D) at the scale (size) you want to write in. Zoom in to a comfortable level for writing, note where the upright is, tap undo to get rid of it, and start writing where it was, at the scale that it was. Zoom out now and then to check your orientation.
I set my brushes up in advance and save them for easy
access. Ideally, you will be able to see them all at the same time and just tap
to switch.
Can you use more? Sure. Do you want to? Eventually. This week, stick to three. Trust me.
2. Choose a simple and limited color palette, and save it for quick reference.
This one is so important that it’s worth looking up a tutorial for how to do it in your tool if it isn’t obvious. My most basic palette has black, a pastel blue, a pastel grey, a bright blue, and red. Sometimes I swap in another color for the two blues for different recordings. I also have white in my palette, but I use it rarely, and sometimes I include a yellow for glow and highlight effects.
My most basic color palette for the Concepts app. Concepts allows up to 8 colors in one palette, so sometimes I add yellow.
I use black for lettering and for outlining my icons. Red is
for emphasis. Light blue is for pastel effects and light gray is for shadows
and fills (shadows are done with the pastel brush and fills with the color fill
brush). Bright blue is for splashes of color in icons and titles.
Like the brushes, you want to be able to see all the colors in a permanent or flyout palette and just tap the one you need. Can you use more colors? Of course. Eventually. This week, keep it simple.
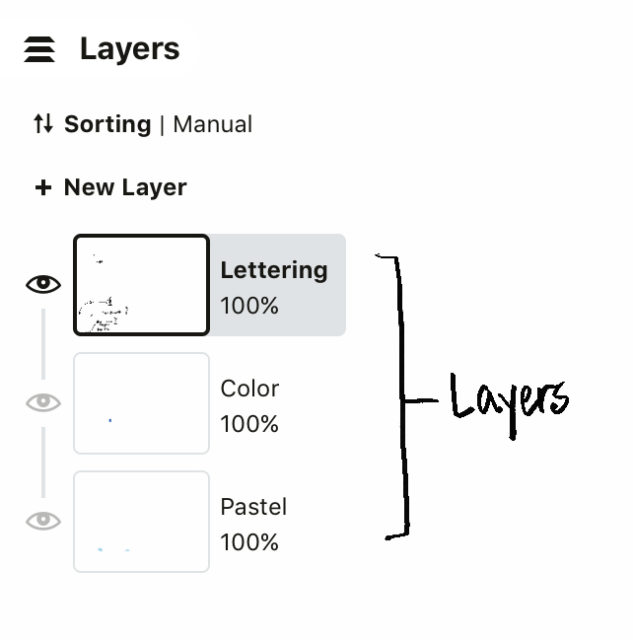
3. Set up three layers, name them, and don’t panic when you
get them mixed up.
From bottom to top, the layers are: pastels, color, line-work. Or whatever names will remind you of those classifications. That way, your letters and outlines are on top, colors slip neatly behind the outlines, and you can gaily sweep pastels behind icons and letters with no fear of messing up the clarity.
My basic layers setup. Concepts allows you to assign a brush to a particular layer, which helps make sure I don’t mix them up, but I still manage to do it sometimes.
You will mix up the layers at some point and put your outlines on your pastel layer or vice versa. If it’s the pastel on the outline layer, it’s immediately obvious and you can hit ‘undo’ and fix it. It’s harder to notice when you start writing on your pastel or color layer. Don’t stress when you do notice, and don’t undo a lot of writing. Just make a new layer, drag it to the bottom of the stack, and start using that for your pastels or colors as needed. There are no layer police and you will be fine.
4. Set aside 2-6 hours to practice.
And you can guess which end of that scale I’d rather you were on, right? The more you practice, the calmer you will be; the calmer you are, the better your work will be. It will take a while to get the hang of zooming in to write and zooming back out to check sizing, of switching pens and colors, of working with the layers. Don’t stress.
The very first graphic recording I ever did on an iPad, back in 2011.
… And this is a few years later, in 2014. See where a little practice will get you?
Here’s a practice regime that I use when testing a new drawing app:
Set up layers, pens, and colors. Take time to mess with the settings until you understand how they work — up to 30 minutes.
Write your name, draw some icons or people, practice the stuff that makes your work yours — about 15 minutes. This is not the most valuable practice activity, so don’t spend the bulk of your time here. This is just a warm up.
Find a photo of a chart you’ve done that you like. Try to recreate it on the iPad. This will teach you more about how your app works than almost anything else. Notice what you can and can’t recreate, adjust your brushes and colors, and get comfortable with your own style — up to 3 hours. I don’t recommend tracing a photo, because you won’t really understand how your app handles scale if you do that. Instead, look at a copy of the chart and recreate it on a blank screen.
Next, go to TED.com or find a podcast or a news channel or something that you can listen to and record. Pick an episode and play it. Record it as it plays, then play it again and just look at your recording while you listen. Notice what you got and what you missed. You’ll miss more than you are used to, especially at first, but always.
Let me say that again. You will always miss more when you are digitally graphically recording than when you are doing it on paper. Everyone does. It’s because the interface is more complicated than paper and pen, so a part of your brain that usually helps you listen and record is always dealing with the interface instead.
Play another video or podcast and record that one. Do this three or four times. Take a minute to compare your last one with your first one — see the progress? You can totally do this.
This is also the time when you want to get yourself into weird interface places so you can get yourself out of them. If you accidentally hit a button and the whole screen changes and it takes you 15 minutes to figure out why and how to undo it, that’s a gift: next time it happens, you’ll know how to fix it.
Spend up to 2 hours on this part.
So much for the recording part. The rest is technical details.
5. Get a headset that’s comfortable and reliable.
You’ll work better if you can hear clearly and if your ear doesn’t hurt (ask me how I know). ‘Nuff said. I use the Plantronics Savi 730.
6. Ask for a 30-minute tech check sometime before the meeting begins.
The tech crew will want to know a couple of things from their end, but they don’t know what you need to know. Here’s what you need to check:
Ask to be put in the exact audio setup that the meeting or conference will use, and ask someone to speak from the place(s) where the speaker(s) will be sitting or standing. (If it’s a Zoom meeting where everyone will dial in separately, you don’t have to ask for this specially, because the tech check itself should be set up the same way.) Make sure you can hear.
Test how to mute your microphone so that you can cuss if you need to without everyone hearing it. (Again, ask me how I know.) Make sure you really are muted and that you know how to unmute. Clarify whether it’s okay for you to speak up if you can’t hear, or if there’s some other way they want you to handle this, like typing in the chat box or texting someone.
Share your iPad or tablet screen into the meeting and get them to confirm what they can see. Draw a little, and ask them to tell you how fast it shows up for them. Notice if there’s any drawing lag on your end while you are connected that isn’t there when you’re not connected (there shouldn’t be, but it’s not unheard of).
Ask whether they expect to switch between you and anyone’s slides or other shared materials, and get clear on what the schedule and expectations are if that’s going to happen. If you will have to click buttons on your end to make this happen, practice sharing and un-sharing your screen until it’s easy.
Make sure your device is charged, including the stylus, if
you’re using an Apple Pencil or other stylus that has a battery. If possible,
plug in to power while you work. If you’re using an iPad with Zoom, connect
your iPad to the computer with the charging cable and share it through the
cable. You’ll get a better connection and your iPad will charge while you work.
Finally, and perhaps most importantly, don’t panic. Stuff will go wrong. You’ll lose a brush or a color. You’ll mess up layers. The app will quit in the middle (or you’ll accidentally hit the round button and minimize the app when you didn’t mean to; ask me how I know…). Just keep breathing. It’s not the end of the world. Everyone is upside down right now because of all the rapid changes and the uncertainty of what will happen today, tomorrow, or next week. Be calm, and people will support you as you do your best, even if you screw up.
Ask me how I know.
Q & A
Q. What if my app can’t hide my drawing tools? This is a nice-to-have feature, where you can see the tools but the participants can’t. If the app you choose doesn’t have it, don’t worry about it. It’s infinitely better to use an app that you are comfortable with that doesn’t have this feature, than to struggle with one you don’t like that does.
Q. Should I use the lasso tool to move or resize stuff? Not if this is your first rodeo, no. (Sorry-not-sorry about the pun.) You can tweak it post-production if it really bugs you, but just go with what you’ve got while you’re working live. Better to keep moving.
Q. My app lets me make icons ahead of time and just paste them in, but you didn’t mention that. Why not? Because it will slow you down. It feels like a shortcut, but as you’re learning how to listen and write and use the app, it will slow you down too much. It’s tempting, but leave it for now. You can work up to that later.
Q. What’s the best drawing app to use? If you are totally at a loss as to where to start, try Procreate. I’ve done these screen shots with Concepts because it’s what I currently use when I record, to the point that I’ve lost facility with other apps. However, I don’t recommend Concepts to a beginner. It’s powerful, but boy is the interface confusing. Plus it lacks a quick way to zoom back to 100% size, which can trip you up.
In reality, the best app to use is the one that feels good to you, which may or may not be Procreate or Concepts. Try a few and see which seems to make the most sense, then use that one. This is worth taking a little time to do.
I’ve listed some common options here; there are others. Some of these may not have all the features I mention in this article, like a watercolor brush or layers. If you find that you love one that doesn’t have those features, great. Make it work for you using the tools that it does have. I’ve also linked to a tutorial for each app, when I could find a good one.
Q. What’s the best stylus to use? Again, the one that feels most comfortable to you. I use an Apple Pencil.
Q. You’re sure I can do this? Positive. You got this. Go help people stop traveling.
* This is the crash-course, bare-minimum, starting-from-zero-got-to-do-it-in-five-days level of information. There’s a lot more to it than this, but this will get you going.
Using a sticky note tool for brainstorming in remote meetings is a wonderful method to gather a lot of different ideas quickly. But once those ideas are up on the shared board, the task of sorting through them and choosing which options to pursue can be daunting. Here’s a method for tackling all that information and turning it into a manageable dataset, and a list of some of the pros and cons of doing it this way.
Step 1: Get the ideas out.
Gather your remote team and get them into the same sticky note board using whatever tool you prefer. (My example here was done in Mural.) Pose a good question and ask them to write one idea per sticky note. They can place ideas anywhere on the board. To make later steps easier, ask them all to use the same color note; yellow, for instance. Anything but red, green, or blue. (A nice feature of Mural is that it’s easy to turn a bunch of notes all the same color in one click, even after they’ve been created.)
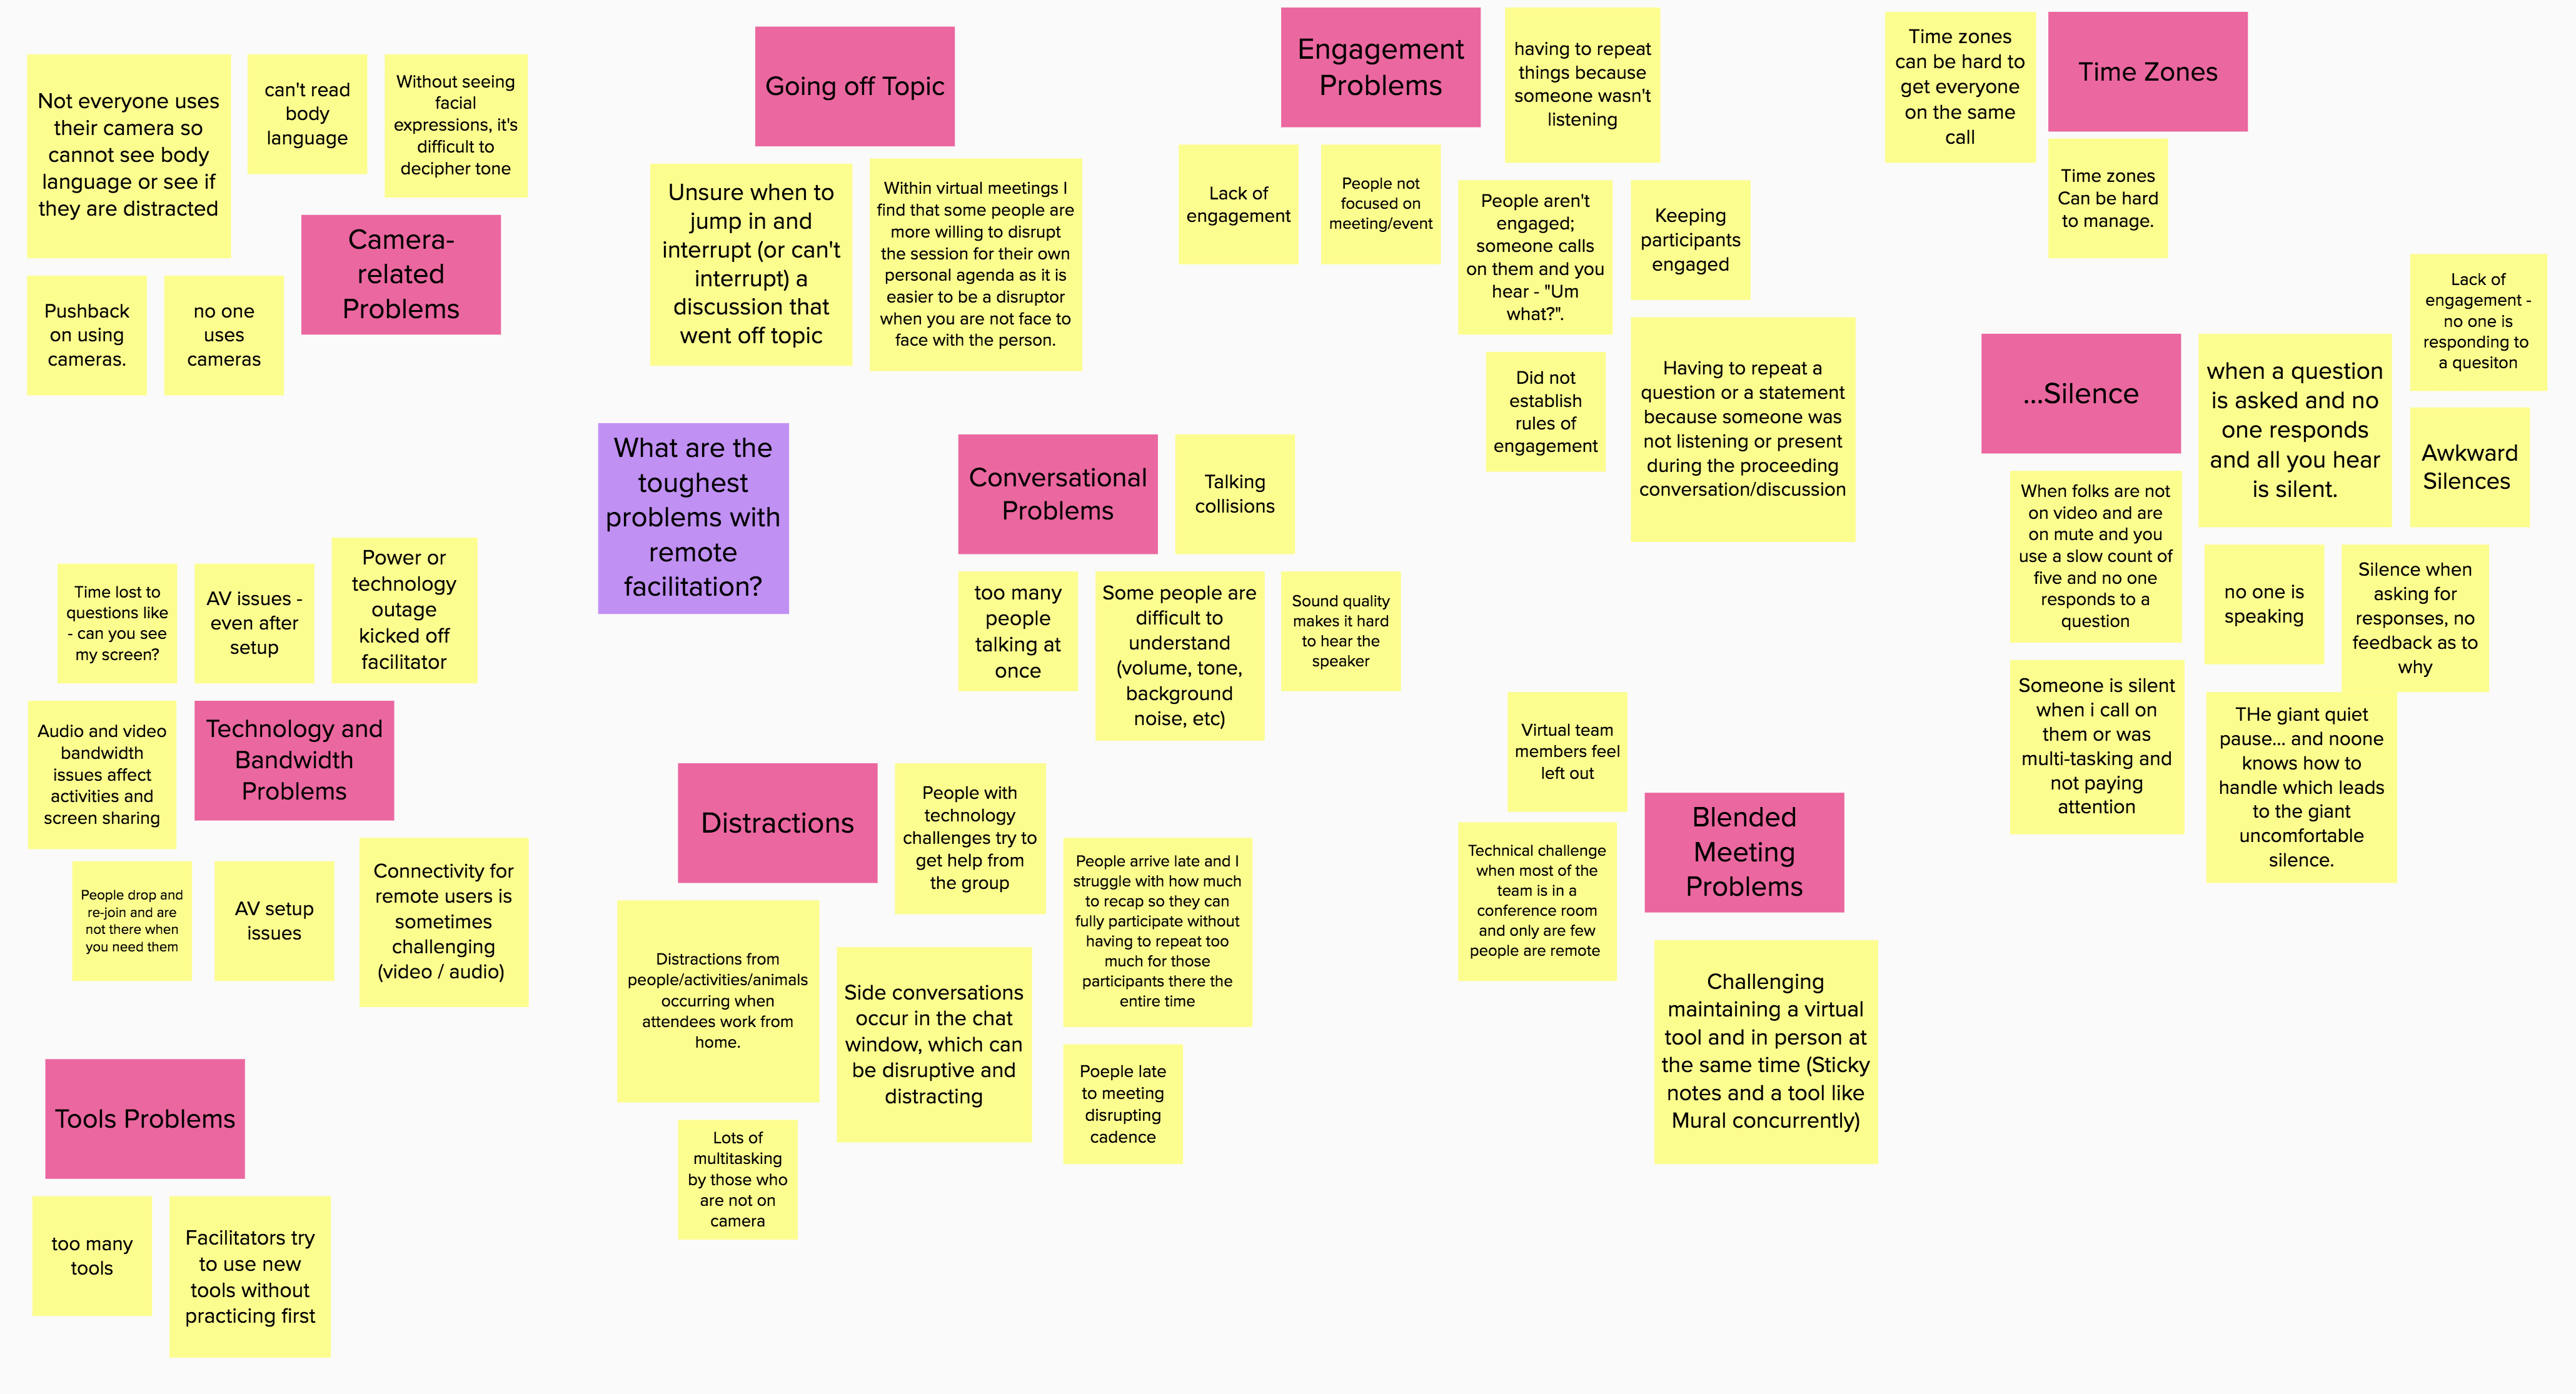
A wall of words — fresh from the brainstorm! Click the images if you want to read the notes.
Step 2: Get the ideas organized. No judgment!
As a group, spend some time clustering the notes and removing or consolidating duplicates. At this stage, you’re just looking for things that are alike. You’re not evaluating anything. You can do this any way you like; if you have a high-energy group, ask them to silently cluster the notes all at the same time, and watch them fly around the board.
If your group is larger, or if you have some folks who are unfamiliar with the tool you’re using, silent clusters can be a little alarming and you might want to take a slower pass as a whole group, or assign sections of the board to breakout groups and then come together to finalize the clusters.
Make sure the clusters are clear and that all the notes in each cluster belong in that group. Naming each cluster as you go is helpful, too.
Sticky notes clustered into groups. The pink notes are the cluster labels.
Step 3: In, Out, or Discuss?
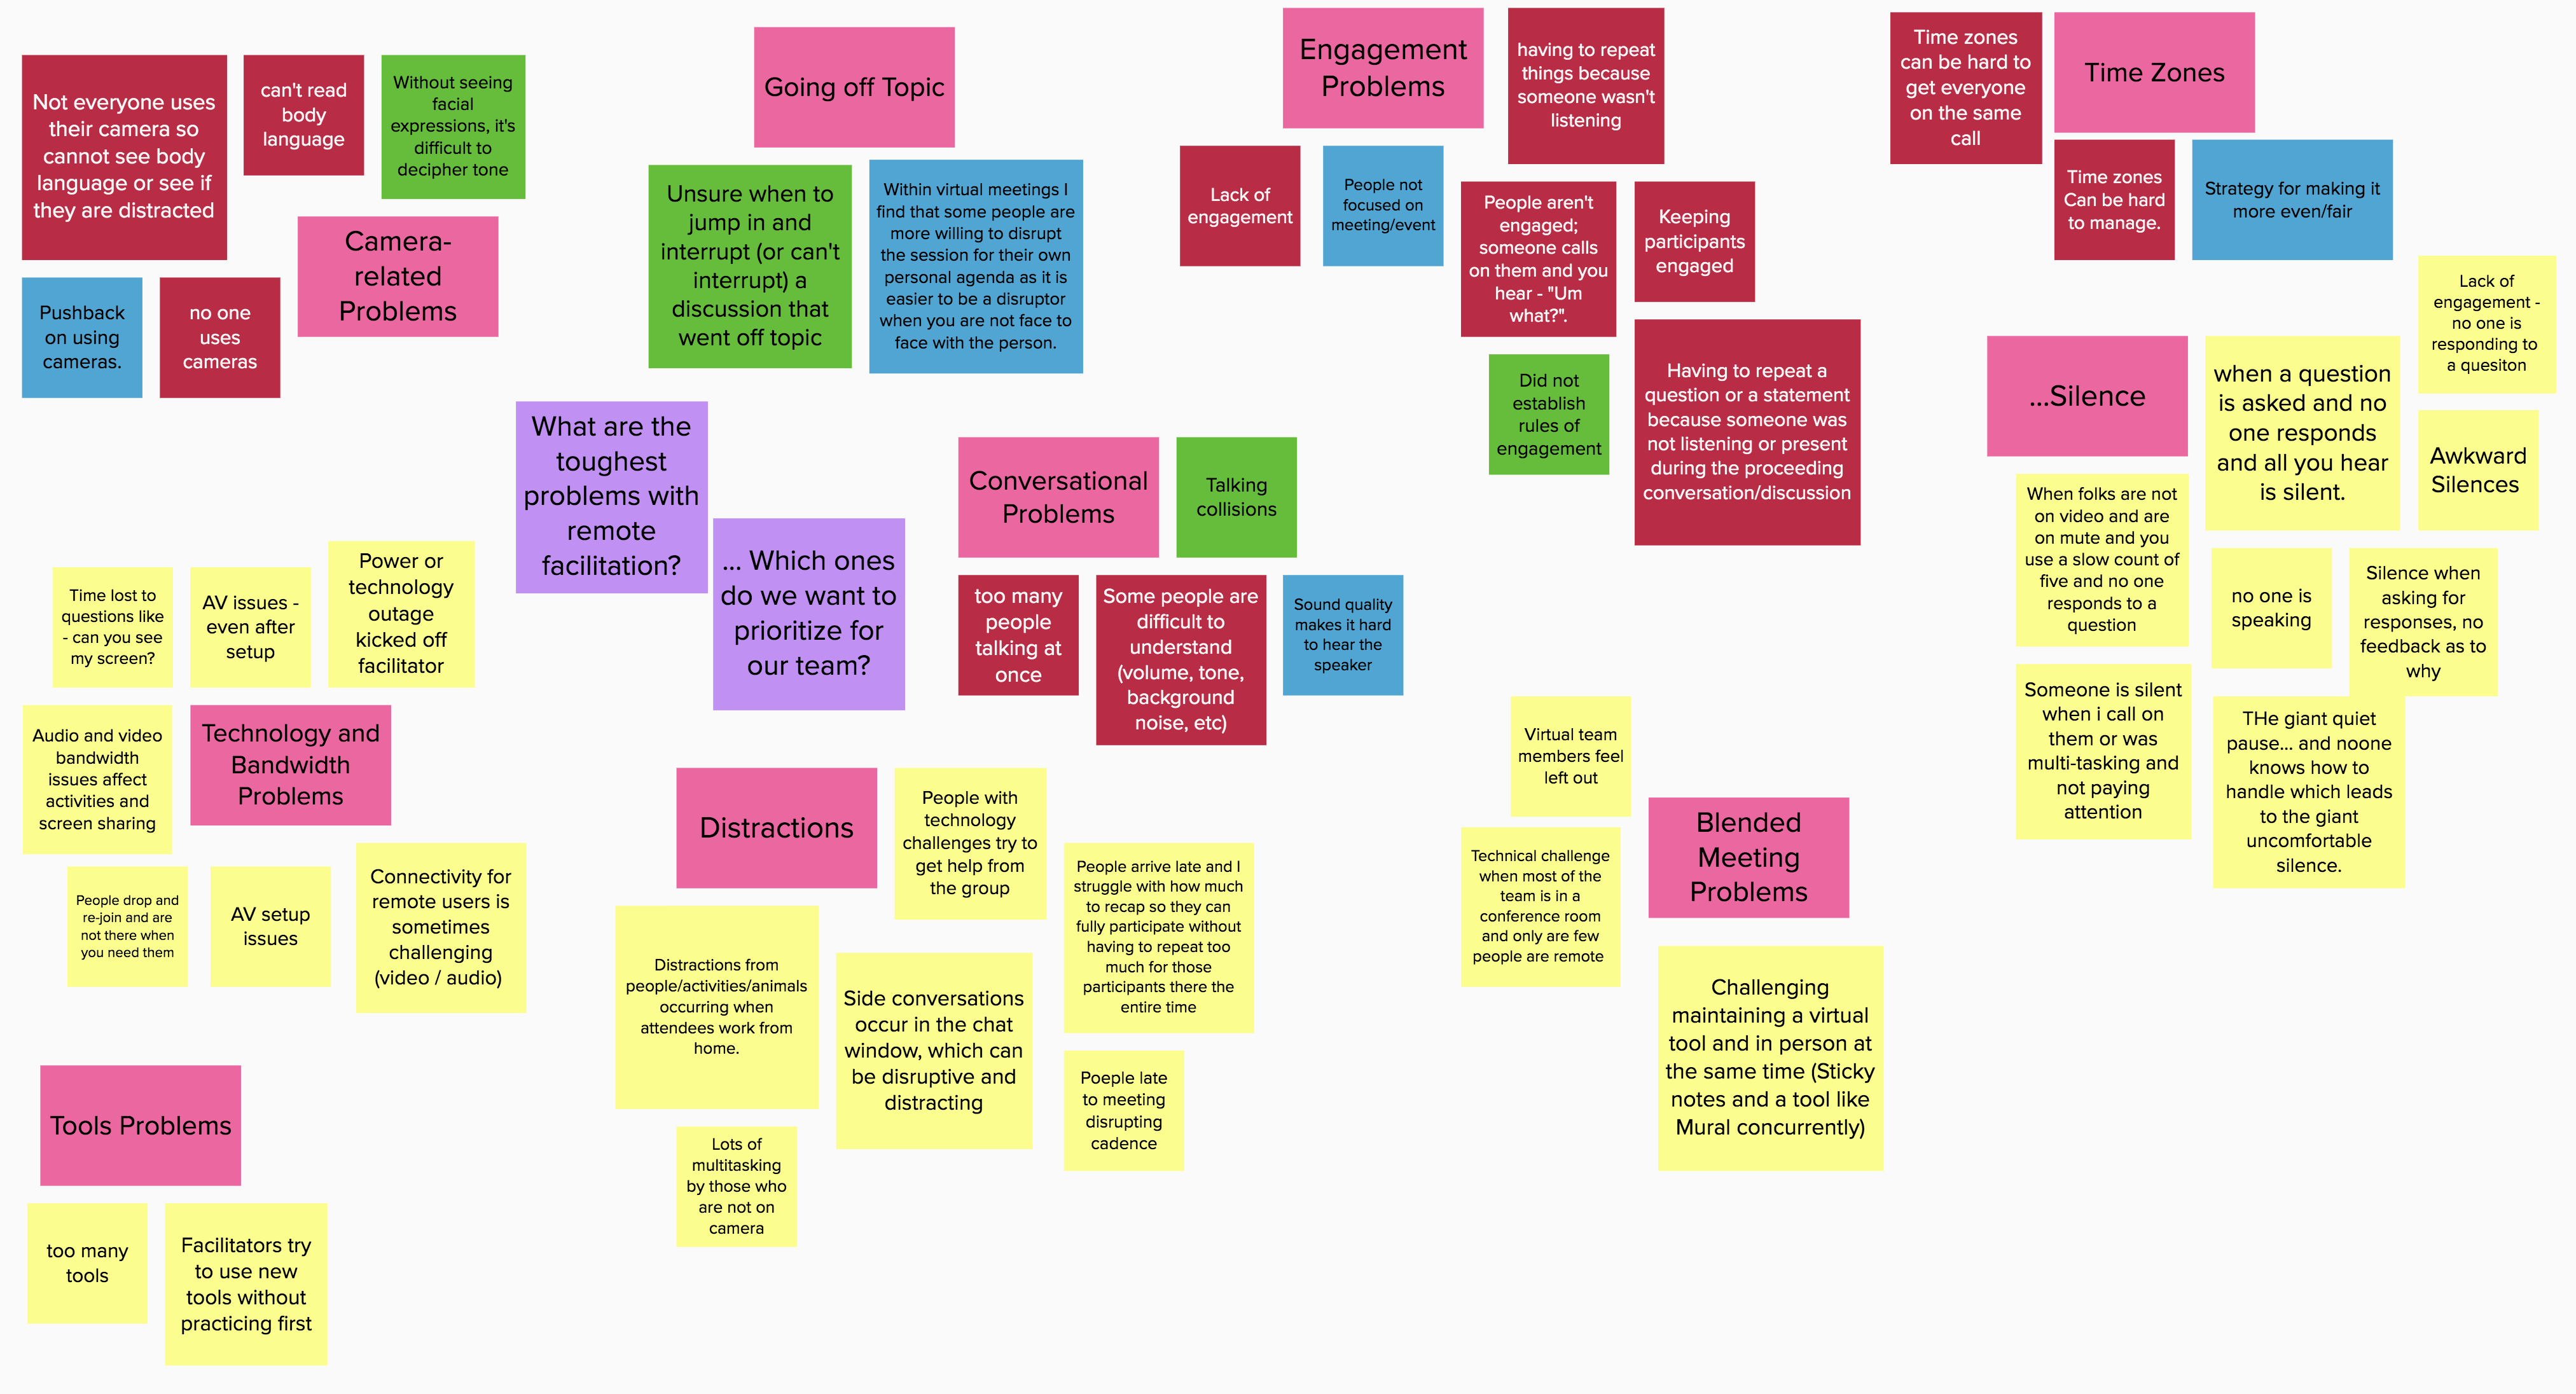
Make sure your guiding question is clear, and change it if you need to. The question must help participants decide whether ideas are in or out of scope. For example, in the fictitious brainstorm shown in my screenshots, the original question was, “What are the toughest problems with remote facilitation?” At this stage, though, I would need to amend the question to add, “… and which problems do we want to prioritize solving for our team?” There needs to be some reason for people to decide whether to keep or discard each idea, so make sure your question is pertinent. This second question makes the end goal clear: We are selecting priorities for action.
Now work through one cluster at a time. Set this up by saying something like, “We’re going to do a quick first pass on the ideas in each cluster. I’ll read out a note, and you tell me if it’s definitely IN, definitely OUT, or needs more discussion.”
Then further explain the labels:
In: An idea the
group definitely wants to accept or adopt. It’s a no-brainer, a table-stakes
item, something you’re already working on, or just plain required.
Out: An idea that doesn’t require any further consideration. It’s out of scope, technically impossible, too expensive (time or money), duplicates another idea already under consideration, or was meant as a joke.
More discussion:
Anything else, including things that some people think are “in” and others
think are “out.”
Work through each cluster note by note. If the group agrees
unanimously that an idea is IN, turn the note green. If they agree unanimously
that it’s OUT, turn it red. Otherwise, turn it blue.
As you read each note, people may only say “In,” “Green,” “Out,” “Red,” “Discuss,” or “Blue.” Again, if opinions on a given note are divided, it’s blue. Even if one person thinks something different from everyone else, turn it blue.
Work through all the clusters. When you’re done, all the notes should be either red, green, or blue.
Asynchronous or silent option: If this is too time-consuming or tedious-sounding for your group, you can use another method. Open up the board to voting, and ask each person to vote only on those ideas they think should be IN. If there’s a note that someone thinks should be discussed, they can turn it blue. If a note is OUT, leave it alone. Take a sweep through at the end. Any notes that have the same number of votes as people become green. Any notes that have no votes become red. Notes that are blue stay blue, and notes that have some votes but not the total possible number of votes also become blue. This can be done in between meetings to free up meeting time for discussion.
Note that some sticky note boards don’t have a vote option, and some have the option but don’t let you limit how many votes a person can put on a single idea. You have to invoke the honor system, but people usually play fair.
Working through each cluster. In this image, five clusters have been dealt with already, revealing four accepted ideas (green) and five ideas that need further discussion (blue). Notice that we’ve refined the guiding question here as well.
Step 4: Deal with the Blues.
The group can now ignore the red notes; they don’t matter.
The green ones can float to the top or side (or leave them where they are) —
they will move forward into the next phase, but you don’t need to talk about
them now.
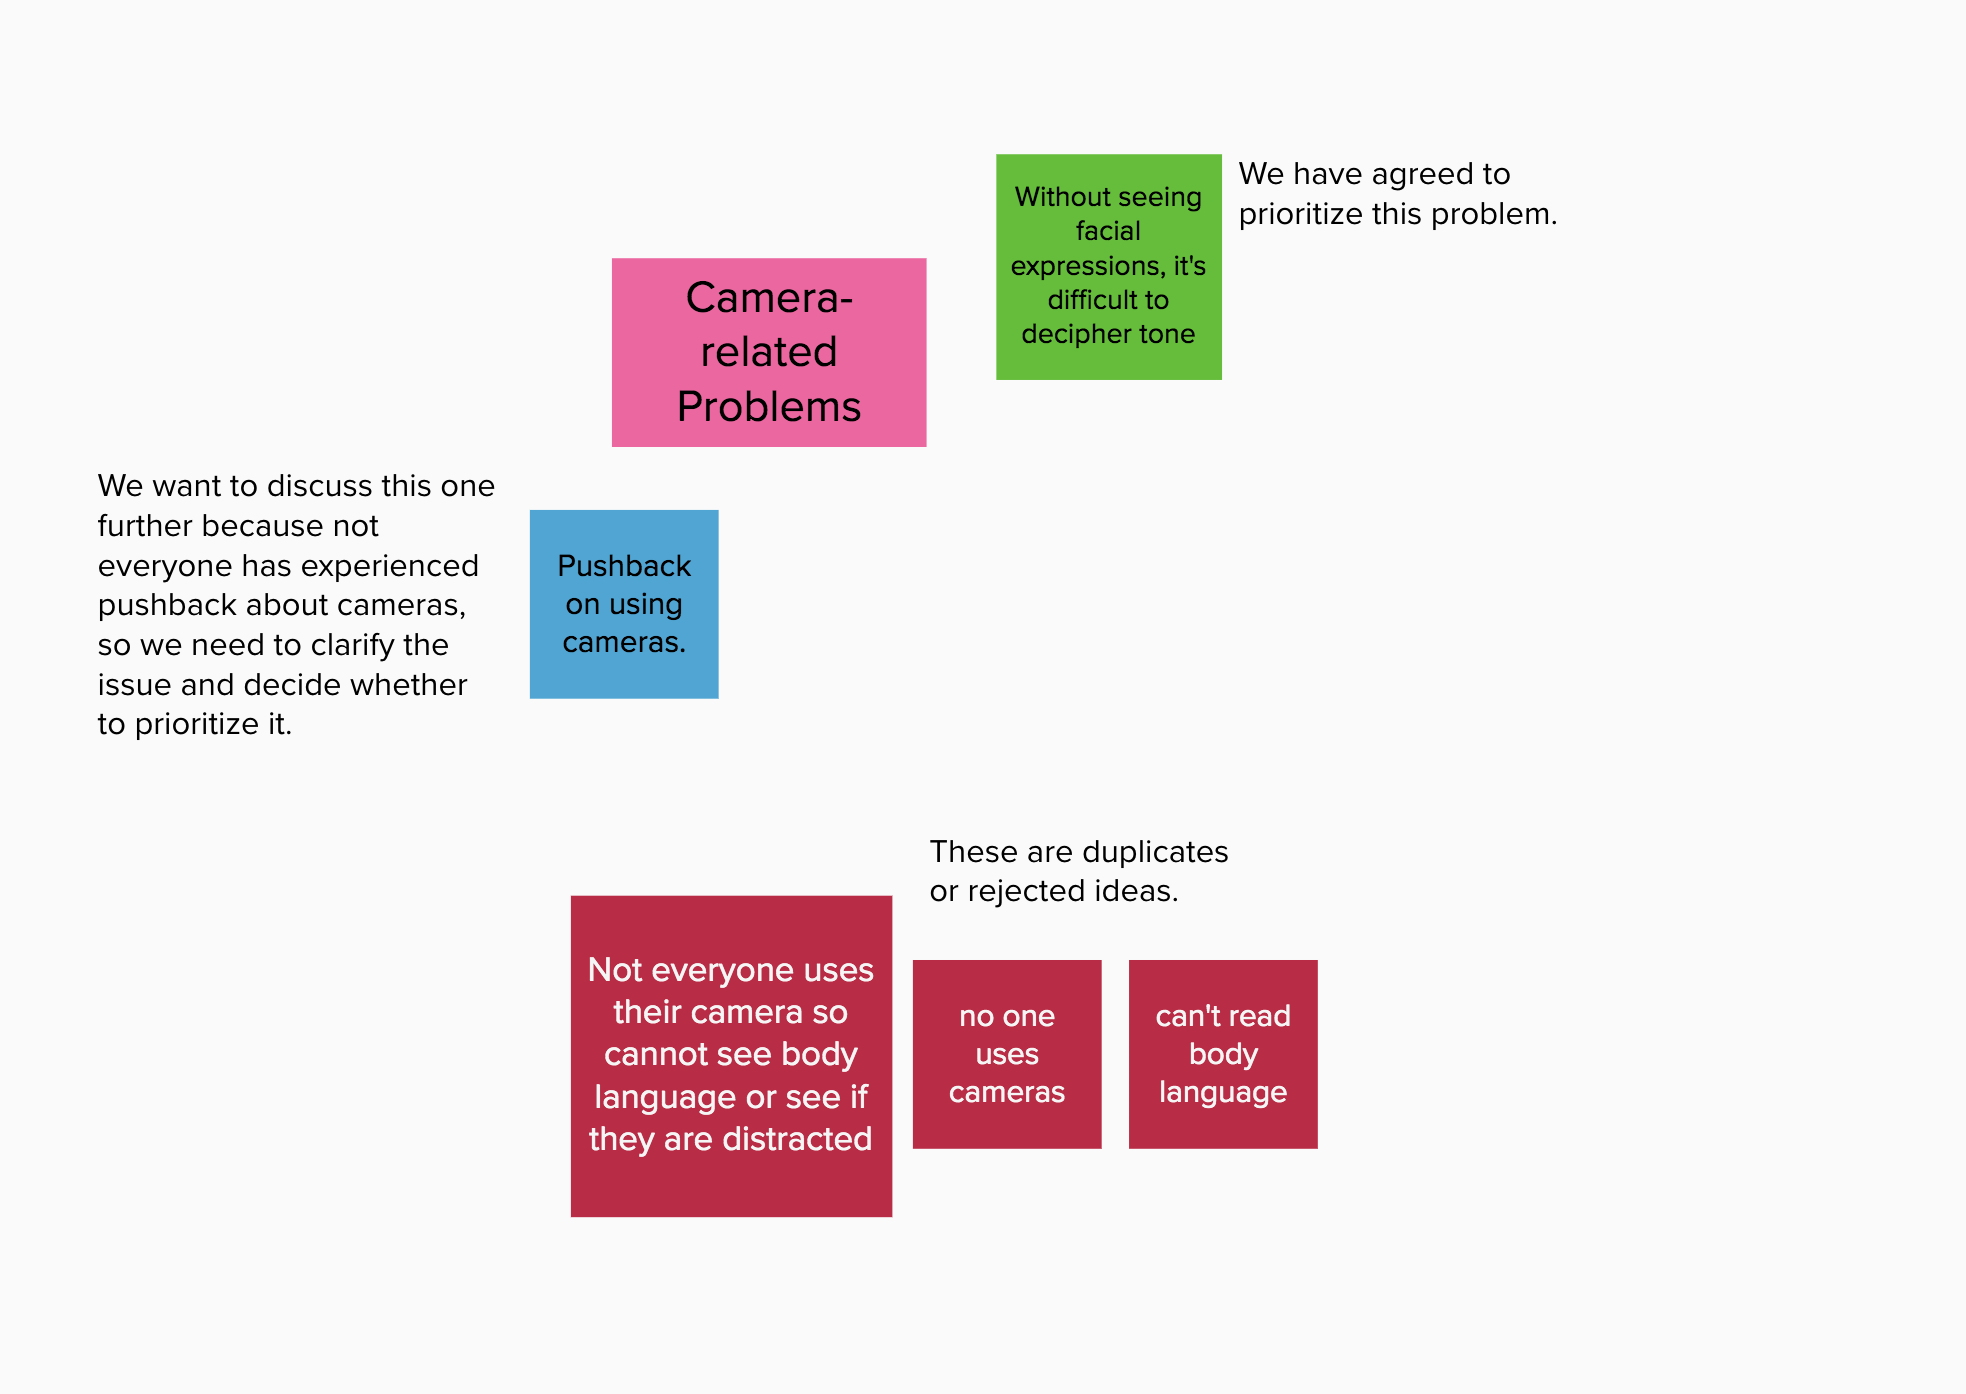
For each blue note:
Call the group’s attention to the note so they are all looking at the same thing. Ask, “What do we need to talk about here?” Facilitate the conversation, helping them work through the issues. At the end, the note should either be turned red or turned green. It’s perfectly okay to revise the note before changing the color, but it needs to be red or green at the end.
When you’re done, everything on the board should either be red or green (or a cluster name). Copy the green notes into a new workspace.
Talking about the blue ideas to get clarity and decide whether to make them red or green. The plain-text annotations are just for illustration here; I don’t write them on the sticky note board.
Step 5: Work with the Greens.
Working with the duplicated green notes, you can re-cluster (if needed — I usually don’t), dot vote, place the notes on a hi-low grid or a risk wall or something similar, or use the method(s) of your choice to decide which ideas to implement or adopt. Every idea has been considered, but no time has been wasted on ideas that don’t merit (or don’t need) discussion.
These are the green ideas from all of the original cluster groups, and this is one way to assess the relative value of the selected ideas. The ones in the lower right will yield the greatest impact for the least effort, in the group’s opinion.
Pros:
This method takes an overwhelming number of choices and turns it into a manageable number of choices pretty quickly.
As the group moves through the process, they feel a great sense of speed and progress rather than feeling bogged down or stuck.
It can bring in different voices, because people often have strong opinions about some of the notes and less strong opinions about others. They tend to speak up when they care about an idea.
Cons:
This can be a tough exercise for people who are color blind. See if your sticky note tool allows you to highlight notes in another way, such as changing the shape (star? stop sign? triangle?) or adding a sticker (check mark? X mark? question mark?).
Be careful about getting bogged down in conversation as you turn notes blue. Cut off blossoming discussions and let the group know you’ll get back to it once the notes are sorted out.
It’s possible for a vocal subset of the group to take over, causing others to check out. Manage this by asking for different voices to speak up, asking more vocal people to step back, or assigning a different champion to each cluster. Using the asynchronous or silent voting option can help combat this problem.
In-Room Adaptation
If you’re working with real sticky notes in a co-located meeting, you can still use this method. Grab markers in green, red, and blue. Add a big green checkmark to the “in” sticky notes. Make a big red “x” on the “out” sticky notes. Write a blue question mark on the “discuss” notes. Just make your marks in the edges of the notes, not over the words, so that people can read the original notes later. To change a blue note to a green or red one, cross out the question mark and add the appropriate green or red marking.
Have you ever been in the Despondent Pit of Techno-Despair? You know what I’m talking about, if you’ve been there. You’ve been trying to get some type of technology to work, usually in front of other people. It probably worked yesterday, or even earlier today, when you tested it by yourself, but the controls are now mysteriously incomprehensible and you’d swear they look different than they did an hour ago. Possibly a lot of people are waiting to do some very important work supported by the technology you’re fooling with. Time stretches and warps in a weird way, and it feels like everyone else is holding their breath and staring at you with saucer-sized eyes. You can almost see them thinking, “What the heck is this person’s problem, and how long is it going to be my problem too?” You start to feel like you are at the bottom of a giant black hole in the earth and the sunlight is so far away you will never see it again. You kind of wish it would just collapse on you and everyone would go away and let you die of embarrassment in peace.
Yeah. Welcome to the Pit.
I spend a lot of time in the Pit, which sometimes surprises people because I generally seem to have a handle on technology. (Generally.) But think about it: I spend a lot more time walking along the edge of the Pit than most people. It stands to reason that I’ll fall in fairly often.
So why would I keep wandering around on the edge of this scary, deep, dark Pit if I know how awful it is when you fall in?
Simple: I also know the way out.
I’ve built a ladder that I use to get out of the Pit. Rung by rung, I can climb my way back to the sunshine. Knowing this makes me unafraid to fall in, and even lets me laugh about it and take it in stride. Well, sometimes.
Here, I’ll show you my ladder. This is the ladder I’ve built for when I’m working with a group, and I’m the one having the issue.
Starting on the bottom rungs, I breathe and I stay calm. I can’t do anything if I’m not calm, so that’s the first thing to get under control.
Moving up a rung, I say oops! That is, I acknowledge there’s a problem and I briefly say what it is. This usually gives me the space to realize what’s likely going on and then I can…
Move up to the next rung, where I Try One Thing. Just one. The most likely one. If it works, yay! I’m out! If not, I reach up to the next rung…
Which is to switch to my backup plan. (Always have a backup plan.)
Once I’m in a stable place with the backup plan in effect, I briefly say what went wrong that made me put the backup plan into action. I describe it neutrally, remembering that the computer is really not out to get me, nor am I an idiot. I just fell in the Pit, is all. At this point, I reach the top rung…
And I can move on — I’m out!
My ladders, now your ladders.
I also know how to climb down on purpose and bring other people out with me. It’s almost worse than falling in yourself: You’re walking along with someone on the edge of the Pit, and suddenly they fall in and start panicking. They’re terrified you’re going to wander off and leave them down there (which is what happens when they encounter really bad tech support).
The temptation to cut the poor person loose can be very strong. Don’t be that guy. Climb down there and show them the way out, now that you’ve learned it.
Here’s the ladder I use when I’m helping someone else out of the Pit:
The bottom rung is about getting them calm. Say, “It’s okay, let’s take a moment to figure this out.” Next rung…
Get them to stop making it worse. Say, “Okay. Don’t click anything until we figure out what’s going on.” (If they keep clicking, they keep changing the state of the problem, and you’ll never work it out.)
From there, climb up to the next rung and ask them to describe what they see on the screen, again without clicking anything. Literally ask, “What are you seeing right now on the screen?” This is assuming you’re working remotely and can’t see them, of course. If you’re right there with them, you can skip this rung.
If what they describe gives you the answer, go ahead and say it. If that works, yay! You’re both out. If not, there’s more ladder.
If you can accomplish the same task another way, switch to that backup plan. (You do have a backup plan, right? You always have a backup plan.) If not, and you can easily view their screen (have them share it in a Skype call, for instance), try that.
Once you’re stable, either in the backup plan or because you can see their screen and talk them up another rung, explain what happened in a neutral way. Nobody is an idiot. The computer isn’t out to get anybody. It’s easy to fall in the Pit. No worries. Then, grab that top rung…
And move on! You’re both out.
Take my ladders with you next time you’re heading for the edge of the Pit. It really helps to have a way out!
One of the participants in last month’s Advanced Visual Facilitation workshop pointed me to a new (to me) app for cleaning photos, CamScanner. I’m pretty happy with the way it cleans charts, and like many of you I’m having trouble with ScanScribe as my laptop advances technologically and poor ScanScribe does not.
CamScanner is an iOS app (there is also an Android version). It can open photos from your phone or iPad’s camera, or you can take photos with the app itself. Once you get a photo in there, you can correct the keystoning (straighten the edges), drop the gray out of the background paper, brighten the image, and transfer it to your laptop for final clean-up or editing. To my delight, I discovered that I could even do the transfer to my laptop even while sitting on a plane with no internet access.
You can also create an account with CamScanner to get cloud storage for your documents, but I didn’t. You can do everything described below without creating an account.
Here’s the original photo I was working with, taken on my iPhone:
A teaching chart from the AVF workshop (original iPhone photo).
And here’s the way it came out of CamScanner after less than a minute of work:
The same chart cleaned up in CamScanner.
Get a Photo Into the App Launch the app and either use the camera button to take a photo (I haven’t tried this with a chart so I don’t know what the results are like), or use the import button (the smaller button) to grab one from your photo roll. You can open a few at a time.
Adding a photo to CamScanner
Correct the Keystoning If you added a single image, the app takes you to the keystoning correction right away. Match up the circles with the corners and middles of your chart and click the checkmark to save.
Correcting the keystoning
If you added several images, it looks like the app does the keystoning for you. Tap one of the photos you imported to look at it more closely. If the auto-correction is not quite right just tap Re-Edit (top right) to do it yourself.
The Re-Edit button
Correct the Color After you do the keystone correction, the app applies Magic Color almost as if reading your mind. That’s the one that drops out the gray paper background. You can check it against the original by tapping the Original button, or play with the other settings, but Magic Color usually does the job. Sliders at the bottom let you adjust the magic, the brightness, and the saturation. Click the check mark when you like what you see.
The Magic Color button
Wait… Was That an OCR Button? Yes, yes it was. There are several languages you can choose from, but don’t get your hopes up. I haven’t found the OCR to do very much with my hand-drawn charts.
Put Them on Your Computer Hidden behind the More button, the app has several ways to share your photos (email, text, upload to social media, connect with apps like Dropbox, Evernote, and others, and so on).
Sharing options
If you save them to your Camera Roll, you can use Air Drop to transfer them to your computer. I was utterly delighted to be able to do this on a plane, because I needed to clean one last chart to complete a project and Photoshop wasn’t cutting it. There was too much variation in the background. Since I had the photo on my phone already and plenty of time on my hands, I decided to give CamScanner a try. It did a great job, I saved it back to my phone, and then I used Air Drop to share the photo back to my laptop in about ten seconds.
Finish Up in Photoshop CamScanner leaves a bit of garbage behind, but it was very easy to clean up compared to trying to do the whole chart in Photoshop.
And there you go! I definitely recommend it for speeding up your chart cleaning if you’ve lost ScanScribe.
What else have you found to quickly clean charts? I’d love to explore more options.
This deals with the desktop version of Autodesk Sketchbook, not the iPad version. Sketchbook is now a subscription application. Only the paid, Pro version allows importing of brushes.
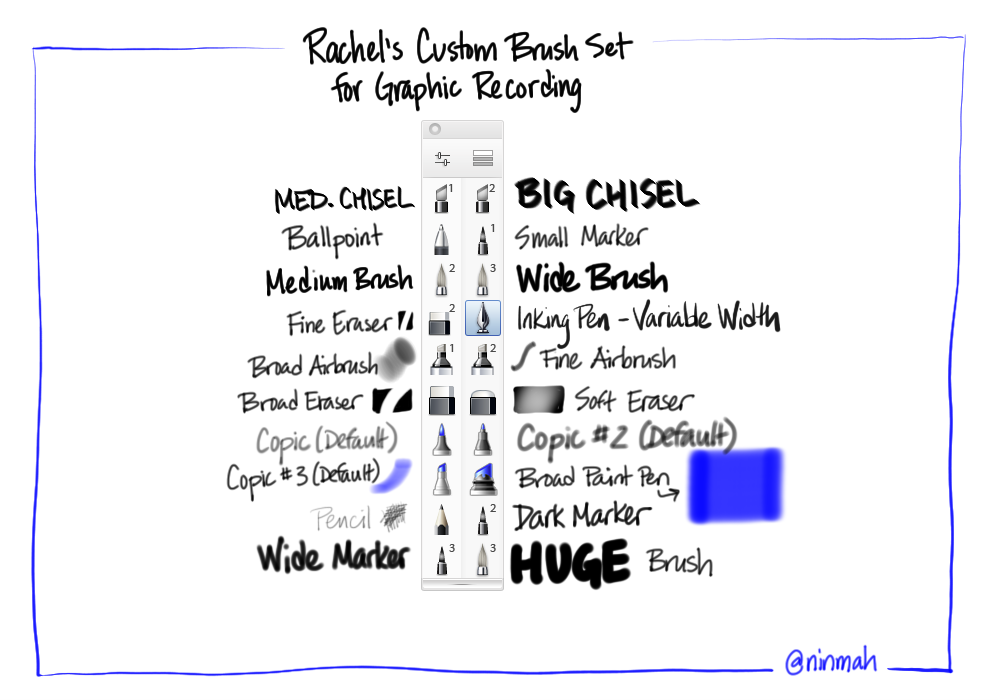
My custom graphic recording brush set.
Some time ago, I created a custom brush set for Autodesk Sketchbook Pro (an older version). I’ve updated the brush set and created a video showing how to import a brush set into the application.
Even if you don’t have access to the original Brushes app, you can make movies of your iPad drawings and sketchnotes again thanks to the new WorkVisual app. As the developers say in no uncertain terms, the Exporter tool is in alpha release. It’s not an easy process, but it’s possible!
A lot of the setup only needs to be done once, and after you get your workflow underway it goes faster. Keep in mind that these instructions will only be useful until the alpha software changes. Also note that the WorkVisual Exporter only works on the Mac at the moment.
THE DEMO MOVIE
I used an old diagram I drew a while ago so that I could test a movie with tracing for this demo. Read on for the long and detailed instructions on how to get your iPad drawing into a file you can open in your favorite video editor.
After following Steps 1-4 below, I imported the .mov file and still frame into Final Cut Pro X, sped the movie up, and added the title that looks like a piece of tape.
A. THE EASY PART: Drawing on the iPad
Open a new drawing in WorkVisual and set up your layers.
Create 3 layers and don’t reorder them. This is very important. Because of a bug in the Exporter, the movie will show layers in the order they were created, so if you reorder them, your movie will not look right.
Import a picture if you are tracing. It gets placed on a new top layer. Drag it to the bottom. Because of a bug that this time works in our favor, the imported picture will be invisible to the Exporter, so it doesn’t matter that you reorder this one layer.
Set opacity on the picture layer down low enough that you can see it but it won’t get in your way. (Ignore this step if you didn’t import a picture.)
What the layers look like when the drawing is finished.
Start to draw or write.
Use the top layer for your outlines, text, and other top-level content.
Use the second layer down to color in shapes you have drawn.
Use the third layer down to add shadows or airbrushing under the colors and shapes.
Detail of the drawing. The outlines are on the top layer, the colors on the next one down, and the shadows on the one under that. The bottom layer is the tracing (set to 0% opacity and invisible at the moment) and the other one is a rogue layer that sneaked in there.
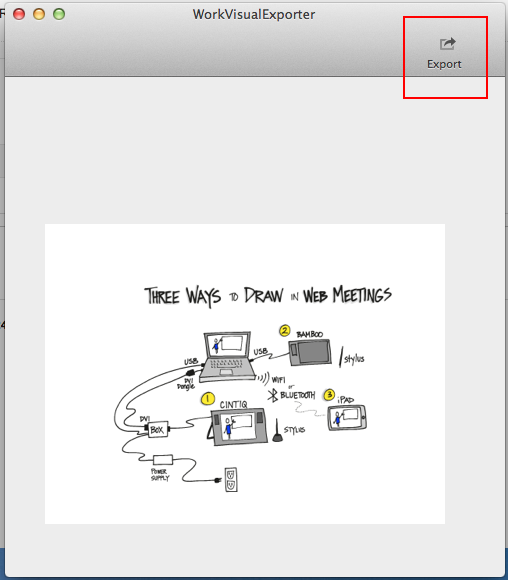
When you’re done, go back to the Gallery to send yourself the file you need.
Tap the Share button.
Choose Export for Mac Tool.
Mail it to yourself (mail needs to be set up on your iPad and you need a wifi or cell connection.)
Gallery and share button.
B. THE HARD PART: Creating the Video File on the Computer
There are four main steps: Install the WorkVisual Exporter; install or identify a program to handle your image sequence; export your image sequence; turn the image sequence into a video file.
Step 1. Install the WorkVisual Exporter.
Download the WorkVisual Exporter in exchange for leaving your email address for update notifications.
While you’re there, you may wish to look through the workflow description on the same page. It’ll help the rest of this post make more sense.
The download link gets emailed to you, so check your email, click the link, and save the file where you can find it again.
Go find the file and double-click to open it. It’s a .zip file, so this will unzip the Exporter.
Double-click the Exporter to launch it. If your computer asks you if you really want to open it, search your soul and do as your conscience dictates. If you decide not to open it, you’re done but you can’t make a movie. Otherwise, read on.
If you wish, you can drag the application icon to your Dock, or place it in your Applications folder so you can find it again later.
Step 2. Install (or identify) a program to handle your image sequence.
Leave the Exporter alone for a moment while you get the second piece of software you need: the one that will turn the image sequence into a movie. There are a lot of choices for how to do this, ranging from free to expensive.
Things to know:
Beware of the free tools you might find by doing a web search. Image and video converters are notorious for containing malware. Not all free tools do, but use common sense when making your selection, and do a search on the name of the tool to find reviews and comments.
Photoshop can apparently convert images into video, but each frame becomes a new layer. The Exporter generates a LOT of frames. I don’t know how many layers Photoshop can handle before it goes nuts, but I’d be careful.
Adobe Media Encoder can also do this, although I found it frustrating when I tried it and eventually went with QuickTime Pro 7.
I gather that Adobe After Effects can also do it, though I don’t know how to use it.
It’s possible that Final Cut Pro X does it, which would save a step, but I haven’t figured it out yet. Final Cut Pro 7 used to do it but that was a while ago.
Most tools want you to only open the first image in the sequence. Don’t select and open all of the images, or it won’t work.
I chose to use QuickTime Pro 7, which is very old but still available and still functional. Please note that although QuickTime is built into OS X, the function that we need isn’t. You can have QuickTime 7 installed right along with the one that comes with OS X. If you don’t have QuickTime Pro already, you can buy it for $30.
Installing QuickTime Pro:
Check your Utilities folder to see if you already have QuickTime Player 7. (Look in Macintosh HD > Applications > Utilities).
If you don’t have QuickTime Player 7, you can download it here (free and necessary in order to upgrade to Pro).
Double click the download file and follow the instructions to install it.
Once you have QuickTime Player 7, open it by double-clicking it.
If you already had QuickTime Player 7, check to see if you have the Pro version by choosing Registration from the QuickTime Player 7 menu (upper left, next to the Apple menu). If you see a code in the box, you are good to go. No code? Just installed it? Read on.
If you need to get QuickTime Pro, you can buy it here.
If you prefer to explore other options, try searching on ‘convert image sequence to video’ or look at the article Convert an Image Sequence to a Movie by Andrew Noske.
Step 3. Export Your Image Sequence.
Now you’re set up, and you don’t have to do Steps 1 and 2 again for your next movie. From here down is the repeatable part.
Go back to your email and look for the one you sent yourself with the drawing file attached.
Download the attachment and save it in a new folder somewhere. Don’t skip the step of making a folder. You can thank me later. Also, don’t change the .workvisual part of the filename. You can change everything before the dot if you want.
Go back to the WorkVisual Exporter that we launched and left running while we installed QuickTime Pro 7.
Go to the File menu > Open, and navigate to the file you just downloaded. Open it.
The image shows up in your WorkVisual Exporter window.
My drawing in the Exporter window. The Export button is highlighted.
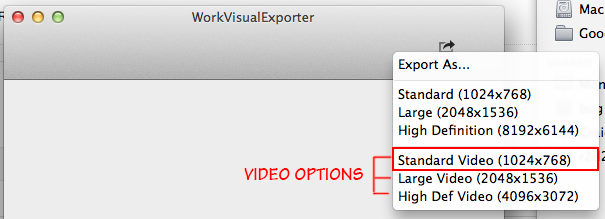
To export the image sequence, click the Export button in the top right of the Exporter window.
Video export options. Use the Standard one.
The top three options will export a nice JPG for you, but that’s not what we want.
The bottom three options export the image sequence for video. That’s what we want. Pick the standard definition. NOTE: Your computer can run out of application memory and crash if you use the large or high-def settings. Even a nice, new computer. USE WITH CAUTION. This is a bug and they’re working on it.
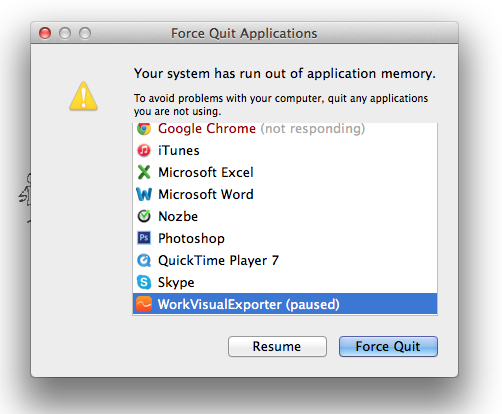
This is what you’ll see if you run out of application memory. Force quit the Exporter, shut everything else down normally, and reboot.
Make another new folder inside the other one and name it Image Sequence or something equally memorable. You want all your images to go into one folder that has nothing else in it.
Save the file with whatever name you want but MAKE SURE YOU ADD .jpg to the end of the name. If you skip that, this will not work.
You’ll see a “Saving Image” progress bar. Let it do its thing, go get some coffee, whatever. It’s best if you don’t try to do anything else with your machine while it’s exporting.
There it goes! Don’t mess with it. Just walk away.
When you get back, there will be a bunch of .jpgs in the new folder, all neatly numbered in order. Don’t change the filenames.
It’s useful to export a still frame at the same size as your video, so go ahead and do that now using the first Standard setting. Remember to add .jpg to your filename. You’ll use this still frame in your video editor, adding it at the end of the video so that you have a nice hold for a few seconds when the drawing is done.
Choose the same size for the image as you did for the video.
Step 4. Turn the Image Sequence into a Video File.
To do this, we’ll use QuickTime Player 7 (even though we upgraded it to Pro, it’s still helpfully called Player). We just need to tell it which image to start with and what settings we want. If you chose a tool other than QuickTime Pro 7, you’re on your own here, but the process should be generally the same.
Switch to QuickTime Player 7, or launch it if it isn’t open.
Ignore the default window or close it if it’s in your way. Go to File menu > Open Image Sequence… and select the first image in your folder.
Only select the first image, not all of them.
Set your frame rate. I used 30, which is a standard frame rate. (24 and 29.97 are good too.) If you want to learn more, read this article on frame rate or play with this demo.
Click OK, then wait a bit while nothing appears to happen. After a moment, your video will open. It’ll look like a blank white screen. Click the Play button at the bottom of the window to preview your video. You’ll notice it’s pretty slow. You can fix this in your video editing program later.
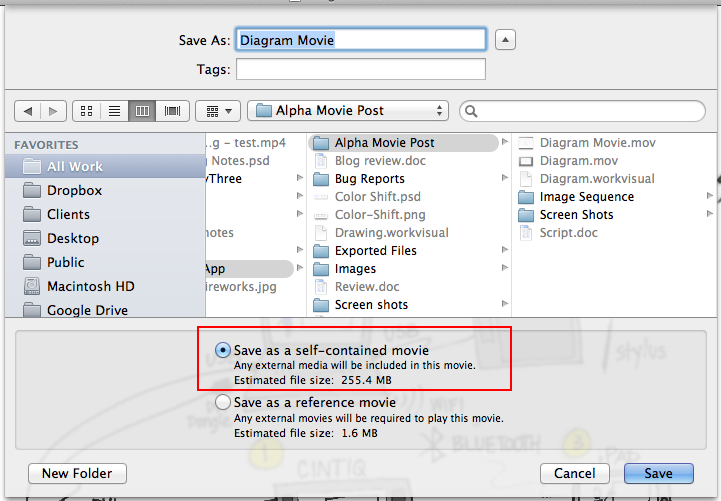
Save the file as a self-contained movie and you are good to go. Ta da!
Choose self-contained movie.
If you want to fiddle with settings, you can choose File > Export… and play with different formats and different options for each one. The Save method described here results in a pretty large file size but you will get good quality.
The Other Part: Making a Whole Movie
I’m not going to cover this in detail because there are lots of great tutorials out there for making movies (one of my favorites is Izzy’s Final Cut Pro tutorial series).
Open your favorite video editing program (I use Final Cut Pro X, but iMovie, Premiere, or any other program will work too).
Import the video file and the still frame you created in the previous step.
Add audio, a soundtrack, still images, or whatever else you wish.
Adjust the timing so it’s faster or slower or whatever you need.
Place the still frame at the end of the drawing sequence to give people a moment to absorb the finished drawing.
Render it out and there you go!
If you try this process and discover something new, or if your experience with it is different, please share what you found!
My colleague and friend Lisa Arora of Get the Picture recently published two digital books about important topics in graphic recording — how to really make the most of the dance between a facilitator and a graphic recorder, and how to conduct gallery walks of completed charts — and they are outstanding.
How To Get the Most Out of Working with a Graphic Recorder is an excellent resource for facilitators and graphic recorders (GRs) about how to work together. The suggestions and explanations are clear and insightful, and if you implement them I guarantee they will make your very next tandem engagement better. I highly recommend it for anyone running a meeting or workshop who plans to work with a GR, even if you don’t think of yourself as a facilitator. If you’re wondering whether you want to hire a graphic recorder and have never engaged one before, read this book to understand how to work with one so that you reap the real value of working visually. If you tend to work solo (doing both the facilitation and recording yourself), you might pick up a few tips, but the book is really aimed at facilitator-graphic recorder partners, and for those who plan to engage one or the other.
The other book, The How To on Effective Gallery Walks for Visual Meetings, is comprehensive, creative, and brilliant. It really gets into gallery walks (where participants spend reflective time looking at the maps at different points in the meeting, and thinking deeply about them). It goes way beyond grouping people up and having them file past the charts. If you want to extend the life of the maps, maximize their usefulness to participants, and deepen the level of thinking in the group, get this book, read it, and build a real gallery walk into your next visual meeting. I’ll be pulling ideas out of this one starting immediately, I can tell you.
Go take a look at the two books. If you partner or hire facilitator/GR partners, get them both. If you are a graphic recorder, a facilitator, or a dual-role graphic facilitator, or if you plan, host, or sponsor visual meetings, get the one on gallery walks. You’ll be glad you did.