In my Rules of Order for Virtual Meetings (first installment, rule B1), I recommend looking at the camera on your computer or device rather than looking at the video window of the person you are talking to, in order to simulate eye contact. Weird for you, much more natural for them: from their point of view, you are looking directly into their eyes. From yours, though, you’re looking at a tiny light and there’s lots of distracting stuff in your peripheral vision.
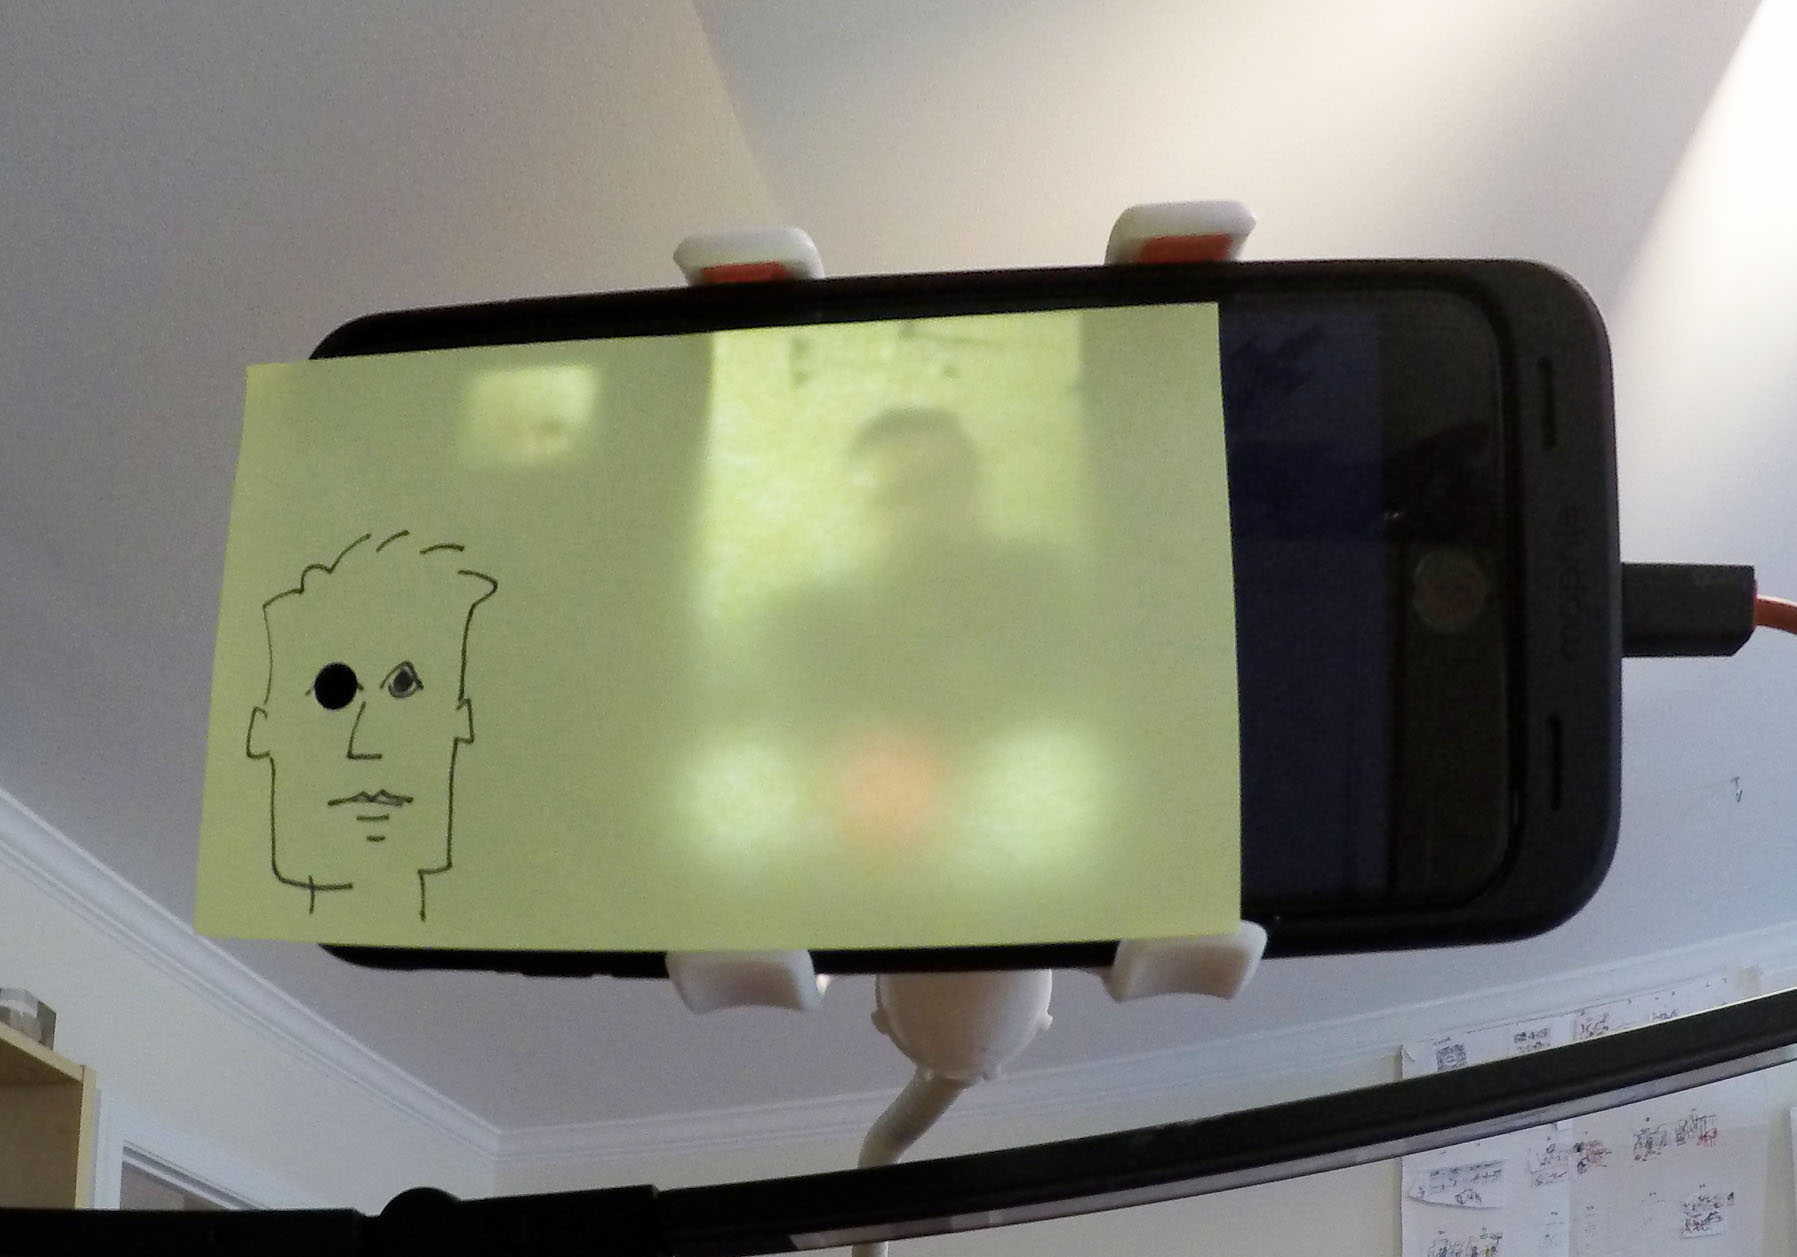
I received this photo today from Brian Tarallo, a colleague who took that advice and ran with it. To help himself remember to look at the camera (and probably feel less weird while doing it), he created a little paper avatar. Look closely and you’ll see a hole punched out where the avatar’s right eye should be. That goes over the camera, so the camera is ‘looking out’ from the avatar’s eyes. Brian can look at the friendly little avatar — which gives him a face to talk to — and make perfect eye contact. In this case, the paper is a sticky note attached to his mobile’s screen so that the hole remains over the camera. The same idea could be applied to any webcam where the camera is close to the surface of the screen (like Mac laptops and desktops).
Look ’em in the eye! Photo courtesy of Brian Tarallo.
I just love it. What an elegant solution!
It might be trickier if you’re using one of those eyeball-shaped USB webcams, because it might be hard to get the hole to line up with the camera in a way that doesn’t cause the paper to obscure the camera’s view. But smartphones, tablets, and computers with built-in cameras should work just fine.
Thanks, Brian, for allowing me to share your idea and photo, and Ben Tinker for being the guy behind the sticky.
The first and second posts in this series covered rules for orienting to purpose, connecting people, drawing out information, and getting closure on commitments — the first four stages of The Grove Facilitation Model. This post, the last in the series, deals with Videoconferencing Rules of Order for the final three stages: supporting action, monitoring progress, and leveraging learning. A future post will go into more detail about the Model itself. For now, if it’s unfamiliar, just think of it as a set of lenses that a facilitator can use to plan and handle group processes.
Tickcounter’s Web-based Timer
Supporting Action
When the videoconference is humming along and people are embedded in the work of the meeting itself, it seems like the safest thing to do is to sit back and not mess with it. But there are still some small things you can do to make it easier for everyone to work together via video.
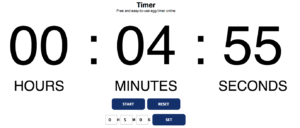
Build in stretch breaks. It’s more fatiguing to sit in a video call than to sit in a face-to-face meeting of the same length. For every hour of meeting, build in a five-minute stretch break, with longer breaks after two hours. Set a countdown timer on a shared screen to help people return on time, and discourage people from skipping their break. (Here’s a timer for PowerPoint — I haven’t tried it, though — and here’s a web-based one that I do use.)
Give participants something to focus on besides each other. Share a screen showing a visual map of the work process or other materials that are not text-heavy. Bring in a digital graphic recorder to capture the meeting in real time on a shared screen. Create a simple template in PowerPoint and complete it while the group talks. Having a visual representation to discuss and refer to helps to keep the conversation on track. People find a bit of variety stimulating and engaging, so don’t use the same technique every time.
Give participants something to do. Use other tools in combination with video. Set up a shared spreadsheet where participants can take a few moments to reflect and type answers to relevant questions, or give their opinions of different options. Once everyone has had a chance to reflect and respond, use the document as a springboard for discussion. Or get everyone into a shared sticky-note board and have them create and interact directly with digital sticky notes.
Monitoring Progress
When the group is working, the facilitator can keep the meeting flowing with light touches as they would do in a face-to-face meeting.
Keep an eye on body language, but not the way you’re used to doing it. On most video conferences, you can only see people from the shoulders up. It’s easy to miss signals that would be obvious in a face-to-face meeting. Watch for signs of fatigue or distraction: looking down often, repeatedly or persistently looking away from the computer, frequent nodding without contributing, leaning the head back onto the top of the chair and looking at the ceiling, fidgeting. These can all signal that patience has run out and it’s time for a quick stretch break. Also watch for quiet people trying to break in to the conversation, and help make room for them. They may suddenly look alert, sit up straighter, or start to open their mouth and then close it again if there isn’t space to talk. Call on them by name and ask if they wanted to say something.
Narrate your actions when you do something that appears to be a distraction. If you need to pull up a document, for instance, or look for a relevant email pertinent to the task at hand, say so. “I’m going to pull up the email that has our agreements from last time. It will only take a moment and I’m not reading any new messages right now.” Otherwise, your obvious shift in focus will be taken as an invitation for everyone to check their messages and the meeting will lose momentum.
Bring the agenda back on screen each time an item is completed. In face-to-face meetings, we tend to keep the agenda posted all the time and refer to it throughout the process to keep people oriented and on track. With videoconferences, it’s easy to lose sight of progress because the agenda is displayed once at the start of the meeting and then never again. Instead, share it on the screen, annotating and updating it if possible, each time you shift from one topic to another. Even if you’ve sent agendas to everyone beforehand, it’s helpful to do a quick group check in now and then.
Leveraging Learning
The activities that fall under the category of Leveraging Learning are often dismissed as ‘extras,’ things that are nice to have but not necessary in our time-pressured workdays. However, they do not need to take a lot of time and the payoff in participant satisfaction, productivity, and engagement is huge. Spare a few minutes for practices like these that get everyone involved in the group’s choices and success.
Take a moment at the end of the meeting for “likes and wishes.” Invite each participant in turn to share one thing they liked about the way the meeting worked, and one thing they wish for next time. You can leave it open in terms of scope or frame it so that people are reflecting on the technical aspects of the engagement. In settings where people are not inclined to speak openly about what they would like to change, set up an anonymous way to contribute, such as a shared sticky-note board or shared document. Use the feedback to adjust future video meetings.
Take screen shots at various points in the meeting. Combine them with images of charts created by digital graphic recording and links to documents jointly edited during the meeting. Share this output with participants via email soon after the meeting as a visual record of their virtual time together.
Host occasional pop-up sessions dedicated to reviewing the technology you use for video, shared editing, and other meeting functions. Invite interested participants to prepare short presentations of new tools that show promise, or ask volunteers to try out specific tools and report the results. Keep your group’s tech fresh by sharing the responsibility for finding, testing, and proposing new tools.
Although synchronous meetings are only a small part of remote work, they provide opportunities to build relationships and cement commitments among distributed colleagues. Using these guidelines will help you make the most of your team’s remote gatherings, bring team members closer together, and increase their effectiveness as a distributed team.
Even if you don’t have access to the original Brushes app, you can make movies of your iPad drawings and sketchnotes again thanks to the new WorkVisual app. As the developers say in no uncertain terms, the Exporter tool is in alpha release. It’s not an easy process, but it’s possible!
A lot of the setup only needs to be done once, and after you get your workflow underway it goes faster. Keep in mind that these instructions will only be useful until the alpha software changes. Also note that the WorkVisual Exporter only works on the Mac at the moment.
THE DEMO MOVIE
I used an old diagram I drew a while ago so that I could test a movie with tracing for this demo. Read on for the long and detailed instructions on how to get your iPad drawing into a file you can open in your favorite video editor.
After following Steps 1-4 below, I imported the .mov file and still frame into Final Cut Pro X, sped the movie up, and added the title that looks like a piece of tape.
A. THE EASY PART: Drawing on the iPad
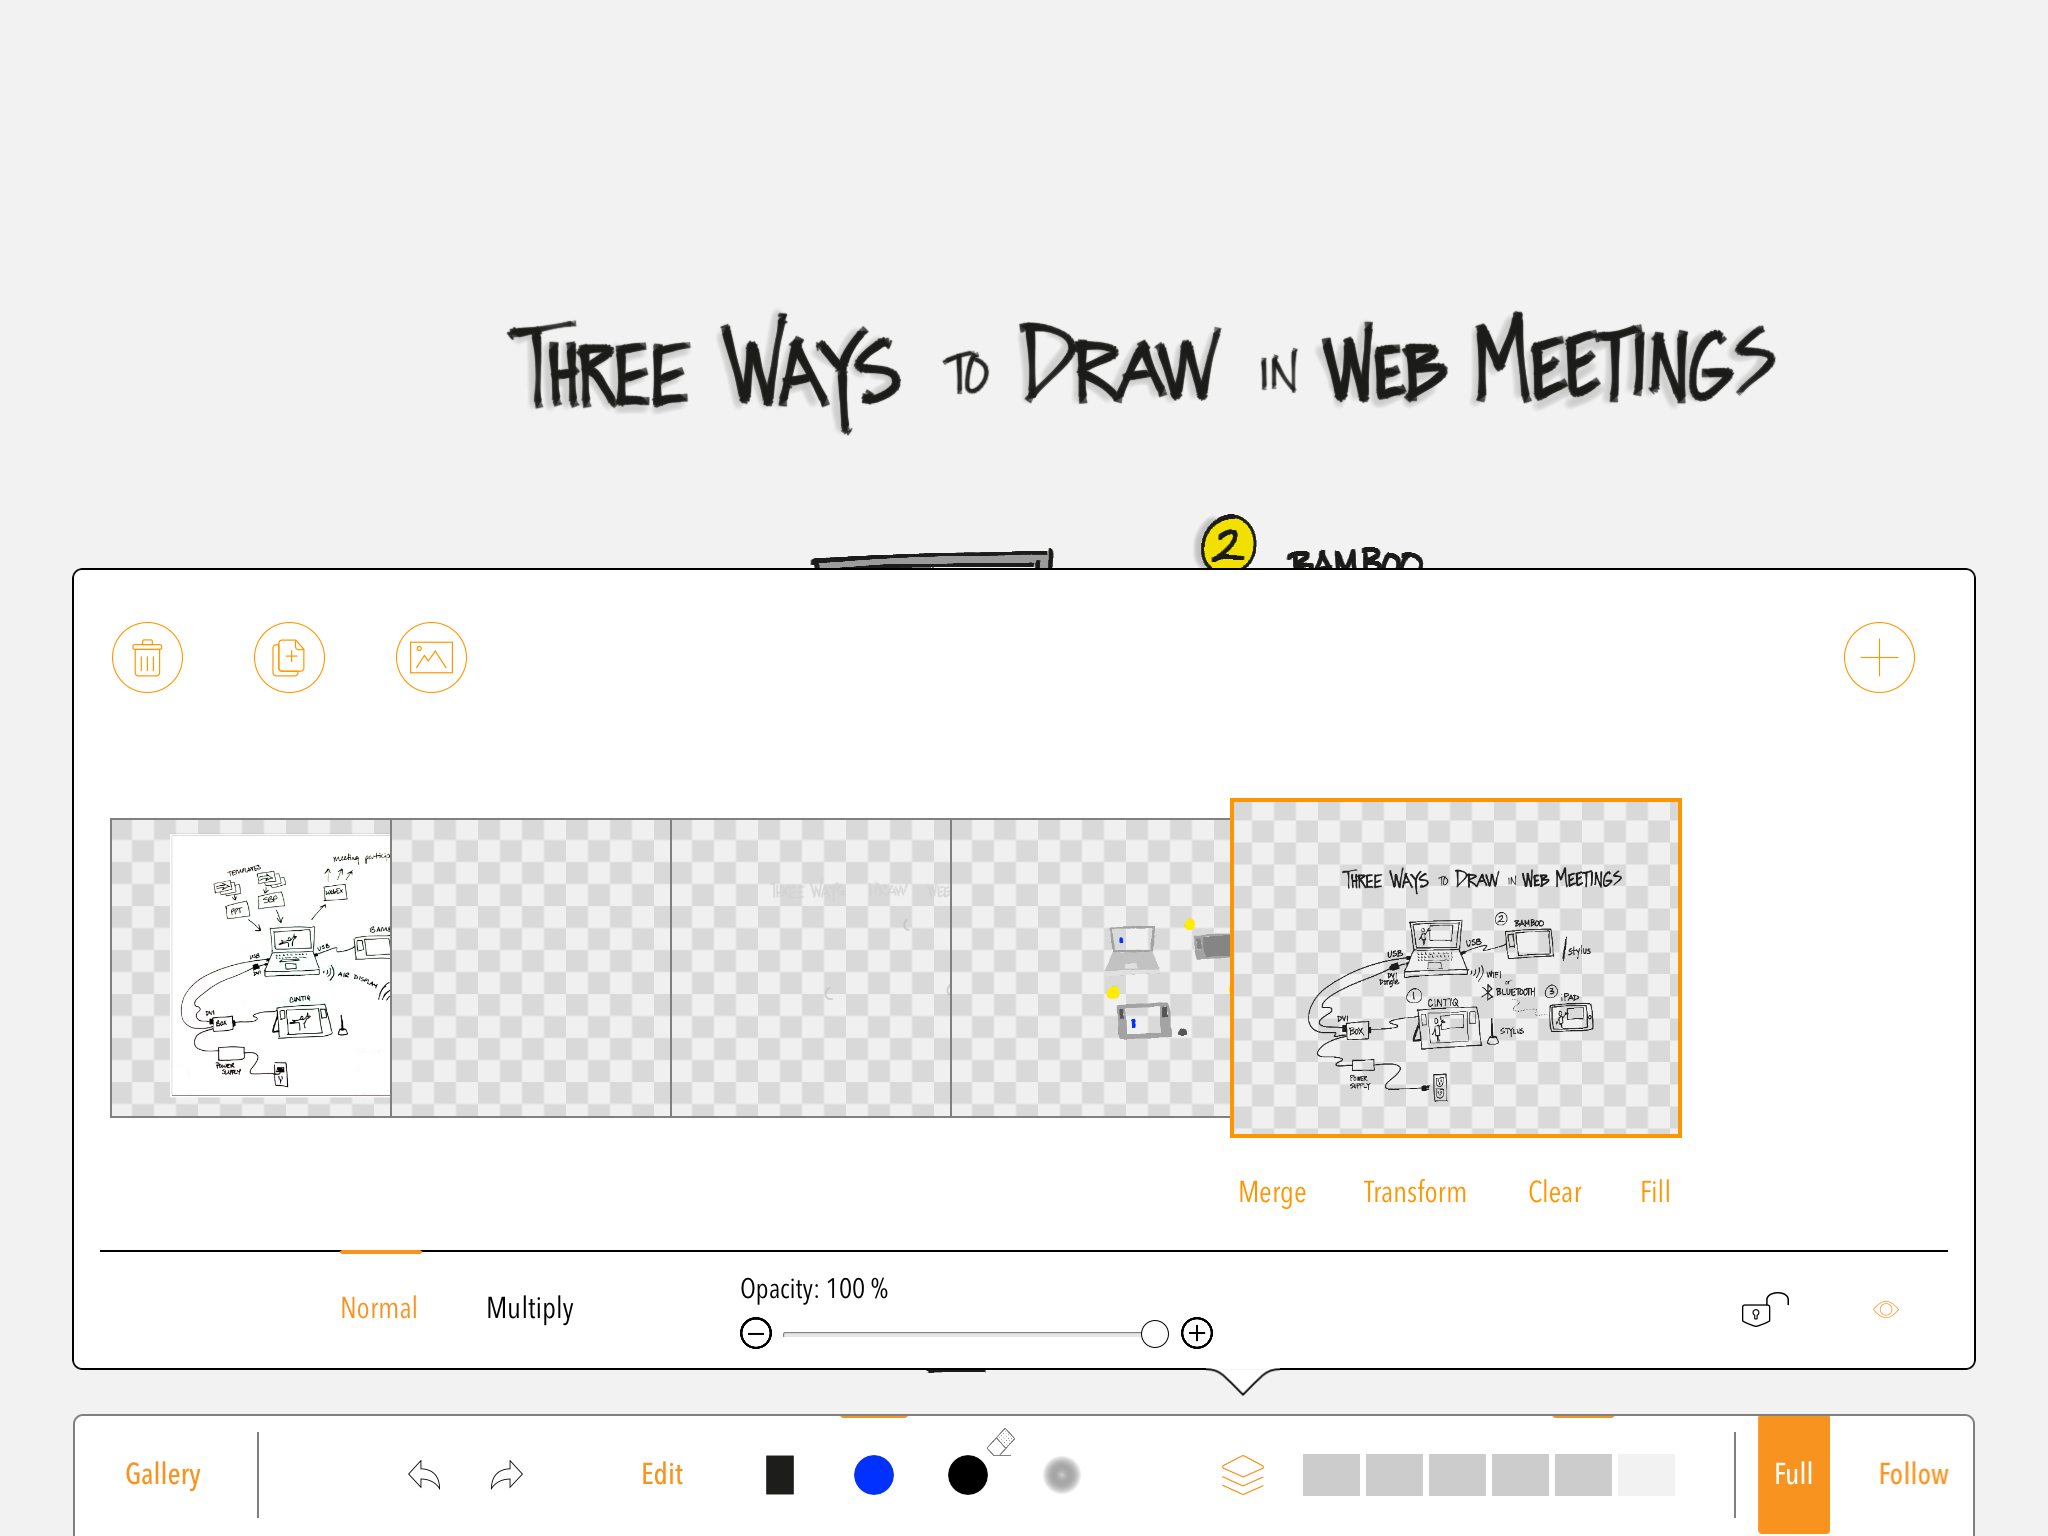
Open a new drawing in WorkVisual and set up your layers.
Create 3 layers and don’t reorder them. This is very important. Because of a bug in the Exporter, the movie will show layers in the order they were created, so if you reorder them, your movie will not look right.
Import a picture if you are tracing. It gets placed on a new top layer. Drag it to the bottom. Because of a bug that this time works in our favor, the imported picture will be invisible to the Exporter, so it doesn’t matter that you reorder this one layer.
Set opacity on the picture layer down low enough that you can see it but it won’t get in your way. (Ignore this step if you didn’t import a picture.)
What the layers look like when the drawing is finished.
Start to draw or write.
Use the top layer for your outlines, text, and other top-level content.
Use the second layer down to color in shapes you have drawn.
Use the third layer down to add shadows or airbrushing under the colors and shapes.
Detail of the drawing. The outlines are on the top layer, the colors on the next one down, and the shadows on the one under that. The bottom layer is the tracing (set to 0% opacity and invisible at the moment) and the other one is a rogue layer that sneaked in there.
When you’re done, go back to the Gallery to send yourself the file you need.
Tap the Share button.
Choose Export for Mac Tool.
Mail it to yourself (mail needs to be set up on your iPad and you need a wifi or cell connection.)
Gallery and share button.
B. THE HARD PART: Creating the Video File on the Computer
There are four main steps: Install the WorkVisual Exporter; install or identify a program to handle your image sequence; export your image sequence; turn the image sequence into a video file.
Step 1. Install the WorkVisual Exporter.
Download the WorkVisual Exporter in exchange for leaving your email address for update notifications.
While you’re there, you may wish to look through the workflow description on the same page. It’ll help the rest of this post make more sense.
The download link gets emailed to you, so check your email, click the link, and save the file where you can find it again.
Go find the file and double-click to open it. It’s a .zip file, so this will unzip the Exporter.
Double-click the Exporter to launch it. If your computer asks you if you really want to open it, search your soul and do as your conscience dictates. If you decide not to open it, you’re done but you can’t make a movie. Otherwise, read on.
If you wish, you can drag the application icon to your Dock, or place it in your Applications folder so you can find it again later.
Step 2. Install (or identify) a program to handle your image sequence.
Leave the Exporter alone for a moment while you get the second piece of software you need: the one that will turn the image sequence into a movie. There are a lot of choices for how to do this, ranging from free to expensive.
Things to know:
Beware of the free tools you might find by doing a web search. Image and video converters are notorious for containing malware. Not all free tools do, but use common sense when making your selection, and do a search on the name of the tool to find reviews and comments.
Photoshop can apparently convert images into video, but each frame becomes a new layer. The Exporter generates a LOT of frames. I don’t know how many layers Photoshop can handle before it goes nuts, but I’d be careful.
Adobe Media Encoder can also do this, although I found it frustrating when I tried it and eventually went with QuickTime Pro 7.
I gather that Adobe After Effects can also do it, though I don’t know how to use it.
It’s possible that Final Cut Pro X does it, which would save a step, but I haven’t figured it out yet. Final Cut Pro 7 used to do it but that was a while ago.
Most tools want you to only open the first image in the sequence. Don’t select and open all of the images, or it won’t work.
I chose to use QuickTime Pro 7, which is very old but still available and still functional. Please note that although QuickTime is built into OS X, the function that we need isn’t. You can have QuickTime 7 installed right along with the one that comes with OS X. If you don’t have QuickTime Pro already, you can buy it for $30.
Installing QuickTime Pro:
Check your Utilities folder to see if you already have QuickTime Player 7. (Look in Macintosh HD > Applications > Utilities).
If you don’t have QuickTime Player 7, you can download it here (free and necessary in order to upgrade to Pro).
Double click the download file and follow the instructions to install it.
Once you have QuickTime Player 7, open it by double-clicking it.
If you already had QuickTime Player 7, check to see if you have the Pro version by choosing Registration from the QuickTime Player 7 menu (upper left, next to the Apple menu). If you see a code in the box, you are good to go. No code? Just installed it? Read on.
If you need to get QuickTime Pro, you can buy it here.
If you prefer to explore other options, try searching on ‘convert image sequence to video’ or look at the article Convert an Image Sequence to a Movie by Andrew Noske.
Step 3. Export Your Image Sequence.
Now you’re set up, and you don’t have to do Steps 1 and 2 again for your next movie. From here down is the repeatable part.
Go back to your email and look for the one you sent yourself with the drawing file attached.
Download the attachment and save it in a new folder somewhere. Don’t skip the step of making a folder. You can thank me later. Also, don’t change the .workvisual part of the filename. You can change everything before the dot if you want.
Go back to the WorkVisual Exporter that we launched and left running while we installed QuickTime Pro 7.
Go to the File menu > Open, and navigate to the file you just downloaded. Open it.
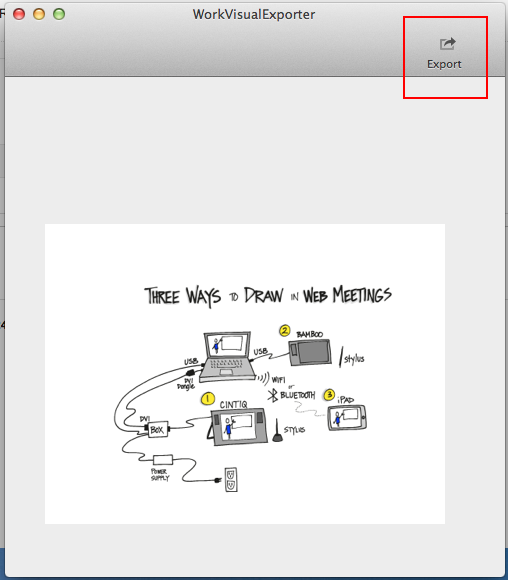
The image shows up in your WorkVisual Exporter window.
My drawing in the Exporter window. The Export button is highlighted.
To export the image sequence, click the Export button in the top right of the Exporter window.
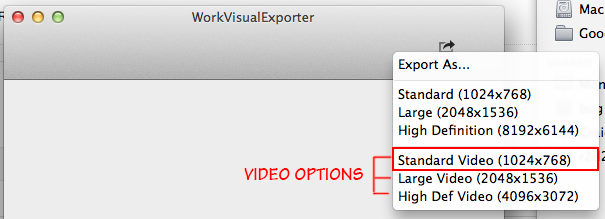
Video export options. Use the Standard one.
The top three options will export a nice JPG for you, but that’s not what we want.
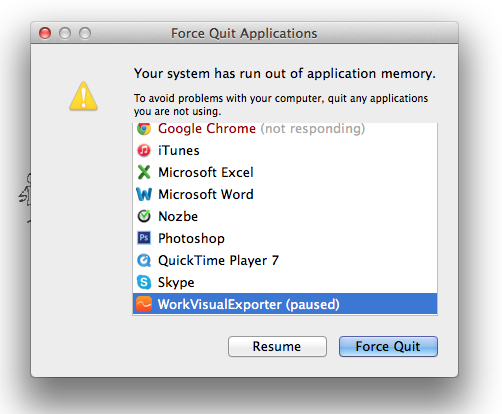
The bottom three options export the image sequence for video. That’s what we want. Pick the standard definition. NOTE: Your computer can run out of application memory and crash if you use the large or high-def settings. Even a nice, new computer. USE WITH CAUTION. This is a bug and they’re working on it.
This is what you’ll see if you run out of application memory. Force quit the Exporter, shut everything else down normally, and reboot.
Make another new folder inside the other one and name it Image Sequence or something equally memorable. You want all your images to go into one folder that has nothing else in it.
Save the file with whatever name you want but MAKE SURE YOU ADD .jpg to the end of the name. If you skip that, this will not work.
You’ll see a “Saving Image” progress bar. Let it do its thing, go get some coffee, whatever. It’s best if you don’t try to do anything else with your machine while it’s exporting.
There it goes! Don’t mess with it. Just walk away.
When you get back, there will be a bunch of .jpgs in the new folder, all neatly numbered in order. Don’t change the filenames.
It’s useful to export a still frame at the same size as your video, so go ahead and do that now using the first Standard setting. Remember to add .jpg to your filename. You’ll use this still frame in your video editor, adding it at the end of the video so that you have a nice hold for a few seconds when the drawing is done.
Choose the same size for the image as you did for the video.
Step 4. Turn the Image Sequence into a Video File.
To do this, we’ll use QuickTime Player 7 (even though we upgraded it to Pro, it’s still helpfully called Player). We just need to tell it which image to start with and what settings we want. If you chose a tool other than QuickTime Pro 7, you’re on your own here, but the process should be generally the same.
Switch to QuickTime Player 7, or launch it if it isn’t open.
Ignore the default window or close it if it’s in your way. Go to File menu > Open Image Sequence… and select the first image in your folder.
Only select the first image, not all of them.
Set your frame rate. I used 30, which is a standard frame rate. (24 and 29.97 are good too.) If you want to learn more, read this article on frame rate or play with this demo.
Click OK, then wait a bit while nothing appears to happen. After a moment, your video will open. It’ll look like a blank white screen. Click the Play button at the bottom of the window to preview your video. You’ll notice it’s pretty slow. You can fix this in your video editing program later.
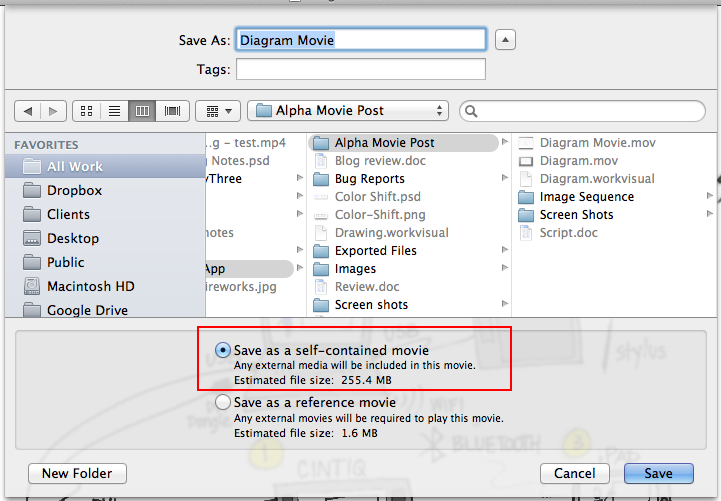
Save the file as a self-contained movie and you are good to go. Ta da!
Choose self-contained movie.
If you want to fiddle with settings, you can choose File > Export… and play with different formats and different options for each one. The Save method described here results in a pretty large file size but you will get good quality.
The Other Part: Making a Whole Movie
I’m not going to cover this in detail because there are lots of great tutorials out there for making movies (one of my favorites is Izzy’s Final Cut Pro tutorial series).
Open your favorite video editing program (I use Final Cut Pro X, but iMovie, Premiere, or any other program will work too).
Import the video file and the still frame you created in the previous step.
Add audio, a soundtrack, still images, or whatever else you wish.
Adjust the timing so it’s faster or slower or whatever you need.
Place the still frame at the end of the drawing sequence to give people a moment to absorb the finished drawing.
Render it out and there you go!
If you try this process and discover something new, or if your experience with it is different, please share what you found!
Update, Feb. 2020: Voicemap is no longer available.
I’ve been playing with Voicemap, an online tool for adding audio and zooming points of interest to an image (like sketchnotes or a graphic recording). It hasn’t been easy. The instructions on the site aren’t very clear, and a lot of mistakes can’t be fixed without starting over. But I have finally completed my proof-of-concept Voicemap: An annotated review of visual notes I took during Doug Thomas’ TEDxUFM talk, “A New Culture of Learning” (link goes to the actual TEDxUFM talk).
(Voicemap no longer available)
Voicemap of my visual summary of “A New Culture of Learning” by Doug Thomas
Reflections
I really like Voicemap for the way it pairs audio with visual notes. Seems like it would be a great way to create a summary after a meeting: Upload the notes, then walk through them with a narration of the meeting’s highlights. Unlike the RSAnimate-style sketch movies, you don’t see the drawings being created in a Voicemap video — it starts with the image already finished — so it’s great for graphic recordings created during an event.
There are a few drawbacks. It looks like you have to publish the piece on Voicemap’s website, which means I can’t use it for many of my clients (too public). The format is better suited for pre-planned visual notes, or notes that are created after hearing the audio, so that you can walk through the image in a logical way. You’ll notice that I skipped around the page, following the flow of the talk rather than the visual structure on the page. That’s because I skipped around the page while creating the notes. Voicemap works better if you have a cleaner visual path to follow.
The most annoying thing is that the aspect ratio of the video when you edit it is different from the one you see when you view it (the editing one is 4×3, but the published one is closer to letterbox). The default embed code is also weird: it gives you a 640 x 640 viewer, which means your careful centering is shifted and everything is cut off on the right, with too much space on the left. The viewer above is actually cut off on the right side. If you want to see it more or less as it was meant to be viewed, try it on the Voicemap site.
Update: Voicemap contacted me and pointed out that I can change the width measurement to 640, which I did. This fixed the embedded display issue. To be fair, I did try that. I just changed it in the wrong place. Doh.
How You Do It
First, you start a project by entering some information about it (title, abstract, script, and so on). You can upload an audio file at this point also, although I had a great deal of trouble with that step. I tried several different formats (WAV, AIFF, MP3) and two different lengths (2:56 and 3:41). Eventually, the audio did load, but it took days in one case, and four or five upload attempts in another.
Once you get past that step, you can add a sketchnote image and set zoom points (points of interest, POI) that are timed to the audio track. You do this by listening to the track, pausing when you want to set a POI, then setting it and continuing. It really helps to have uploaded the script before you do this so that you can scroll through the script while you listen. When I did it that way, I found I could time the POI swaps better.
When everything is to your liking, you click Publish. From what I saw, publishing happens instantly.
Other Uses of Voicemap
It looks like graphic recorders can sign up with Voicemap, take a test, and become certified to do sketchnotes for audio clips that Voicemap sends them. Voicemap clients, then, can send in a script or audio clip and request a corresponding sketchnote video. The graphic recorders don’t get paid very much, but if you have an iPad or tablet, it looks like you could pick up a couple extra bucks illustrating Voicemap clips. I’m not sure how busy the service is yet.
… but I just can’t. I *like* Sparkol’s VideoScribe, but I don’t *love* it. But that doesn’t mean it’s not lovable. I know people who have done very cool things with it, like Chipp Walters’ overview of Agilix xLi, along with many other examples — see the Sparkol YouTube channel for lots more. And I do think the “behind glass” hand is pretty neat.
I’ve only used the free trial versions (desktop and iPad app), so it’s also possible that the paid version is a whole different animal. I made a silly little movie about the beginning of the book Watership Down by Richard Adams, because I’m in the middle of reading that with my son and it’s on my mind. It took about 45 minutes to create this, starting from not really knowing how to use VideoScribe at all. If I were to make something similar now it would only take about 15 minutes. The learning curve isn’t bad at all.
Here’s my take on it:
When I compare it to my current workflow for creating this kind of movie, I find VideoScribe to be limiting. I’m used to being able to create images from scratch and control how they appear. I did create my own drawing in Illustrator (the image of the downs in the sample movie here), but as you can see, it didn’t come out quite the way I wanted it to in the video. I used the brush pen in Illustrator to get a brushy line quality, but in the movie you see the outline of each stroke and then all the strokes fill in at the end, so it looks odd.
I also wanted to add audio effects at different places in the movie, and I could not figure out how to do this. When I recorded an audio effect as a voiceover (just myself saying “Ta-da!”), it played at the very beginning, and I didn’t see a way to shift it to the point where I wanted it to be. It may be that there is a way to do it and I couldn’t find it, or it may be that this is only something you can do in the full-price version. Or it may not be possible at all.
However, it’s much less complicated to create a movie using VideoScribe than it is to do it the way I currently do it (with Brushes 1 and Final Cut Pro X). VideoScribe also has an advantage over Brushes 1 in that you can actually obtain it, which is significant for folks who are just starting out (the original Brushes is no longer available on the App Store, and the new one doesn’t let you work with the movie files in the same way). VideoScribe’s library of imagery seems to be extensive and can be supplemented by custom material, and it’s nice to have all the parts in one place: images, soundtrack, voiceover, and output. I use four different applications or services to achieve the same end.
Is VideoScribe right for you? Well, if you are looking for a relatively easy way to get into creating this kind of movie, and you don’t need an OCD-level of control over the output, and you’re willing to put in some time to learn the ins and outs of its unique user interface, then it might be. It’s certainly less complicated than working with a video crew — you can sit down and work on it any time, without reference to other people’s schedules, and you don’t need special lighting or space. The results are definitely polished enough to use for client work. It’s much easier to learn to use than Final Cut Pro X or even iMovie, and there are fewer moving parts to worry about. If you do decide to try it out, be aware that there’s a 7-day free trial. Don’t start until you have some time to devote to it, so you can give it a fair shot. I’d be curious to learn what you think if you try it.