Author Archives: ninmah

Two Apps to Watch: bContext and Underlay Stripper

Well, one app, and one tool that makes another app work better:

bContext

bContext is an iPad app that lets you record drawings and annotate them with audio. Thanks to some embedded editing tools, you can import images and draw over them, record yourself talking about what you are drawing, and create a video of the whole process. The drawing tools are not quite ready for the kind of detailed work I tend to do on my iPad — yet — but I have high hopes that they will be.

I had the pleasure of meeting bContext’s co-founders, CEO Massimo Scapini and CTO Felipe Saint-Jean, a couple of weeks ago when they were in town for TechCrunch’s Disrupt SF 2012 conference, and they gave me a tour of some of the new features that are coming up. I also got to put a in good word for some of my favorite wishlist features. This is definitely an app to keep your eye on!

Underlay Stripper

Underlay Stripper is a tool created by Altuit that runs on the computer (it’s not an iPad app) and works with the Brushes iPad app. I don’t believe it has been released yet, but I was able to beta test it and I am hooked. It lets you remove a layer from a Brushes drawing so that it doesn’t appear in the final image and video. This may not sound like a lot, but if you do iPad movies with Brushes, it’s huge: you can drop your sketch into the bottom layer, draw the movie on top of it, and then strip the sketch out so it doesn’t show in the final video. Fabulous!

I’ve used the beta extensively, and it’s reliable and simple to use. Keep your eye open for the official release — it’s a tool worth having.

Cleaning Chart Images with ScanScribe

The instructions below come from David Sibbet of The Grove and were updated by Cynthia Derosier of Good Juju. I’ve just edited them a little and am reposting them for convenience. If you’re looking for another method of cleaning chart images, I have previously posted instructions for cleaning chart images with Photoshop

Cleaning Up Your Charts

Once you’ve taken photos of your charts, you can run them through a program called ScanScribe to drop out the shadows and the gray or yellowish background that results from photographing paper charts. It’s quick and easy, once you get ScanScribe set up. It’s not like most applications — it’s really a script, so you have to be prepared to fiddle a little bit, but once it’s working it’s a great tool for the job. Like David, I haven’t used it’s other features, but I know it’s capable of more than just whitening images. ScanScribe is available for Mac and Windows platforms.

David Sibbet says, “The best program [for cleaning chart images] is still ScanScribe, a never-released piece of software from Xerox [now Parc]. The interface isn’t very intuitive, but it does a great job keeping your yellows intact. You can change the exposure settings: 4 or 7 seem to work best. You can also correct for keystoning under the edit function. TIFF files work best. These are the only functions I’ve ever used and it seems to work very well.”

Using ScanScribe

  1. Download ScanScribe from the Parc site: http://www2.parc.com/isl/groups/pda/scanscribe/
  2. Save it to a spot on your computer where you will be able to find it (perhaps make a ScanScribe folder inside your Applications or Programs folder).
  3. Double click on the Scan app. This will launch a terminal program that then opens the software, so don’t be alarmed when the new program opens.
  4. Under EXECUTION, open “SCANSCRIBE.” 
  5. Go to “Options” set your Automatic FB/BG Color Processing on Image Load/ background sensitivity to 4 (or 7 — you can experiment).
  6. Under FILE open the folder where you have your chart pictures. It doesn’t have menus that open automatically so you have to go through each click manually.
  7. Open your file. It may take a little while to process, during which time it can look like nothing is happening. After a bit, your photo should open. When it opens, the photo will be magically whitened! (If not, see the notes below).
  8. To adjust for keystoning, go to Edit/Keystone Unwarp. This gives you a box that you can change by using your cursor on the corners. Drag corners to where you want them to be on the photos. Then click the button in the window frame that says “run Keystone” and the picture will unwarp.
  9. Save As a TIFF file if possible, or a JPG if you can’t work with TIFFs.

Notes

Cynthia reports that she had a very large TIFF file and had to reduce its file size in order for the program to work. If you load the photo and have done all the steps correctly but still see no change, you may need to reduce the file size. Cynthia noticed that the script at the bottom indicated the computer was out of memory for a TIFF file, but did not run out of memory for a JPG of the same size.

I have noticed that ScanScribe can have difficulty opening files if they are too deep in my computer’s file system — that is, if they are inside a lot of nested folders. I think this is because all the folder names get added to the path name for the image, and perhaps the long path name exceeds some limitation in ScanScribe, but that’s just a guess. To get around the issue, I created a folder inside my Pictures folder called “For ScanScribe,” and I just drop all the photos in there that I want to clean up. ScanScribe remembers the last folder it opened images from, so this is a handy way to avoid having to click through your folders to find your images. I just save the edited versions right back into that same folder, and then move everything to where I actually want it when I’m done to keep the folder clean.

If you have additional questions, please check the ScanScribe discussion forum


Cleaning Chart Images in Photoshop

Update, Feb. 2020: This was originally posted on my first (and now defunct) blog, Ninmah Meets World. Unfortunately, I only posted part of it here before removing the original post. At some point I’ll rewrite it with current instructions. If you are looking for it, drop me a line (rachel at digitalfacilitation dot net) to let me know and I’ll push it up the priority list.

I get asked a lot how to clean up chart pictures in Photoshop, so this post is probably way overdue. I learned this process from David Sibbet and I’m just passing it along. There are lots of other ways to do this; this is just one method, and it happens to use Photoshop. Some of the other ways are faster, and some maybe give better results, but they mostly involve esoteric software that nobody owns. Click any image for a larger view.

The Goal
The idea here is to take those dark, uneven photos of charts taken right after they’ve been drawn…

(the original photo was here)

… and turn them into clean, bright images that look good on the computer and reproduce cleanly in print. (Okay, this one isn’t the best example, but it’ll do to illustrate the process.)

(the final photo was here)

(The rest of the post was on Ninmah Meets World)

Another paintbrush for the iPad

I haven’t tried it, but Sensu’s new brush looks like a delicious option for painterly work on the iPad. It converts from a paintbrush to a stylus, and the bristles look very well-shaped. Anyone tried one?

image of the brush's features

Features of the Sensu Brush

The (oooh, aaah) Sensu Brush

The video of my TEDxUFM talk ‘Drawing in Class’ is up!

The wonderful folks at UFM have begun putting videos of the TEDx talks from August 18 up on YouTube, and mine is one of them! They did a fantastic job with the editing. Take a look:

Other talks from this year are being added as they are ready. You can see Rocío Pinto’s La vida no es un algoritmo now (it’s in Spanish, but you can turn on subtitles).

Last week, I gave a TEDx talk in Guatemala…

… and it was an awesome experience!

The event was TEDxUFM at the Universidad Francisco Marroquin in Guatemala City. The theme was to explore education and the new culture of learning, especially as it involves play, questioning, and imagination. I am over-the-moon thrilled that I had the opportunity to participate in a TEDx event, especially this one, as the topic is close to my heart. The organizers and staff who put on TEDxUFM 2012 did a fantastic job — just look at this year’s lineup of speakers!

It was an honor to be speaking alongside USC’s Douglas Thomas (co-author of A New Culture of Learning) and Khan Academy developer David Hu, as well as the spectacular group of speakers and performers from Guatemala.

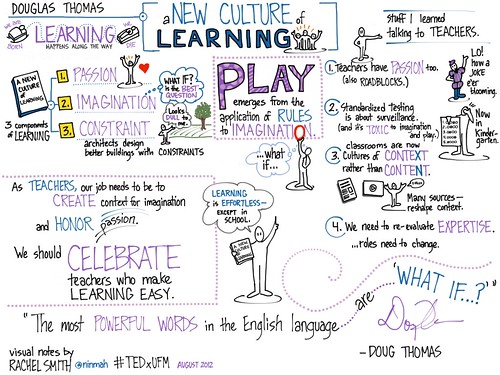
My visual notes of @douglast's talk at #TEDxUFM last Saturday

My visual notes of Doug Thomas’ TED talk, TEDxUFM, August 19 2012

More of my visual notes are coming soon to Flickr… I have to finish them! Following my own advice, I got the key points down and left spaces for embellishments to be added later. TED talks go by fast, and almost all the points are key!

My talk, Drawing in Class, explored visual note taking — particularly the role of personal visual note taking for students. The video will be up in four to six weeks, but here is the full slide set (with notes), posted on Slideshare:

Related Materials and Links:

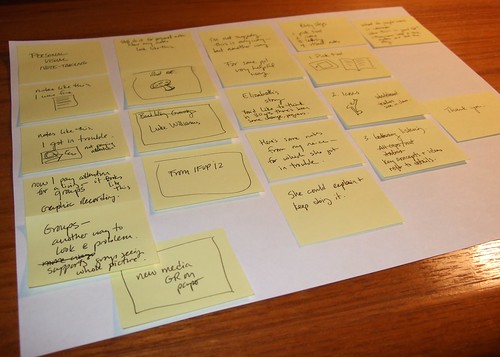
While I was preparing for the talk, I found Nancy Duarte’s 10 Ways to Prepare for a TED-Format Talk to be a wonderful resource. I started with the sticky note tip and wrote each example or point on a note. Then I moved them around until I was happy with them, trimming and re-ordering until I liked the story.

Using sticky notes to plan my presentation

Preparing for my talk using Nancy Duarte’s advice

Her suggestions helped me to focus on the “why,” and the advice about rehearsing with the clock first running up and then running down was invaluable.

I found this page after I had already given the talk, but if a TED-format talk is in your future, you might want to take a look: How to “Do” a TED Talk from Teaching with TED.

The whole experience was incredibly cool, but I think my favorite part was being called a conferencista. How fantastic is that?

UPDATED 24 August — added more related links.
UPDATED 29 February 2020 — added notes to links that are no longer available.

precision lettering in iPad drawing apps

I received a question today that many people have asked me: How do I make my lettering so neat and precise when I’m using drawing apps on the iPad? I’ve been asked if it’s a font, or if I use a special stylus or some other trick. Here’s my (perhaps disappointingly simple) answer.

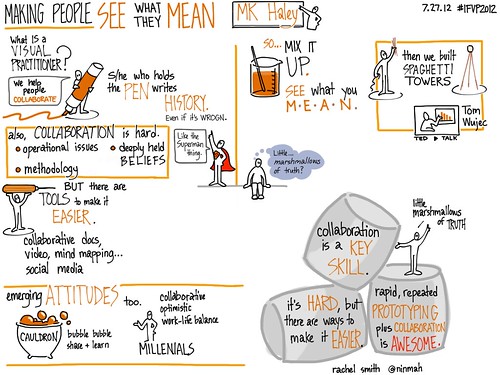
My iPad notes of MK Haley's keynote at #IFVP2012

A recent piece. I’m still working on my lettering, by the way. Always.

I don’t use a stylus; I just use my finger. I zoom way way in so that I can only see a few words at a time, and then I scoot along as I write. The precise lettering is mostly due to practice — if you look at some of the earliest work I did, you’ll see that I’ve come a long way 🙂

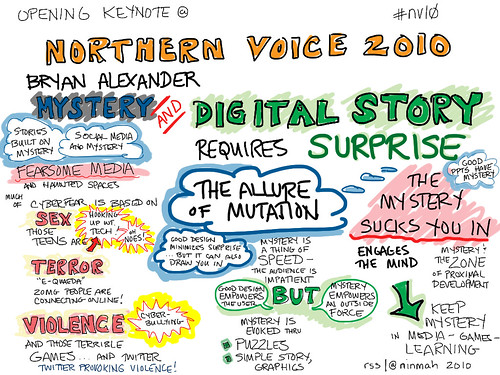
Bryan Alexander's Keynote

The very first iPad graphic recording I ever did – May 8, 2010. For reference, the iPad I was using (wifi + 3G) became available on April 30, 2010 — about a week earlier. I leapt right in.

One trick I can share is to line up the baseline of whatever you’re writing so that it’s a little bit above the app border on the iPad. For instance, if you zoom way in, you can move the page around to put the words about half an inch above the bottom edge of the app, which of course is straight. Then use that as a guide while you write. In Brushes, you’d do this by using the two-finger-spread to zoom in, then use two fingers to move the page around until your text was just above the toolbar (or the bottom of the app if you’ve hidden the toolbar). Write a bit, use two fingers to move the page sideways, and continue.

zooming in with Brushes

Zooming in and lining up the baseline of text in Brushes.

That’s the main reason I don’t use a stylus, by the way — I’m always zooming and moving the screen, and if I had to hold a stylus while I did it, it would take way too long.

Happy zooming!


A Counterintuitive Approach to Structuring Virtual Meetings – from Guided Insights

This article by Nancy Settle-Murphy and Rick Lent includes excellent tips for structuring virtual meetings to be successful.

Excerpt:

Structuring Successful Virtual Meetings: 

A Counterintuitive Approach

Wouldn’t it be great if all we had to do to run a great virtual meeting is to use the exact same structures and techniques that we use for face-to-face (FTF) meetings? Great for the meeting leader, maybe, but not so great for the meeting participants who have to muster every ounce of energy to just pretend they’re engaged.

Sadly, many people run their virtual meetings pretty much the same way they run their face-to-face meetings, which truth be told, aren’t all that engaging to begin with. After all, it takes a lot less time to simply ignore the unique challenges and opportunities of virtual meetings–such the inability to read nonverbal cues, the tendency to multitask, and the imperative to keep virtual meetings exceptionally focused and brief–than it does to accommodate them.


Read the full article at guidedinsights.com

Doing the Gmail Two-Step

Some friends have been asking about two-step verification for Gmail accounts. Should we do it? How does one go about it? What behavioral changes will we have to put up with afterward?

The answer to the first question is yes, Ruthie, yes. Read on for answers to the other two. First, though, if you’re imagining that this is a funky new dance step, you need a little background information. Go read Matt Honan’s story. This is what we’re preventing with this precautionary measure. I’m not a fear-monger, but it could happen to you, too. Go read it. I’ll wait.

Back? Great. Now, go watch this Google video explaining two-step verification. Don’t follow the directions yet — just watch it and come on back here, and I’ll walk you through it. Take your time.

All done? Okay.

Two-step verification, then, pairs a password with a unique numeric code that exists in another physical location (the phone or mobile device, or the printed list of codes). In order to log in to Gmail once two-step verification is enabled, you need both of these pieces of information. Banks commonly use this system to verify their customers. World of Warcraft also provides an authentication option that works the same way — you need both a password and a unique code that gets generated when you want to log in. The idea is that even if your password is hacked or guessed, someone still can’t get into your Gmail account without having that code also.

Google will ask you to enter this code every 30 days on a trusted computer (if you switch browsers on the same computer, or clear your cookies, Google will ask for the code again). You can also choose not to have a given computer be “trusted,” and Google will ask for your code every time you log in.

Note that if you are using Google apps, and not a regular Gmail account, you can’t use two-step verification until your site admin enables it for the site. If you follow the steps below and get stuck in the middle of Step 1 because you don’t see “2-step verification,” this is the case for you. Contact your site admin to see about getting it enabled.
Two Foot

Two Foot by Jack Keene. Creative Commons.

So, how does one go about it? 

Let’s get started.

1. Gather what you need.

Setting this up properly will take 15 to 30 minutes, and you don’t want to get interrupted in the middle, so make sure you have enough time before you start. Grab your mobile device(s), including phones and iPads. A printer is handy but not absolutely necessary. You’ll do most of the work on your main computer. If you use more than one computer to access your Gmail account (a laptop and a desktop, or a work computer and a home computer), you’ll need to do some of the steps on each one, but you can start with just one for now.

Ready? Let’s go through the process. First, we’ll enable 2-step verification. We’ll set up apps and devices, and then set up backup options for our account.

Start by logging in to Gmail as you normally would, on your computer (not on a mobile device).

2. Enable 2-step verification for your Gmail account.

In Gmail on the computer, click on your name and the plus sign at the upper left of the screen (for example, mine says “Rachel+”). This takes you to your Google+ profile. Click the gear icon in the top right and choose Settings from the drop down menu.

If you haven’t set up Google+, you can get to your profile by clicking your email address in the top right and then clicking “Account.”

Click Security on the left.

See where it says “2-step verification”? Click “Edit” to bring up the setup wizard.

Step through the wizard and have it send a code to your phone. Look at your phone for the text message (or voice message, if you prefer) from Google. Then enter that code on the computer screen. Ta da! Google takes you to a new screen. Stay there for the next step.

3. Enable access from mobile devices.

Here’s the tricky bit: some things that you have already set up to access Google can’t do the two-step, so you have to set up special passwords for those things. You’ll do that next (do it now, even though Google gives you the option to do it later). This includes email programs on your phone, email clients like Outlook and Thunderbird, calendar clients, chat clients, and so on. Read on.

The top of the screen you are looking at lists things that you have connected to your Google account. Take a moment to look over the list of stuff that has permission to access your Google account (or that you opted to sign in to using your Google ID), and revoke access for anything you’re not still using. You can leave the rest alone. Now, look at the lower half of the screen for the next part.

You’ll need to generate bizarre application-specific passwords for all the places that you access Google other than your computer. For instance, if you use the mail program on your iPhone or iPad to get your Gmail, you need to make a special password for those devices. Google makes this very friendly and easy, and you don’t need to make up the passwords yourself or remember them after you type them in once. Before you start, go get your iPhone, Android phone, Blackberry, iPad, or whatever other devices you want to set up, and have them handy. You’ll need them.

Got everything handy? Now, look back at the bottom half of the computer screen. (If you wandered off to collect your devices, Google may ask you to log back in when you try to do the next step. Just enter your email and password as usual and you’ll be right back on track.) In the list on the bottom of the screen, you’ll see a text box and a button.

For each device, type a descriptive name in the text box so you know what it is later (like “Gmail on my iPhone” — spaces, caps, whatever you like is OK) and then click “Generate Password.” Now leave your computer alone for a minute and pick up the device — let’s say it’s your iPhone. Open the settings app on the iPhone. Click the “Mail, Contacts, Calendars” item in the settings list, and then tap the name of your Gmail account in the list of accounts. Tap again where it says “Account” with your Gmail address. On the device, erase the password that’s in there — that is still your Gmail password, but this device can no longer use it because of the two-step verification process. Now look back at your computer screen, and find the string of characters that Google has generated for you. Type them into the password field on your device. You can omit the spaces if you want. Click Done on the device. The iPhone will verify the information, and when it’s successful, you’ll see a row of checkmarks in all those fields on the iPhone. Click Done again on the device, and your device is set up. Ta da!

To set up the next one, click Done on the computer screen and you’ll get a new text box. You’ll also see that the device that you just set up is listed there now with the name you gave it.

Do the same thing for your iPad and any other physical devices you use to access your Gmail.

4. Enable access from other apps.

Next, we’ll set up other apps besides Mail. Examples of apps you might need to change are Spanning Sync, Google Notifier, Outlook, chat clients like Adium and Google Talk, and so on. These might be apps on
your computer, or they might be on your mobile phone. If you don’t use any of these, you can skip this part. If you try to access something later and it says that your Gmail password isn’t working, come on back and follow these instructions for that app.

In the same place where you set up your iPhone, iPad, Blackberry, or what have you, type in a name for the app you will be authorizing (“Spanning Sync,” for instance). Click “Generate Password.” Leave that screen up, and open the preferences for the app you are changing. Find where you put in the password, erase the password that’s in there, and put in the new weird one that Google has generated for you (spaces optional, again). Click “Done” or “OK” or the moral equivalent both in the app and on the Google screen, and you’re good to go.

4.5 Ack! I came back to do this part later and I can’t find the settings page with the text boxes!

In Gmail, click your name with the plus (“Rachel+” for me) in the upper left. Look on the right for the little gear and click it. Choose Settings from the drop down menu.

If you haven’t set up Google+, you can get to your profile by clicking your email address in the top right and then clicking “Account.”

Click Security in the menu on the left. Click the Edit button next to Authorizing Applications and Sites. Enter your password (your usual Gmail one) if prompted. There you are!

5. More information from your friends at Google.

Now, check your email. Gmail has sent you a helpful message full of useful details. It also contains action items:

1. Set up your backup phone. If your mobile gets lost or stolen, you can use the backup phone to receive a verification code. Click the link in the email, then click “Add a phone number” on the page it takes you to, and enter the backup phone number. If it’s a landline, be sure to select “voice call” and not “SMS/text message” as the delivery method.

2. Print a set of backup codes. Print these out, and even if you’re unable to access either phone, you can still use a verification code to get back into your account. Just carry these with you when you travel. If you don’t have a printer handy, you can save them to a text file and print them later. Follow the directions in the email to get these codes.

3. Optional: set up the Google Authenticator mobile app. If you like, you can get the Google Authenticator app for your mobile that will generate a code you can use, whether or not you have cell service. (This is great if you travel overseas.) If you want to do this, you need to get a free app from the app store and then set up your app using the online instructions. Click the link in the email for the type of mobile you have to get started, then just follow the on-screen instructions. You can configure the app to work with multiple Gmail accounts, if you have more than one.

Save the email from Google for later, just in case.

That’s it! Now your account is protected with two-step verification.

Huh. What behavioral changes will we have to put up with now?

Every 30 days, Google will ask you to log in again. After you enter your password, it will ask for a verification code. You can have that code texted to your mobile, or you can use the Authenticator app to generate one, depending on what option you selected when you set it up. If you change your mind about how to get the code, you can change that in your settings (see “4.5, Ack!” above for how to find your settings).

Something weird happened, or I have more questions.

Google has a great help system that covers 2-step verification.

This post is dedicated to my mom and my sister, with lots of love. Go do it now, guys.

Updated 8/8/12: Added instructions for folks who don’t use Google+.


Quickly share those delicious iPad notes (how-to)

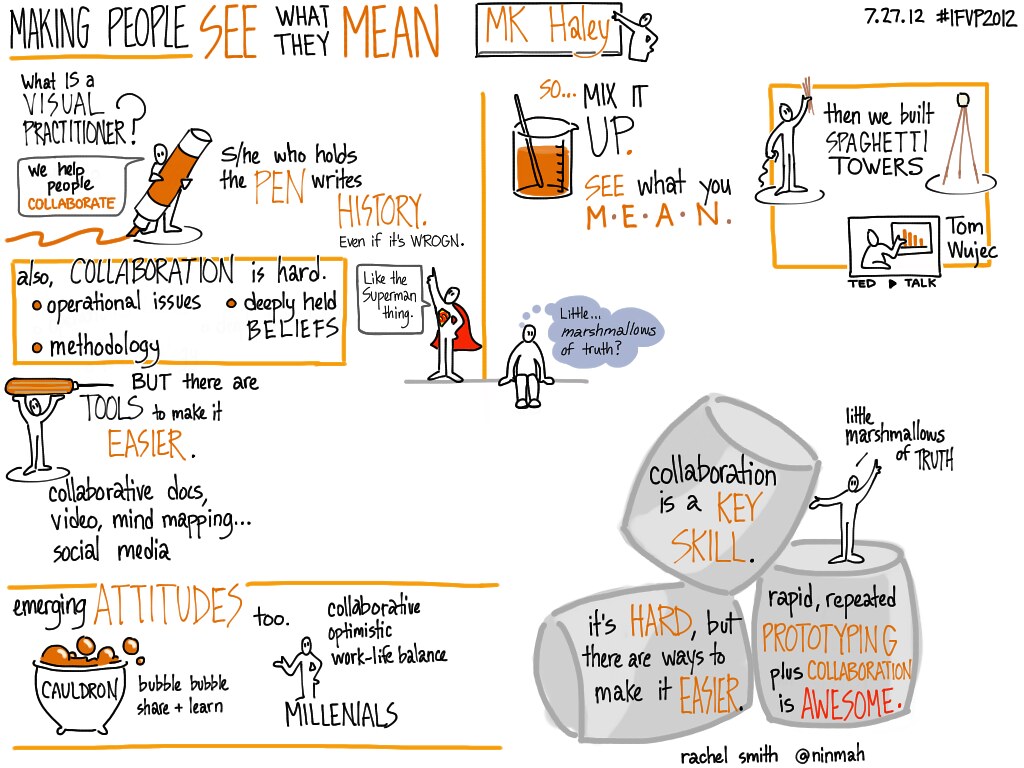
At the 2012 IFVP Conference last week, I took visual notes on my iPad during several sessions. Right after each session — and I mean right after — I posted the image to Flickr and tweeted the link with the conference tag. It took me about 15 seconds to post each one, and I didn’t even have to switch away from my drawing app. Here’s how I did it.

My iPad notes of MK Haley’s keynote at #IFVP2012

What You Need:

  • A Flickr account (I have a Pro account, not sure if you can do this without it, but Flickr’s awesome so you probably can)
  • A Twitter account
  • An iPad that can access the Internet and send email
  • A drawing app on the iPad (Brushes, Sketchbook Pro, whatever)
  • Something that you drew in your drawing app

What To Do:

1. Set up Flickr to do the heavy lifting.

Once you have a Flickr account, you can set it up so that you can email stuff to it and also so that it will tweet for you. To make the magic happen, log in to your Flickr account and go to Account (You menu > Account, or click on your name in the top right). You have two tasks here: To hook up your Twitter account to your Flickr account, and to get the address you will email stuff to.

To connect Twitter and Flickr, click on the Sharing & Extending tab. Click the Twitter icon or link, and then click “Authorize this App.” Follow the on-screen instructions until Flickr tells you it’s all set and you see Twitter in your Sharing list on Flickr with an “Edit” button next to it. (If you are freaked out by this, you can skip this step and do the automatic post-to-Flickr part below, and then just tweet manually.)

To find your special email address for Flickr, click the Emails & Notifications tab in your Flickr account. Scroll down to where it says “Your Flickr2Twitter upload email” and copy that address so you can paste it in a minute. (If you decided not to do the Twitter part, copy the address next to “Your Flickr upload email” instead.)

2. Create a contact with that email address.

Now go to your iPad and open the Contacts app that came with the iPad. Create a new contact (Click the plus sign at the bottom) and call it “Twitter and Flickr” or “Flickr” or something similar. Just make it something you can remember later. Then paste the email address you copied in step 1 into the email field, and save the contact.

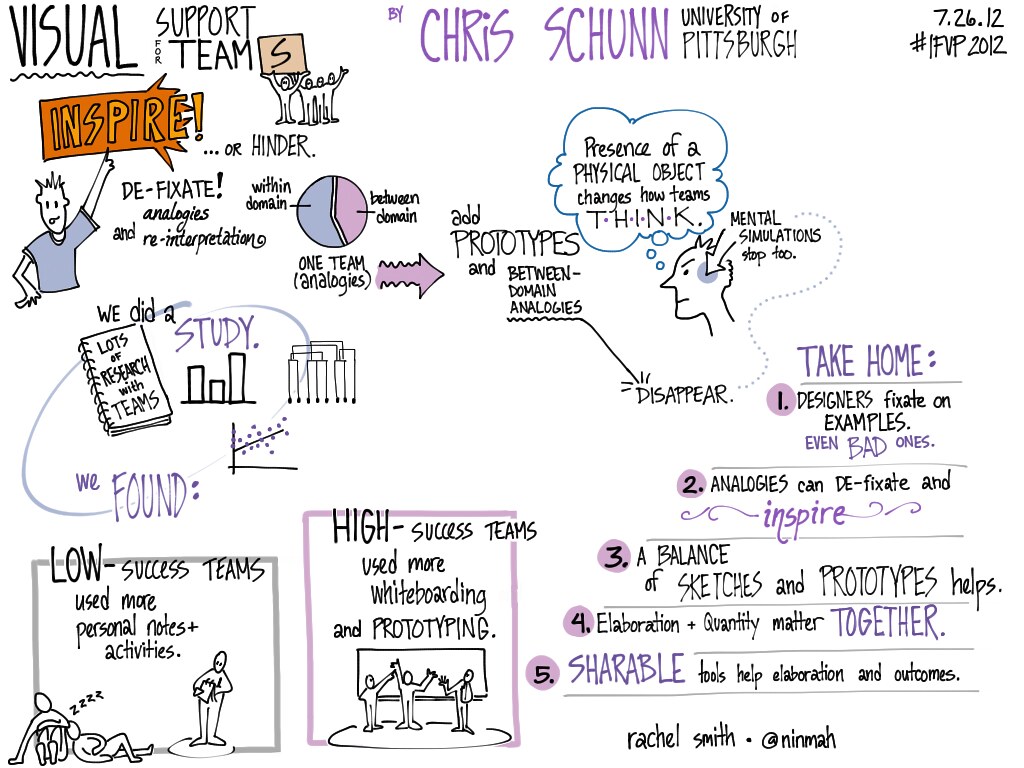
My iPad notes of keynote by @LRDC1’s Chris Schunn at #IFVP2012

3. Find or create a drawing to share.

Open your favorite drawing app and either create a new drawing, or find one that you already did that you want to share. I use Brushes and Sketchbook Pro the most, and for both of these, you want to be in the Gallery, not in edit-image mode. When you are looking at the image you want, tap the Share button (in Sketchbook Pro, this looks like a flower with an arrow; in Brushes, it looks like a rectangle with an arrow). You might have to select the image in the gallery in some apps (like SBP) first. If you’re using a different app, look for a similar icon somewhere. Tap this icon.

4. Email the image, including the right text and tags.

When you tap the icon, you should see an option that says “Mail image” or something similar to that. Tap that, and a blank email appears with the image in it. (In some apps, you might have to choose an orientation for the image, so that it’s not upside down.) Here’s how to fill out the email:

To: Start to type the name of the “contact” you made earlier (Twitter, Flickr, etc) until that weird email address pops in.

Subject: This will become the text of your tweet AND the title of the image on Flickr. If you’re at a gathering, this is the place to include the hashtag (like #IFVP2012) so that it will show up in Twitter searches. It’s also nice to go find the Twitter handle of the speaker and include that, too. That way, the speaker sees your notes later, and sometimes retweets you. Just keep the subject short, because the tweet will also include a shortened URL to your Flickr page.

Body: The image is in the body. In addition, any text in the body (including your email signature, so delete that!) will become the photo description in Flickr. I use this space to give more detail about the speaker, the event, or anything special about the notes.

5. Send it!

When you’re satisfied with the text, hit send! Then go peek at Flickr and Twitter to see what happened. You can adjust your next subject and body based on what you see from this first experiment.

Screen Shot of Twitter Posts

That’s it! After you’ve set it up, all you need to do is draw, tap the email button, type in the contact name, add a subject and body, and off it goes! Quick as anything.