Last week, my colleague Malgosia Kostecka and I co-facilitated a challenging four-hour remote meeting of 33 attendees in 22 locations involving complex work: developing a mission statement and the initial five-year vision for a new organization. This meeting kicked off a five-month process to explore different models for how the organization might be structured. Over the summer, sub-groups will design possible models and prepare to present them to the whole group. The process will conclude in October with the group’s first face-to-face meeting, where the final mission, vision, and five-year strategy will be set. These will then be used in securing approval to launch the organization.
For this kickoff, we used Zoom, Boardthing, and Slack as our workspaces. I’m happy to report that it went well. Astonishingly well, actually, given that I always assume something will go horribly wrong! We barely needed Plans B and C and didn’t reach Plans D or E at all. Here’s how it worked.
Pre-Meeting Preparation
Facilitators:
- We worked closely with the meeting sponsors to identify outcomes and understand who would be in the meeting.
- We set up Slack for the whole team, since they will be doing ongoing work throughout the summer. The ongoing setup includes channels for smaller working groups, plus one for questions, general information, and workgroup chairs. Special temporary channels were also set up for the meeting (see Plan C, below).
- We set up a Zoom room for the main meeting space.
- We created a Boardthing board for collecting and sorting vision ideas. Advance setup included creating a list of instructions, uploading a template image for sorting the ideas, and preparing an agreement scale in case we needed it.
- We prepared 14 digital templates covering each part of the meeting from the Do-Now to Closing Thoughts. Not all were used, but they were ready!
- We created a spreadsheet to track who had signed in to Slack, who had done the tech check, who was to be at the one co-located venue, and who would be in each breakout discussion group during the meeting. We took into account the 11 people who would be connecting from a single location when planning breakout groups.
- We prepared a visual roadmap of the entire process, from this kickoff meeting throughout the summer and fall to the final group meeting scheduled in October.
- We prepared the agenda (a detailed facilitators’ version and a more general participants’ version).
- We prepared a text document with participant names and email addresses, key web links that would need to be copied and pasted, and a few technical support statements that we would likely need to paste multiple times.
Participants:
- Prior to our involvement, participants went through a selection process based on interest, expertise, and availability. There were also initial discussions about the process and its outcomes.
- We asked participants to sign in to the Slack team space prior to the meeting and to have Slack open during the meeting itself.
- They were also encouraged to attend a brief tech check to make sure they could access Zoom.
Meeting Tools/Technologies
As mentioned above, we used Zoom, Boardthing, and Slack; additionally, I used Autodesk Sketchbook, a spreadsheet, and a text editor. We used a countdown timer to time breaks.
Agenda & Activities
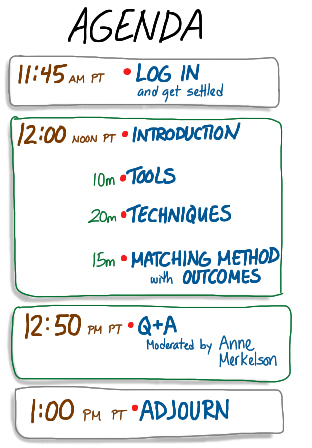
The planned timing is on the agenda image here. The actual timing is noted in parentheses next to each activity below.

Our agenda. Organization and other names have been removed.
- Do-Now & Orientation (15 minutes)
- The do-now was designed to help folks start thinking about the meeting content and give them something to do while everyone else got connected. Everyone was to type into a special Slack channel, answering the question: Why is this organization important to you personally? [Wondering whats a do-now is? Here’s a PDF that explains.]
- Once everyone was settled and had had a chance to work on the do-now, the sponsors opened the meeting by setting the context for the work this team will be doing, why do it now, and why the team was comprised of these particular people.
- I introduced myself briefly when I took over, and ran through the outcomes, agenda, roles and rules as shown above. I left space for additional rules but the group didn’t add any.
- I mentioned the backchannels (Slack and the chat feature of Zoom) and encouraged participants to speak up in those channels if they were having trouble. Malgosia was monitoring both channels throughout the meeting.
- We asked people to turn off their video cameras while they were in the full-group session and said they were welcome to use them in the breakouts later.
- Introductions (30 minutes)
- Since this group is not an intact team but a group of colleagues from different organizations, we invested some time in team introductions. Using a prepared template that showed six ‘tables’ — one for each of the working groups that will meet over the summer — we went around the virtual room.
- Malgosia and I modeled what we were looking for with our own introductions first.
- Each person’s name was already written in, along with his or her organization. When it came time to speak, each person said who they were and where they worked and also shared one hope or expectation for the process. I added each person’s hope/expectation to the template as they spoke, using Sketchbook and my Wacom Cintiq pen display tablet (it’s like the 27HD but mine is a 24HD).
- Project Roadmap (10 minutes)
- We placed the project roadmap on the screen and walked through it to be sure the five-month process was clear.
- Facilitators and meeting sponsors/workgroup chairs answered questions as they arose.
After that, we took a five-minute stretch break. I placed a countdown timer on the shared screen to time five minutes.
- New Org.’s Mission (55 minutes)
- After the break, we shifted to developing a draft mission statement. We started by reviewing mission statements from four or five well-known organizations (selected in advance and written on a template).
- Next, we explained the process we were about to use, as well as the backup plan should our initial plan fail (see Backup Plans, below). We answered questions (all this took a little less than 10 minutes) and then got started.
- First, each person wrote down an answer to the question: What is this organization’s reason for being? This was done individually on whatever piece of paper was handy. (5 minutes)
- Next, we grouped everyone into trios using the Zoom breakout rooms. In each group, the three people shared what each had written and generated one statement for the trio — either choosing one of the three, or writing a new one. (10 minutes)
- Whenever they worked in breakouts, we checked in with each group periodically to make sure that everything was going well.
- Next, we grouped up three trios together to make a group of nine, and they repeated the process: listen to each trio’s statement, and come up with one statement for your group of nine. (15 minutes)
- This resulted in three statements. We came back to a whole-group discussion, and each group read their statement. We captured it on a template using Sketchbook and screen sharing, and then briefly discussed the three statements. We noted issues and key questions that would need to be resolved in the work over the summer. (10 minutes)
We ended that segment with three possible mission statements, agreeing to finalize the new organization’s mission in October.
At this point we were halfway through the four-hour time, and we took a 20-minute break to stretch, wolf down food, adjust any technical glitches, and so on. Once again I shared the countdown timer.
- Vision Images (10 minutes)
- After the break, we briefly reviewed the agenda to check in with the process and our progress.
- Then we shifted to working on the vision. We opened with a guided imagery activity, set five years in the future. We set the context by saying that five years had passed and the organization was very successful. Then, everyone listened and imagined, but did not answer or speak, as we asked the following questions: What activities are happening throughout the year? Who is involved? What are the media saying? What publications and resources exist that didn’t before? How is your work different now?
- Everyone was then given five minutes to jot down some ideas that had come to them during the visioning.
- New Org.’s Vision (65 minutes)
- Using a template prepared in advance (a Mandala with the imagery questions written in the segment circles), we asked the group to share thoughts that they had had. We worked through each of the questions and captured ideas as they were voiced. (25 minutes)
- When that was complete, we saved it and uploaded it to Slack right away so that everyone could use it during the next activity.
- Once again, before launching into the activity, we showed a template with the steps written out, reviewed them, and answered questions. We explained and gave examples of what we were looking for: specific vision themes, or what the organization will be, do, or have in five years’ time. (about 5 minutes)
- Once everyone was ready, we pasted the Boardthing link into the Zoom chat and into Slack and asked everyone to open it.
- While they were doing that, we placed them into breakout groups of about six people (the 11 co-located people formed two groups where they were).
- Each group was responsible for generating 3-5 cards in Boardthing. Each card included one key theme for the vision, either pulled from the previous conversations or generated now. (25 minutes)
- While they worked, we checked in on each breakout to make sure that everything was going well.
After that time, we gave everyone else a 5-minute stretch break (using the timer). Meanwhile, Malgosia and I took an initial pass on the cards, grouping them into rough clusters and proposing cluster names. When the group returned, we had six or seven theme categories and three or four cards that we weren’t able to place in groups.
- Refining the Vision (15 minutes)
- After the break, we reviewed the clusters and asked for corrections or changes. We refined the cluster names and added the loose cards to clusters with the group’s guidance.
- We copied the seven cluster heading cards and placed them into the vision template in Boardthing.
- The group discussed and refined the vision elements further, adding nuances and making distinctions, until they were happy with the draft vision.
- We did a brief and informal check for alignment, and declared victory!
- Next Steps & Closing (7 minutes)
- We briefly brought back the process roadmap and reviewed it again, answering new questions.
- The sponsors outlined next steps, thanked everyone for their involvement, and closed the meeting — on time. Well, almost. We were two minutes over.
After the meeting, we created a PDF file containing all the meeting charts, including screenshots from and a link to the Boardthing board, sent it to the sponsors, and uploaded it to the team’s Slack space. Now we are in the process of planning and scheduling the series of smaller remote meetings for each of the six working groups that will take place over the summer.
Backup Plans
When I create a backup plan, I pick the thing that is most likely to go wrong, imagine what will happen if it does, and come up with a workaround. I keep doing this until the only remaining workaround is for everyone to talk normally on the phone while I take notes on paper. The backup plans for this meeting centered on people not having access to Zoom, or the Zoom breakout groups not working, since those were the trickiest parts of the meeting.
- Plan A: The meeting as designed and described above, and basically what we did.
- Plan B: Assuming people couldn’t see the screen but could connect to Zoom via the phone, they would be paired up with a ‘screen buddy’ who could help them create Boardthing cards. I also read everything that was on the templates and described each new one briefly as I brought it up.
- Plan C: Plan C covered us if the breakout groups in Zoom failed. In every meeting, there are always a few people who can’t get into the breakout rooms, and I have yet to figure out why. If it’s just a few, then I leave them in the main room and they become their own breakout group. If it’s a lot, then we are into Plan C. To prepare for Plan C, we created temporary channels in Slack for each breakout group and invited those people to each channel. The instructions to the group were that if the Zoom breakout wasn’t working, they were to have their discussions via text in the Slack channels instead. We only needed to do this with one group once.
- Plan D: Plan D assumed failure of Boardthing, or failure of people to get into Boardthing. In this case, I would have brought it up and shared my screen and we would have talked through the process, perhaps collecting ideas in Slack and having Malgosia read them to me to type in. Luckily, we didn’t need to do this.
- Plan E was the last-ditch backup, where we do the whole thing in full-group discussion while I share my screen and do graphic recording.
What I Would Do Differently
I learned a LOT about Zoom breakout rooms in this meeting. One thing I should have taken advantage of more is the ability to set breakout groups up in advance and then re-use them. If I had done that, it would have greatly simplified (and speeded up) the process of getting people into breakout rooms. Instead, I created different groupings on the fly based on lists in our spreadsheets, which got a little complicated and took some time to set up. Astute readers will notice that in steps 4 and 6 in particular, we lost a few minutes of work time getting people into the breakout rooms.
On the whole, though, I’m happy with how it went, and I’ve heard very positive feedback from the participants and sponsors as well.
Need a Good Remote Meeting?
Do you need to get work done with a remote group? I’d love to help. Contact services@grove.com to set up a time to talk about what you need.