The worst question to ask in a virtual meeting

Ever been in a virtual meeting where something was being decided? How did it go? Perhaps it started with some discussion, maybe someone shared some slides with graphs or data, people talked for a while to present different points of view, and someone finally said, “It seems like we should do x and y and then z.” And, almost always, right after that someone asks the absolute worst question you can ask in a virtual meeting.

“Does everyone agree?”

“Um… no?”

On the surface, it seems like a simple, even straightforward question. It seems to ask what we really need to know: Are we in agreement? Have we reached a decision? Can we end the meeting and go our separate ways, knowing we are aligned on this one? That’s the information you actually want. “Does everyone agree?” is simply poor shorthand for all of that.

When someone asks this question in a face-to-face meeting, you can at least scan the faces of those around you to look for obvious signs of discomfort, disagreement, or confusion. In fact, I’ll bet that’s your first reaction when someone asks this. In a remote setting, you get a lot less information from doing that, even if everyone is visible on video. So you have to rely on what people say in response.

However, there is no possible way to respond to this question that accomplishes anything useful. First of all, we can’t know what everyone else thinks without hearing from them individually. We all realize that, but we also know that if we stay silent, there will be an embarrassing pause, so we often speak up. The people who really do agree tend to speak first, because it’s generally easier to express agreement than dissent. So you hear a bunch of “Yes!” responses from those who are satisfied and/or just want the meeting to end.

Potential dissenters also realize that there is no room for pushback in that question. The responses you really need — the objections, the need for further information or clarification, or the alternative proposals — aren’t invited. Even if someone tries to speak up with “Um… no?” it’s often drowned out by the polite chorus of “Yes!” So how do you find out if people are in agreement if you can’t use that question? Try an alternative that draws out the responses you need, like one of these:

“It sounds like we should do x and y and then z. Does anyone have an alternate proposal right now?”

“I’m curious if anyone has a different perspective before we make a final decision. Anyone?”

“Does anyone still have questions or reservations about this decision?”

Or, simply invert the question so that people who do agree keep quiet and people who don’t are invited to come forward: “Is there anyone who does not agree?”

Then keep quiet yourself for a minute to give people time to frame a response. My favorite trick for this is to take a leisurely sip of my beverage right after asking the question, and then keep quiet until I’ve carefully placed my cup back down on my desk. Works every time.

Do make sure you allow enough time to actually discuss anything that comes up. If you don’t, people will quickly catch on that you’re really asking, “We all agree, right?” and they won’t bother speaking up. It may extend the discussion a bit, but that will pay off in stronger alignment at the end.

Photo by bruce mars on Unsplash

Announcing the Visual Facilitation Field Guide

World map with co-author locations

Our global co-authors!

I’m pleased to announce that I’m a co-editor for a forthcoming book on visual practice! The book is The Visual Facilitation Field Guide. The other co-editors are Jeroen Blijsie of The Visual Connection (the Netherlands) and Tim Hamons of Art of Awakening (Singapore). The book’s design is provided by Visuality (Belgium).

Why this new book?

The Field Guide is intended for visual practitioners to use as a sourcebook of ideas and inspiration, but it’s also intended for non-practitioners to get a sense of the depth and breadth of the field and understand why and how to partner with a visual practitioner. Over 50 co-authors, all visual practitioners or facilitators who partner with them, from all over the globe are contributing chapters about their own experiences and methods. It’s been an interesting process so far — coordinating the chapter contents, working with the co-authors, and gradually seeing the book take shape. Most of the work is being done virtually, which is one of the reasons I was interested in the project to begin with. There’s a great write-up of our synchronous Book Sprint from The Grove that gives a feel for how we kicked the project off.

What’s the book about?

The Field Guide reflects the experience and interests of its diverse co-authors. It includes sections on visual language and drawing, visual facilitation basics, roles, listening, dialog, templates, meetings–including large-scale meetings–both face-to-face and virtual, team performance, storytelling, working off the paper and beyond the meeting, and intersections with other fields. There’s also a section of stories using visuals in action and a section about the future of the field.

Help us by pre-ordering your own copy – at a discount

The book is being self-published and will be available this summer (2018). To cover the costs, we’re launching a Kickstarter campaign! The campaign opens on April 24, 12.00 PM CET, when you’ll be able to pre-order the book at a deep early bird discount. Or you can pledge a higher amount for other rewards, like a one-on-one coaching session with David Sibbet (The Grove) or Brandy Agerbeck

The Kickstarter campaign is open!

We have 500 copies at a deep discount available only through Kickstarter. Be the first to order! If you want to be kept informed, you can sign up here:


I’ll be posting updates on Facebook and Twitter as the campaign gets closer. Stay tuned!

Quick Tips for Blended Meetings

A colleague recently asked me this question:

How do I manage a quick check in during a Zoom meeting when some people are co-located in one (physical) room, some are in their offices, and some are on the phone? And I have a paper list of names, but not sure who’s actually attending? We’ve met everyone and they all know each other, but I want their voices in the virtual room.

Blended meetings are tough. It’s a lot easier to pay attention to someone right next to you than to a voice on the phone. Setting the tone with an inclusive check in is a great way to bring the remote people into the room—or bring the in-room people into the virtual setting, depending on your point of view.

Meeting room

Photo by Benjamin Child on Unsplash


Check In Ideas

  • Ahead of time, ask an in-room partner to bring in a bunch of interesting, small objects. Have each in-room person select an object. Ask each remote person to look around their space and select an interesting object. For the check-in, each person shows their object to the camera or describes it aloud and says why it connects with them at this moment.
  • Have each person describe the local weather where they are and then share their internal weather state (stormy, calm, sunny, frozen…). The in-room group only needs to describe the outside weather once for everyone there, and then each person can share their individual internal state.
  • Ask each person to use a marker to draw a circle on a scrap of paper, then fill it in with eyes, nose, and mouth to create a simple drawing of their mood. Under the circle, have them write their name. Each person holds up the drawing to the camera, says who they are, and says something brief about their mood drawing.

Beyond the Check In

It’s also essential to make sure that the remote folks are never overlooked throughout the course of the meeting, so anything you can do to give the in-room people a way to imagine something real about the remote people’s surroundings will help.

This is one of my favorite ways to bring remote people into a room where several others are gathered. I’m assuming that the facilitator is in the room with some participants and other people are connected from their individual locations, but this works if the facilitator is remote and has an in-room partner, too.

  1. Bring a stack of table tent cards to the meeting and set them out for the in-room people to write their names on.
  2. Recruit an assistant in the room to be your virtual liaison. As people are getting settled, have your assistant get the remote people’s names on additional cards. Make sure that each remote person is represented on a separate tent card.
  3. Set the remote people’s tent cards in a ring in the center of the table, or place them between other people’s chairs, so they are present at the table.
  4. When you go around for check ins or other round-robin responses, include the remote people by reading their names from the cards.
  5. For groups that meet this way routinely, you could assign a remote card to each in-room person and have them be accountability buddies with their remote counterpart. Buddies are responsible for ensuring their remote person gets copies of documents during or after the meeting (texting images of visual captures at critical points or getting the remote buddy’s ideas onto sticky notes, for example).

If I’m remote and there are a bunch of remote individuals plus a room full of people attending the meeting, I might rename the ‘room’ in my list of participants to include the names of everyone present there. For example:

‘Meeting Room 101’ shows up in my software’s participant list. Bob, Doris, Sara, and Michael are present in the room. I rename the ‘participant’ to ‘Bob, Doris, Sara, Michael’ instead of ‘Meeting Room 101.’

Obviously, this has limitations if the number of co-located people is large. In that case, I try to get someone in the room to tell me who is there and keep me informed as people arrive and leave, and I use an old-fashioned list on paper.

What are your favorite ways to be inclusive in blended meetings?

New workshop: Virtual Team Facilitation (in collaboration with TeamCatapult)

Image courtesy of TeamCatapult

I’m delighted to announce a project that’s been underway for several months now: a new online workshop developed in collaboration with TeamCatapult called Virtual Team Facilitation. The workshop is hosted by TeamCatapult and will be co-taught by their CEO Marsha Acker and myself.

It’s offered in a two-day online format and includes a mini team intensive that gives participants an opportunity to really practice what they’ve learned. The workshop focuses on creating and facilitating effective team engagements in virtual settings. It’s different from my current Grove workshop Facilitating Virtual Collaboration in that the new workshop is framed within the context of agile teaming methodology and taking agile practices into virtual settings. Some experience with agile team facilitation is required. We review key tenets of agile facilitation but don’t cover it in depth — TeamCatapult has another course for that. Learn more about Virtual Team Facilitation and/or register here.

Continue reading

Let grownups be grownups (in remote meetings)

In today’s FVC (Facilitating Virtual Collaboration) workshop, the topic came up about how facilitators can engage participants in a remote meeting so that they don’t check email, tune out, stop listening, and fail to … well… participate. My unusual and occasionally unpopular advice: It’s not entirely your problem.

Continue reading

Hey, I’m writing a book! And it’s almost ready!

A project I’ve been working on for three years is tantalizingly close to completion… it’s a book! The working title: Beyond Virtual Meetings.

I think the world would be a better place if people could work together more effectively at a distance. Based on experience and observation, I’d say that working with a remote team can be pretty painful and frustrating… but it doesn’t have to be. So that’s what I’m writing about: how you, as a team member, team leader, or facilitator, can make remote collaboration better for yourself and everyone you work remotely with.

The Grove recently published a short interview in which I talk about some of the main themes.

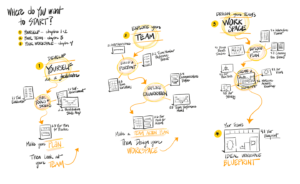
Sketchnotes showing a possible path through Part I

One possible path through Part I

Writing the book itself has been an interesting process, sometimes fun, sometimes painful; just like writing any book, I imagine. At this point, the manuscript is complete and I’m doing an editing pass to tighten it up. We don’t have a publication date yet but I’ll post it when we do! The current draft has three parts: the first, illustrated here, is about being facilitative in online settings, finding out what your team needs most, and creating a beautiful virtual workspace to support collaboration. The second part includes agendas and checklists for doing virtual work (both in meetings and in between meetings, when lots of important work happens too!). The third part is a collection of 70 best practices for yourself and your teams to make remote collaboration smoother, easier, and more effective.

There’s a website attached to the book, too, which is where I talk about actual tools. The book’s best practices are linked to types of tools rather than specific ones. Look up the tool type on the website to find specific applications you might want to try. The website will also have a bunch more best practices — there were too many to fit in the book — all targeted at specific areas your team needs to work on. You can see the site in its embryonic stage right now! (Just the tool reviews, though. No best practices there yet.)

Want to stay informed? Sign up to be notified when the book is ready. If you think this book will be helpful, I’d love it if you’d leave a quick comment saying so. Thanks!

The software question: build or buy?

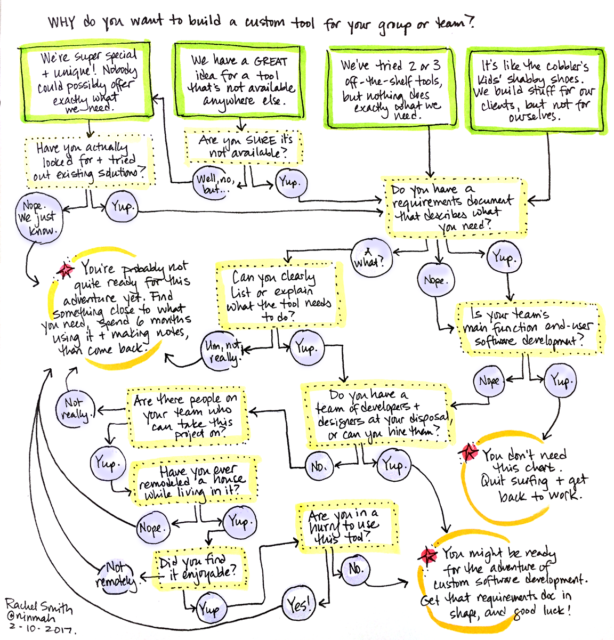
The question of whether to find or buy a collaborative tool for your remote team, or to build your own perfect, custom version, will pop up at some point if it hasn’t already. It’s a complex question that involves a lot of variables. To save you some time and help you find the right answer for your team, I’ve created this handy flowchart. Click the image for a printable (and readable, for that matter) larger copy.

flowchart for deciding whether to build a custom tool or buy an existing one

Build or buy? You decide.


You’re welcome.

How long does it take to get things done in a virtual meeting?

One of the most common mistakes people make when planning virtual meetings is allocating time incorrectly. Hint: the problem is not usually that meetings end early.

Time by Alex Tian (cc by-nd)

Time by Alex Tian (cc by-nd)

To help you avoid this error, here is a handy formula you can use to calculate how long something will take in a virtual meeting.

  1. How long would this conversation with this group of people take in a face-to-face meeting? Write it down. We’ll call that number n.
  1. Add modifiers to n as follows:
  • If there is no facilitator, double n before continuing. Then hire or assign a facilitator.
  • If there are more than 10 people involved (not counting the facilitator):
    • For 11-15 people, add 5 minutes to n.
    • For 15-20 people, add 10 minutes to n.
    • For 21-30 people, add 15 minutes to n.
    • For more than 30 people, design pre-work to take care of as much as you can before the meeting, then add 20 minutes to n.
  • Will you be switching tools during the meeting? For instance, going from screen-sharing to a collaborative sticky note board, Google doc, or similar?
    • If so, add 5 minutes for every time you switch to a new tool.
    • If the additional tool is new to at least half the group, add another 5 minutes.
    • If the additional tool requires participants to log in, add another 2 minutes.
    • If the additional tool requires a download or plug-in, add another 5 minutes.
    • If you don’t display clear written instructions about how to access and use the tool, add 5 minutes.
  • Will you be using breakout rooms in this meeting? Add 5 minutes for each time you go into breakouts.
  • Will the group need to make a major decision during this conversation?
    • For groups up to 15, add 10 minutes to propose the decision and check for agreement.
    • For groups of 16-20, add 15 minutes to propose the decision and check for agreement.
    • For groups over 20, add 15 minutes to propose the decision and check for agreement, and expect a lot of follow-up questions after the meeting.
  • If the group is very divided about the content of the decision, add another 5-10 minutes to the decision time.
  • Will you be keeping a Parking Lot, and do you expect more than two Parking Lot issues to come up? If so, add 5-10 minutes to resolve the Parking Lot issues.
  • Look at the total you have so far. For every 60 minutes, add 5 minutes for stretch breaks. If you’re over two hours total, add another 10 minutes for a sanity break in the middle.
  • Remember to add 10 minutes up front for people to connect to the meeting and get their audio and video sorted out.
  • Remember to add 5 minutes at the end of the meeting to review decisions and action steps.

As an example, let’s look at a group of 14 people who need to brainstorm ideas about their next product launch, select two, and assign research leads to each idea. It would take them 45 minutes to get this done in one focused face-to-face meeting with a facilitator, so n is 45.

  • Add 5 minutes for the number of people (14): 50 minutes
  • We’ll use screen sharing and Boardthing (a sticky note tool), so we add 5 minutes: 55 minutes
  • Boardthing doesn’t require an account or a download, so we don’t need to add any time for that.
  • Naturally we will create clear, visual instructions for Boardthing and show them before we switch as well as in Boardthing itself, so we don’t have to add 5 minutes for not doing that.
  • We will be using breakout groups once, so we add 5 minutes: 60 minutes
  • The group will need to make a major decision, so we add 10 minutes: 70 minutes
  • The group isn’t particularly deeply divided, so we don’t need to add time for that.
  • We don’t expect a long Parking Lot, so we don’t need to add time for that.
  • We add a 5-minute stretch break: 75 minutes
  • We add 10 minutes at the start for getting settled: 85 minutes
  • We add 5 minutes at the end to review decisions and actions: 90 minutes

In order to accomplish our objectives in a virtual meeting, we need to set aside 90 minutes, including a 5-minute stretch break.

By now you’re probably wondering whether this is meant to be satire. Nope. I’m serious. This is how long it takes to do real work when you’re not face-to-face. If you plan for it and people are prepared in advance, the meeting will run much smoother. People will feel great about achieving their objectives in the time they set aside. And hey, if you’re wrong, you can always end the meeting early.


Tech: where “no, it can’t be done” usually means “well, yes, technically it can, but…”

Earlier this year I was completely delighted to learn that it is finally, finally possible to easily share your iPad’s screen in a web meeting using Zoom (see how here). It’s easy, responsive, and really works.

Since then, when people ask me if they can use their iPad to graphically record remote meetings, I’ve been saying, “Yes! Just use Zoom and it’s quick and easy!” Which it is, and they do, and life is good. Until someone says, “But my company only lets me use WebEx. Can I still share my iPad?”

This is where I typically say, “No, you can’t.” Not because that answer is technically true (it’s not — you actually can share your iPad using WebEx), but because the hurdle from HERE to THERE is pretty darn big.

And that’s just one example. There are so many things about remote meetings that actually, yes, you can do them, if you’re willing to do a bunch of research, possibly buy some new equipment, do some trial and error, and put up with it maybe not working the first time every time. In my experience, most people aren’t. They quite understandably want to be able to do the thing they need to do quickly, easily, and without a lot of extra expense and setup. And if it’s something where I look at the steps and think, “No, thank you,” then it’s a reasonable bet that anyone asking me if it’s possible isn’t going to want to, either.

So if you ask me “Can I [insert your idea here] in a web meeting?” and I say “Not really,” feel free to follow up. Whatever it is might be possible, if you’re the experimental sort.

A delightful way to make virtual eye contact

In my Rules of Order for Virtual Meetings (first installment, rule B1), I recommend looking at the camera on your computer or device rather than looking at the video window of the person you are talking to, in order to simulate eye contact. Weird for you, much more natural for them: from their point of view, you are looking directly into their eyes. From yours, though, you’re looking at a tiny light and there’s lots of distracting stuff in your peripheral vision.

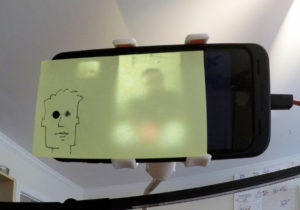
I received this photo today from Brian Tarallo, a colleague who took that advice and ran with it. To help himself remember to look at the camera (and probably feel less weird while doing it), he created a little paper avatar. Look closely and you’ll see a hole punched out where the avatar’s right eye should be. That goes over the camera, so the camera is ‘looking out’ from the avatar’s eyes. Brian can look at the friendly little avatar — which gives him a face to talk to — and make perfect eye contact. In this case, the paper is a sticky note attached to his mobile’s screen so that the hole remains over the camera. The same idea could be applied to any webcam where the camera is close to the surface of the screen (like Mac laptops and desktops).

Photo of Brian's solution

Look ’em in the eye! Photo courtesy of Brian Tarallo.


I just love it. What an elegant solution!

It might be trickier if you’re using one of those eyeball-shaped USB webcams, because it might be hard to get the hole to line up with the camera in a way that doesn’t cause the paper to obscure the camera’s view. But smartphones, tablets, and computers with built-in cameras should work just fine.

Thanks, Brian, for allowing me to share your idea and photo, and Ben Tinker for being the guy behind the sticky.