Author Archives: Rachel

Annotating Sketchnotes with Voicemap

Update, Feb. 2020: Voicemap is no longer available.

I’ve been playing with Voicemap, an online tool for adding audio and zooming points of interest to an image (like sketchnotes or a graphic recording). It hasn’t been easy. The instructions on the site aren’t very clear, and a lot of mistakes can’t be fixed without starting over. But I have finally completed my proof-of-concept Voicemap: An annotated review of visual notes I took during Doug Thomas’ TEDxUFM talk, “A New Culture of Learning” (link goes to the actual TEDxUFM talk).

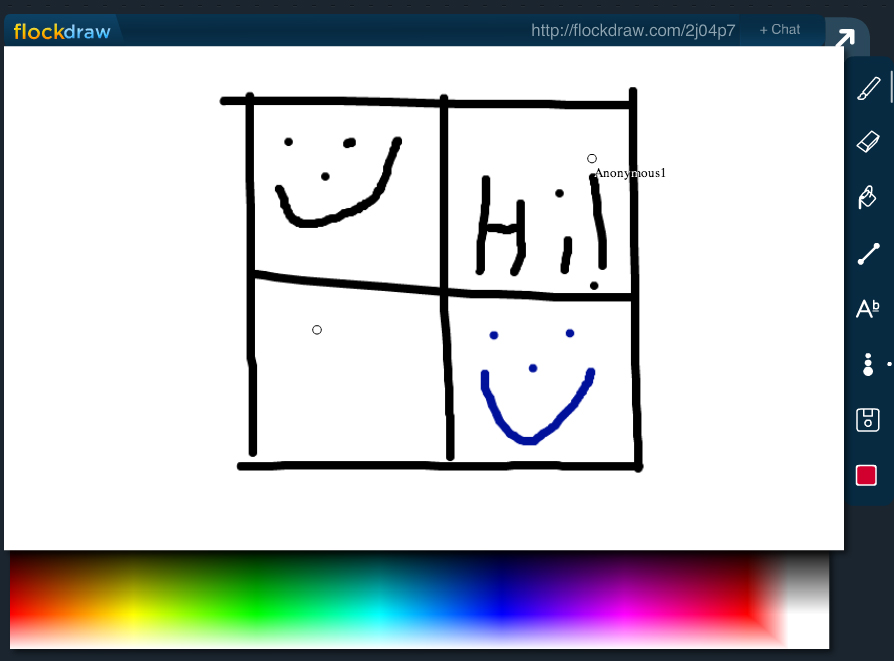
(Voicemap no longer available)

Voicemap of my visual summary of “A New Culture of Learning” by Doug Thomas

Reflections

I really like Voicemap for the way it pairs audio with visual notes. Seems like it would be a great way to create a summary after a meeting: Upload the notes, then walk through them with a narration of the meeting’s highlights. Unlike the RSAnimate-style sketch movies, you don’t see the drawings being created in a Voicemap video — it starts with the image already finished — so it’s great for graphic recordings created during an event.

There are a few drawbacks. It looks like you have to publish the piece on Voicemap’s website, which means I can’t use it for many of my clients (too public). The format is better suited for pre-planned visual notes, or notes that are created after hearing the audio, so that you can walk through the image in a logical way. You’ll notice that I skipped around the page, following the flow of the talk rather than the visual structure on the page. That’s because I skipped around the page while creating the notes. Voicemap works better if you have a cleaner visual path to follow.

The most annoying thing is that the aspect ratio of the video when you edit it is different from the one you see when you view it (the editing one is 4×3, but the published one is closer to letterbox). The default embed code is also weird: it gives you a 640 x 640 viewer, which means your careful centering is shifted and everything is cut off on the right, with too much space on the left. The viewer above is actually cut off on the right side. If you want to see it more or less as it was meant to be viewed, try it on the Voicemap site.

Update: Voicemap contacted me and pointed out that I can change the width measurement to 640, which I did. This fixed the embedded display issue. To be fair, I did try that. I just changed it in the wrong place. Doh.

How You Do It

First, you start a project by entering some information about it (title, abstract, script, and so on). You can upload an audio file at this point also, although I had a great deal of trouble with that step. I tried several different formats (WAV, AIFF, MP3) and two different lengths (2:56 and 3:41). Eventually, the audio did load, but it took days in one case, and four or five upload attempts in another.

Once you get past that step, you can add a sketchnote image and set zoom points (points of interest, POI) that are timed to the audio track. You do this by listening to the track, pausing when you want to set a POI, then setting it and continuing. It really helps to have uploaded the script before you do this so that you can scroll through the script while you listen. When I did it that way, I found I could time the POI swaps better.

When everything is to your liking, you click Publish. From what I saw, publishing happens instantly.

Other Uses of Voicemap

It looks like graphic recorders can sign up with Voicemap, take a test, and become certified to do sketchnotes for audio clips that Voicemap sends them. Voicemap clients, then, can send in a script or audio clip and request a corresponding sketchnote video. The graphic recorders don’t get paid very much, but if you have an iPad or tablet, it looks like you could pick up a couple extra bucks illustrating Voicemap clips. I’m not sure how busy the service is yet.

Graphic recording of web meetings with the iPad – Yes, you can!

“So can I graphically record a web meeting on my iPad?”

That’s a question I get asked a lot, and historically, it has had a complicated answer. For a while, the answer was “Not if you want anyone in the web meeting to see your graphic recording while you’re doing it, no.” Then it was, “Yes, but only if they’re on the same wireless network you’re on, and even then it’s a lot of setup.” After that it was, “Technically, yes, but realistically, no,” because although it was technically possible to share your iPad’s screen to a desktop and then share the desktop’s screen in a web meeting, it wasn’t easy, smooth, fast, or reliable. As of last week, the answer has changed again.

That’s because last week, Squirrels released Slingshot, the first really workable solution that I’ve seen for real-time graphic recording in a web meeting using an iPad. Is it perfect? Nope. Is it good enough? Yes, for some situations. Is it for everybody? Nope.

Screenshot of iPad

My quick iPad drawing (screen shot from iPad).
I’m zoomed in a little, which is why it looks a bit fuzzy.

How Does It Work?

Slingshot lets you host a web conference in a snap from your desktop computer or mobile device. If you’re hosting from your desktop, you can use Airplay (built into your iOS mobile device) to mirror your device’s screen to your computer, where it is automagically screen-shared with everyone in the web meeting. Once I had downloaded and installed Slingshot on my computer, it took about five minutes to launch a meeting, connect my iPad, and share my iPad’s screen with someone in the web conference. I launched a drawing app on the iPad (Brushes in this case) and started drawing, just as I would if I were taking notes. My remote-viewing partner in crime (in this case my partner in many other things, Craig Smith) reported that the drawing was very smooth, no delay, no jumping around.

Squirrels also makes an app called Reflector, which mirrors your iPad screen to the desktop just like Slingshot. With Reflector, you have to join a web conference with something like Skype, WebEx, Connect, or Join.Me, and then share your screen. Slingshot skips all that by blending Reflector’s mirroring capability with an easy-to-use web conferencing tool, so you only have one thing to set up.

Photo of computer and iPad showing Slingshot

The iPad, where I was drawing, mirroring into Slingshot.
You’re seeing the Slingshot app floating over the Slingshot web page.
Don’t worry that the iPad is plugged in; it doesn’t need to be. I was just running out of juice.

Sounds Great! So Why Isn’t It Perfect?

First, because of how the mirroring works. Not only does your drawing get mirrored, but everything on your screen gets mirrored too — the palettes, title bar, whatever you can see. But we could live with that. The thing that really gets in the way is that the zooming gets mirrored as well.

To get good results and fit a lot of stuff on one screen, you need to zoom in when graphic recording on the iPad. Which is fine, except that when someone else is watching the screen and sees the zooming without any context, it’s very disorienting. I would be very careful about using this to record a web conference just because of the mirrored zoom. I wish there were a way to turn that off and just show the graphic recording unfolding without the zooming. That would be pretty darn close to perfect.

Second, you can’t do it just from the iPad, without the desktop computer. You still need to join the meeting on a desktop computer running Slingshot, and then you connect the iPad in order to mirror it. I really wanted to be able to join the meeting on the iPad and share the screen from there, but that’s not how it works.

The third reason isn’t particular to Slingshot. It’s just that live graphic recording on the iPad is not for everyone, regardless of how it’s shared in the web meeting. It’s slower than recording on paper and it requires more concentration, which means you can miss things. It’s much easier to get sucked into what you’re doing and forget to listen, especially if you’re not completely familiar with the drawing app.

Last but not least, both times I set up iPad sharing, Slingshot on my desktop crashed as I connected the iPad the first time. Once I relaunched and reconnected the iPad, all was well.

However, at long last, when someone asks if it’s possible to use their iPad to record a web meeting, I can say, “Yes! Yes it is.” Thanks, Squirrels!

Creating sketchnote joy with Inkflow by @Qrayon

Qrayon does it again! You may remember Air Sketch (which is still super awesome, by the way), the app that lets you wirelessly broadcast your iPad drawing to other devices on the same network while you draw it. This week, I happened upon another tool by Qrayon: Inkflow.

I am in love. Inkflow is a wonderful tool to blend digital and paper sketchnoting. You can use the app itself to take notes and organize them into books. You can also add typed text, images, and photos of notes you have taken on paper — which then become objects on the Inkflow page that you can move and scale with no loss of quality. Look at me, I’m so excited I’m jumping all over the place! Let’s get organized here and look at how Inkflow is for sketchnoting, the vector/bitmap comparison, a few key features, a list of what’s missing from my point of view, and whether or not I’d recommend it as a visual notetaking tool.

Sketchnoting in Inkflow

Writing and drawing in Inkflow is a beautiful thing. The flow is smooth, there’s no lag, and the canvas is large. Since I’ve only just begun to play with it, I’m using it as though it were Brushes, which is causing me some angst. But I can see that with a little practice I’ll get used to the way it works and do much nicer work. To test it out, I did a little visual notetaking while listening to the TED talk How Great Leaders Inspire Action by Simon Sinek.

Sketchnotes of Simon Sinek's TalkMy visual notes of “How Great Leaders Inspire Action” by Simon Sinek.
Click for a larger view.

Don’t let the non-white background alarm you; you can choose different styles. I just used the default for this one. You can actually change it after the fact, which rocks, and there’s a plain blank white one. It has a palm blocker too, so if you prefer a stylus you can pull up the palm guard to cover the bottom part of the screen.

One thing to note: A lot of the features I’m describing are only available in the paid version, which at the time of this writing costs $7.99. Definitely worth it.

Vector vs Bitmap

Inkflow is a vector drawing tool, which means that what you draw is stored as resizable objects. However, it behaves a little like a bitmap drawing tool (like Sketchbook Pro), which means that it feels like you’re painting with a brush. The lines are smoother and more even than I’m used to, and I can’t quite get the same variable quality of line that I love in Brushes (which is also a vector tool with a brushlike feel). The trail-off at the end of a stroke is different, too, which makes my lettering look a bit sloppy to my (self-critical) eye.

However, one of the coolest features of the vector-based Inkflow is that you can select, move, and resize parts of your drawing (or the whole thing). You can enlarge small things and they won’t get fuzzy, or shrink big things and they won’t get muddy. Oh, and if you need to rearrange your notes as you go, you can! File the selection tool under A for Awesome.

Adding Text or Photos

If you don’t feel like writing, you can type instead, and then draw or write alongside the typed text. You can also drop in photos or illustrations alongside your work, or annotate them. The stationery feature lets you pull in images to use as custom backgrounds (did someone say templates?).

Adding Paper Notes

I love this part. I have a bunch of notes I took on copy paper (you know, analog) for different meetings for whatever reason. I’ve been carrying them around in a folder and trying to decide what to do with them — I’m in an awkward place between using a paper notebook or my iPad at work, so I have notes in both places. Yuck.

With Inkflow (the paid version), you can take a photo of your paper notes and they get pulled into your Inkflow notebook. They become a vector image, so you can resize them up or down, move them around, select part of them, erase the little smudges around the edges… it’s totally cool. Now I have a work notebook that includes my loose notes, plus I can add as many pages as I need to for notes during meetings. Whoa.

What’s Missing?

The things that are keeping Inkflow from being absolutely perfect for my needs (I know, like it’s all about me, right?) are, in order of importance:

  • A lack of layers. This is the biggie, because I want to be able to draw outlines and color them in later, with the color underneath the outline. I also want to be able to experiment with stuff and get rid of it easily if it doesn’t work out. Update: Qrayon says they are working on a ‘draw-under highlighter’ that might help with this. Yay!
  • No quick way to zoom out to 100%. This was pretty frustrating while I was recording the sample. I do a lot of quick zoom outs to check size and placement of elements, and it’s annoying to have to do the pinch thing several times to make sure I’m looking at the right view.
  • Limited sizes and shapes of the brushes. Three brush shapes plus an eraser is actually okay; I can live without the airbrush. But the settings for tip size aren’t fine-grained enough for me. For instance, on the paintbrush, you can pick 24, 32, 48, 64… you get the idea. Nothing in between. I also miss being able to easily draw a dotted line. I use that a lot.
  • A limited active color palette. This is annoying, but it isn’t a show stopper. You have access to lots of colors, you just can only pick eight of them to use without mixing at any one time. Update: Qrayon responded to let me know that you can swipe the palette sideways for more colors, which I hadn’t realized. Definitely helps with setting up colorsets.
  • Zoom only goes to 12%. This bothered me a lot at first and then less as I learned to work with the app. I wanted to zoom in further, but I found that if I just worked at a slightly larger scale it was actually okay. I still would like a little more zoom action for that extra precision I like in my lettering. I love that the screen stays at full resolution even when I’m zooming.

So, Overall?

Overall, I love Inkflow and I’m looking forward to using it to take notes in my next meeting. It effectively combines several of my favorite features from other sketchnoting apps, it’s easy to use, and I love that it’s vector-based so I can move stuff around. Easily 4 out of 5 stars, and adding layers would kick it up to a 5. If you’re looking for a notetaking tool that’s simple but versatile, I can recommend it.

Updated 5-3-2014 with some news about color palettes and an upcoming draw-under tool.

The skinny on Paper and Pencil

So I did order a Pencil by 53, and was very excited when it arrived. It’s beautiful (I got the wooden one) and easy to charge. It comes in a lovely and creative package that brought back fond memories of Painter and its paint can packaging. However, once it was charged and ready to go, I had some trouble.

At first, Pencil wouldn’t pair with my iPad and I kept getting a message to charge the battery (which I had done). I had left the spare tip at home, so I couldn’t try swapping them out as the app recommended. A colleague tried it with her iPad, and it paired right away, so she unpaired it and I tried again. That time, it worked. I tried to make a list of what I liked and didn’t like. As you see, it’s not up to my usual standards.

My notes using Paper and Pencil by 53

My notes using Paper and Pencil by 53


Some tools work better than others. I love the look of the ink pen, but the ballpoint pen is more useful for digital notetaking. The ink pen is harder to control when doing small work like letters.

Zoom is essential but painful. The zoom is, for me, the worst part. Zoom is critical to writing clearly at small sizes in any app on the iPad. In Paper, I can’t zoom in far enough, and the loupe only allows me to see a small circle of zoomed-in area. I found that using a stylus worked better than using my finger with the zoom, but it was still quite difficult.

Pencil behaves unexpectedly at times. Pencil feels great in the hand and looks great lying around, but I can’t say I had a great experience using it with Paper. The squishy tip has to be pressed down fairly hard in order to make the right part of the stylus come in contact with the screen to make a mark, and it’s not always where you expect it to be. Occasionally, it wouldn’t mark at all, or it would behave like my fingertip and smudge the lines instead of drawing new ones. Overall, it was too slow a process for me to comfortably use it to create visual notes. I also tried using my fingertip, which is how I usually take notes. I had trouble with that, too, mostly because of the zoom.

The good news: Best palm blocking I’ve ever seen. When you’re using Pencil, you really can rest your palm on the screen and the iPad won’t pick it up. It worked worlds better than other palm-blocking styli I’ve tried.

The end result: Not the best choice for iPad note-taking. I love Paper’s interface and I love the look and feel of Pencil. I wish I could love how they function, but they aren’t a great way to take visual notes. Again, for sketching and drawing, I do really like them as a team.

Pencil and Book for Paper by 53

Do you take notes with the Paper app on your iPad? I haven’t used it very much, but after seeing these two tools, I think I will give it another go. Plus, it looks like zoom is available in Paper now, which is what I was missing before.

The first is Pencil, a Bluetooth stylus for the iPad that has an eraser and palm blocking (so you can rest your hand on the iPad surface while you draw with the stylus). It looks like — what else? — a pencil. The palm blocking and eraser features only work with Paper, but the stylus works with everything on your iPad. It comes in graphite or a beautiful wooden finish. I’m especially intrigued by the hint that they have handled the friction problem. I’m hoping this means that Pencil doesn’t feel too slippery or drag too much as some other styli do.


Pencil By 53Pencil By 53 by Daniel Y. Go, on Flickr (cc)


The other isn’t really a tool… it’s something you can do with your notes after they’re done. It’s called Book, and that’s just what it is. Moleskine and FiftyThree have teamed up to offer a printed and bound book with your notes from Paper in the lovely Moleskine format. I find myself wanting to create a set of new visual notes just to be able to get them as a Book. If you’re familiar with Paper, you know that notes are organized in virtual notebooks inside the app already. Book brings them to life. Imagine your notes from a conference or a course printed and bound afterward!

Speaking of which, do you run a conference? Consider hiring a visual notetaker to record the sessions in Paper, then send out copies of the printed version as a high-end conference giveaway. Ooooh. I even know a visual notetaker who would be interested.

Virtual Meeting Tool: The Check-in Grid

Getting people comfortable in a virtual meeting can be a challenge, especially if you plan to use some of the more advanced features of your web conferencing tools. Even if that’s not in your agenda, it’s helpful to have folks take a minute to check in once the group has assembled. You’re familiar, I’m sure, with the awkward-silence-and-simultaneous-speaking method of going around the virtual room. How about trying a visual alternative in your next meeting? This one was shared with me by a student in one of my digital facilitation workshops.

The check-in grid is a quick, easy and fun way to avoid the awkward stumbling while still giving everyone a chance to have his or her voice heard. It also lets folks experience the group whiteboard feature of a web conferencing tool during a safe and low-stakes activity, so that later, when you ask them to dot vote or contribute to a group visual, they aren’t totally lost.

You’ll need to enable the collaborative whiteboard feature in your web conferencing tool. Some of them require you to do this when you set the meeting up, and others let you activate it once the meeting has begun. (See below for alternative ideas if your system just doesn’t have this feature.)

Start by drawing a grid on the collaborative whiteboard that has at least enough squares for each person to have one (including yourself). You can do this in advance of the meeting, or while people are gathering in the call, or right after you call the meeting to order when everyone is present.

the check in grid - it looks like a tic tac toe board.

Draw a simple grid.


Next, set the stage for participation by saying that you’d like to have the group do a visual check-in. When you give the signal, everyone will pick an empty square and use the drawing tools to draw a simple face that reflects how they are feeling right now. Alternatively, you could frame the instructions in one of these other ways:

Draw a simple face that shows…
• …how you are feeling about our progress so far.
• …how you are feeling right now about the issue we have come together to discuss (name the issue so it’s clear).
• …how your weekend went.

And so on. Explain that there will be a little pandemonium for a moment as people sort out which square to use. Point out that there are enough for everyone, so if two people start to use one square, one of them should just choose a different one instead.

Show people where the drawing tools are and how they work, if they don’t already know. You can invite everyone to make a test mark outside the grid if they want to practice.

When everyone is ready, tell them to go ahead. Let them sort out the squares themselves – it’s a mess at first, but it will work out. It’s okay if they talk. Wait until it looks like most people have chosen before drawing your own image in an unused square.

filled-in version of the check in grid

Makes you want to know what’s up with the cat person, doesn’t it?


When everyone has finished, start at the top left and go along the rows. Ask each artist to identify him or herself and say something about why they chose to draw what they did. Acknowledge each person’s contribution.

There you go! You’ve given everyone a chance to speak and share something about themselves, and you’ve established a speaking order that you can use throughout the meeting to help avoid talking over one another.

Bonus Points:
Once everyone is done drawing but before you go around for the verbal check-in, take a screen shot or download the image, open it in your drawing program, share your screen, and graphically record everyone’s remarks around the outside of the grid. Only do this if you can manage it very smoothly and quickly, or you will lose the good energy built up by the drawing.

No collaborative whiteboard? No problem!
Alternative #1: Ask everyone to draw a quick face on a scrap of paper, take a photo with their phone, and either upload it to the web conferencing tool (if that’s easy) or email it to you right away. Flip through the uploaded drawings in the web conference, or share your screen and open them one by one on your computer. Have each person explain as above.

Alternative #2: There are a lot of free shared whiteboarding tools that you can use for your meeting. Flockdraw is one. You just create a whiteboard and share the link, and everyone can draw together using its incredibly simple interface. There are many other options too — just keep searching until you find one that you like.

flockdraw screenshot

A co-conspirator and I created this in about fifteen seconds on our first Flockdraw visit.


Alternative #3: Instead of drawing a face, everyone can use the whiteboard type tool to write one word that describes how they are doing (or answers whatever question you have asked them).

Give it a try — let me know how it goes!

Virtual meeting nightmares: funny, sad, and way too true

This lovely little piece, created by Tripp & Tyler to promote Leadercast Live, came to my attention this week:

I laughed. Then I cried. Many of my colleagues had similar reactions. The video points out some of the common events that make so many online meetings so incredibly dysfunctional: ineffective introductions, bad audio, people talking over one another because of a lack of visual cues, and of course the Technology Factor.

We have a lot of skills for coping with these issues in face-to-face meetings, but we’re still working out the promising practices for handling the same issues in online meetings. Throw in some technology tools — which sometimes work and sometimes don’t — and a group of people who have different kinds of equipment and different levels of comfort and skill with the tools, and you’ve got a situation that is uncomfortable at best and disastrous at worst, especially for the meeting facilitator. We’ve all been that guy out in the hallway, talking to the wall, slowly realizing that no one else can hear us.

The good news is that the tools are growing simpler and more cross-platform. Enterprise-level tools that have been around for a long time in terms of Internet timeframes (think WebEx and similar systems) are evolving, and new tools are emerging (think Join.Me and Skype and so on). Instead of requiring special plug-ins or client versions of the software or different setups for different operating systems, the tools are being adapted to work on any platform, be it PC, Mac OS, or the different mobile flavors. The users of the tools don’t need to do as much to make them work, because the tools are becoming more flexible.

More good news is that we’re developing methods to cope with the social aspects of online meetings regardless of the technology we’re using. Not everyone can manage multi-party video calls — although that’s getting cheaper and easier too — so we’re working out ways to handle basic interactions like introductions, orientation to the meeting purpose, and conversations that lead to real work, even when you can’t see your colleagues. Visual methods that support these interactions can be employed without much special equipment at all, and the payoff in terms of lower frustration, greater efficiency, and higher engagement is huge.

So go ahead and laugh at the poor folks in the video. Then think about which of those painful moments you encounter the most — and how you can address that one issue in your next online meeting. I’d love to hear your ideas… and I’ll share some of mine too. Let’s make awkward online meetings a thing of the past.

What’s with all the words?

The other title I considered for this post is Only You Attend the Meeting in Your Head. This is about two related questions that I get from time to time. From prospective clients or people who are curious about visual practice, I hear: “How do you decide how to balance text and images in your work?” From fellow practitioners, I hear: “My client asked me to record using only pictures. Got any advice?” Advice? Maybe. Opinions? Always. Read on. 

Graphic recorders, as you know, capture a presentation or a discussion in a visual way. To me, “a visual way” implies a few different things:

  • The people having the discussion, or listening to the presentation, can see what is being captured. (Otherwise, I call it “visual notetaking” and not “graphic recording,” but YMMV.)

David records

David Sibbet recording reflections at IFVP 2008. The whole group can glance over and see the chart as he creates it.
  • The graphic recorder organizes the information on the page or screen while she is recording it. The completed map is clear and easy to navigate. The information is presented in an engaging and maybe a beautiful way.*
  • For a discussion, this means that related ideas are grouped or linked visually, even if they are expressed at very different times in the conversation. Important or repeated ideas are highlighted somehow. Group agreements are clearly indicated. In other words, the graphic recorder helps organize and annotate the group’s thinking. At Elliott Masie’s Learning 2013, where I remotely captured a series of plenary interview sessions this week, this was described as ‘curating,’ a term I like.
Color, shading, and placement indicates related concepts. Remotely digitally recorded for Elliott Masie’s Learning 2013.
  • For a presentation, the speaker’s key points are captured, usually in the sequence they are presented. This is because someone — the presenter — has already curated the subject matter. (One hopes.)
  • Some key points, important concepts, evocative moments, or relationships between ideas are annotated or captured with images as well as, or instead of, words.
Avril Orloff blending words and images (beautifully) to capture a presentation at IFVP 2010 in Redwood City, California.

Notice that the pictures part of ‘visual’ is way down in that list. I did that on purpose because in my practice, I emphasize the first and second bullets.

Every now and then, when I’m scoping a project with a client, she will say something like this: “… and I want you to capture everything with pictures. I don’t want a lot of words, just pictures.”

So here’s the thing with that.

The first rule of graphic recording (as I practice it) is this: Capture the speaker’s exact words. There are two reasons to do this. One is that the speaker will only understand he has been heard when he sees his own words written down on your chart. The second reason is that there are always two meetings going on: the one in the room, and the one in your head. The only experience that you can guarantee everyone is having is the one that is happening there in the room. The only person attending the meeting in your head is you. (Honest.) If you change the speaker’s words, even if you are interpreting or paraphrasing, you are recording the meeting in your head, which no one but you is attending.

If you use only pictures to capture the discussion, you are interpreting everything. Pictures can enhance understanding only if the context is clear. Without the shared context of the words, the meaning is apt to be lost, and when participants review the charts after the meeting they will not recall as much as they would if you had also captured some of the exact words they heard in the room. There are very, very few universally recognized images, and they generally communicate very simple concepts — not the complex ideas and relationships between them that are the substance of a facilitated working session or a really good presentation.

When a client asks me to record using only images, I try to get a little more information about what they want to do with the finished work — what their outcomes are. If they want the piece to remind people of the conversation and be a resource for future discussion, it’s critical for the words people actually heard to show up in the chart. If they are looking for a commemorative mural to frame and hang as a work of art, I happily direct them to other practitioners who will give them something much more in line with what they are after. It’s not wrong to want that as an outcome. I’m just not the best person to deliver it.

There are many, many flavors of visual practice, and many applications for the different approaches. Just like any other method or tool, some applications are a better fit with some approaches than with others. Match your tools and methods to your outcomes, and you’re golden.

* If I’m doing graphic facilitation — working directly with the group as opposed to working only with the chart while another facilitator handles the process and group dynamics — my charts are often not, strictly speaking, beautiful. I’m okay with this. The information is there, and it’s organized, and people can read it. When I’m doing straight graphic recording, I go in for beauty a bit more. I also know some wonderful practitioners who achieve beauty at very high levels no matter what their role.

This makes me so happy.

You know how Wikipedia has a convention to put ‘citation needed’ after facts that don’t include citations? Look at this excerpt from the List of Cetaceans page on Wikipedia, and be delighted:

Excerpt from Wikipedia page.

How cool is that?


And by all means, if you can outline those cetaceans, please do.

Via Craig Smith via BoingBoing.

What I See When You’re Using Your Smartphone

When you see someone standing on the sidewalk looking at a smartphone, what do you see? I’ve heard people describe it this way:

bored person standing in front of a brick wall

What you may imagine when you see someone with a smartphone.


I can understand that, but that’s not what I see. When I see someone looking at a smartphone, or iPad, or computer, this is what I see:


person looking through a window at a rich world of interactions

This is what I see when I see someone with a smartphone.


We don’t stare at our devices because we are fascinated with the way they look (at least, not after we’ve owned them for more than 24 hours). We stare through our devices. They are windows, not walls.

Granted, people are sometimes unwise in choosing when to open those windows, and sometimes we miss nearby things because we’re looking farther off. But don’t imagine that the device is what’s holding our attention. The device is just a window.

And as long as I’m on this subject, here’s a related one that’s been kicking around in my head for a while.

Technology != Not Human

Or, to put it a little less esoterically, ‘technology-mediated’ does not equal ‘not human.’

Last week, I once again heard a variation on the theme of I don’t like to use technology to communicate/draw/read/insert-your-activity-here because it doesn’t feel human.

I don’t buy it. I don’t mind at all if you don’t want to use technology for a given purpose, don’t get me wrong. But I don’t buy into the idea that the tool I’m using makes me less human, or makes my interactions less real, or my creativity less mine.

As my friend Lynn Kearny put it when I asked her if she felt using technology de-humanizes the activity being done, “Well, I ain’t never seen no hoss do it.” People communicate with people, whatever the medium. People create art, and people experience the art created by others. The tools will affect the experience, but it’s still essentially a human experience.

When I’m taking visual notes on my iPad, it’s a very different experience than when I’m doing it on paper. Lots of people don’t care for how that experience feels, and I have no problem with that. I also like taking notes on paper. But drawing on paper isn’t realer than drawing on an iPad. It isn’t a more human way to draw. You might as well say that drawing on paper is less human than drawing on cave walls, or chalking on sidewalks is less human than painting with oils on canvas. What does the medium have to do with how human the activity is?

The medium affects the experience of creating the work, and it may affect the qualities (please note, qualities plural, not quality) of the completed work. It doesn’t take anything away from the creator of the work.

So don’t use technology if you don’t care to. But don’t tell me I’m being less human for choosing it as a medium when it suits my outcomes.


The illustrations in this post were created by the fabulous Marianne Rodgers and are copyright © 2013 Marianne Rodgers. Find her work, and hire her to do some for you, at Mindtwin.net.